

Most golfers think they’d notice if their lead wrist was cupped at the top. They film their swing, pause the video, and eyeball it.
The problem is, very few golfers actually know what the correct wrist angle should look like – or how much extension is too much. What you see is the result. A weak push, a wipey fade, or a shot that feels like it has no compression.
Most golfers react to those shots by changing their grip, aiming differently, or chasing the latest swing tips. The real problem often happens earlier in the swing, in a position you can’t clearly see or feel.
A cupped wrist at the top quietly opens the clubface, forces compensations on the way down, and makes solid contact harder than it should be.
In this guide, you’ll learn what a cupped wrist at the top actually is, why it hurts distance and consistency, how to know for sure if you have it, and the most reliable way to fix it so your ball flight finally matches your effort.
Cupped Lead Wrist at the Top (Key Takeaways)
- A cupped lead wrist at the top opens the clubface early, forces timing-based compensations, and leads to inconsistent contact and lost distance.
- You can try mirrors or video to get a rough idea, but small wrist angle differences are hard to judge reliably without measurement.
- You can start practicing with awareness drills, but improvement requires confirming your wrist position at the top and training the transition.
- The most reliable way to diagnose and practice fixing a cupped wrist is with HackMotion, which provides real-time feedback instead of guesswork.
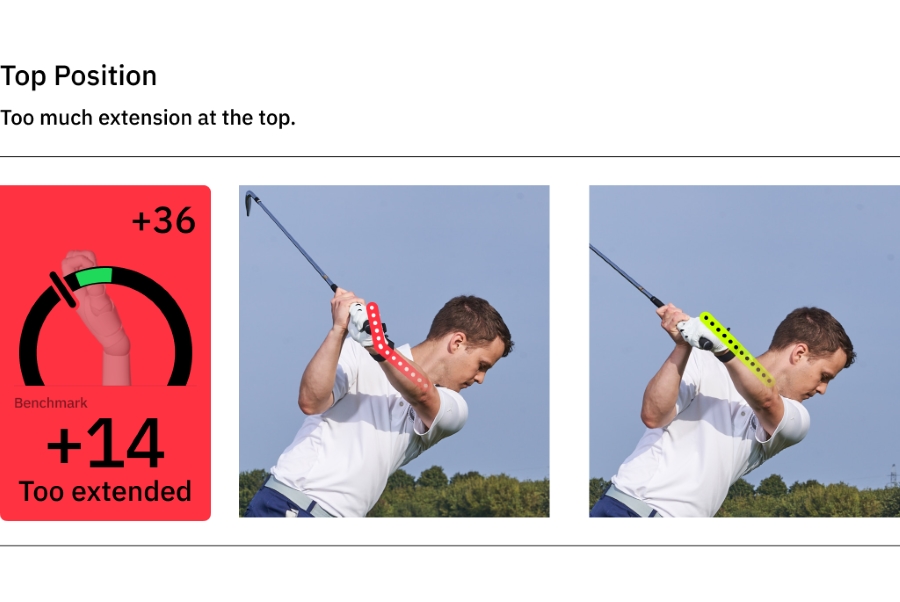
What Is a Cupped Wrist at the Top of the Backswing – and Why It’s a Problem
If your lead wrist is cupped at the top of the backswing, it quietly opens the clubface and makes solid contact much harder than it should be.
Even when the swing feels decent, this one position can force you to compensate on your downswing.
A cupped wrist means the lead wrist bends back toward the forearm at the top of the swing, instead of staying flat or slightly bowed. For a right-handed golfer, this shows up as the back of the left hand arched at the top.
Because you can’t really see it and rarely feel it, a cupped wrist shows up in the results, not the position.
- Shots that block right, then suddenly over-correct left.
- Weak or glancing contact, especially with irons.
- Distance that never quite matches your swing speed.
- A feeling that you have to “save” the shot at impact.
Even a small amount of cupping opens the clubface early, forcing timing-based saves at impact – flipping, stalling, or manipulating the face – just to get the ball started on line.
That’s why there is so much inconsistency in the shots you are hitting.
How to Diagnose a Cupped Wrist
Weak contact or inconsistent ball flight doesn’t automatically mean you have a cupped wrist. Many swing issues can produce similar results, which is why guessing based on shots alone often sends golfers in the wrong direction.
Before trying to fix anything, you need to know whether your lead wrist is actually cupped at the top of the backswing. There are three common ways golfers try to diagnose it.
1. Using a Mirror
A mirror can help you rehearse positions and get a rough idea of your wrist at the top.
The problem is that mirrors only show your swing in slow, controlled rehearsal.
When you move slowly, you can “place” your wrist where you want it. But a real swing, with speed and the intent to hit a ball is different. As soon as you add speed and contact, your body shifts into an athletic motion, and the wrist position often changes.
What looks flat in a slow rehearsal can become clearly cupped at full speed.
Mirrors are useful for awareness but they don’t show you what your wrists actually do when it matters.
2. Using Video
Video is more dynamic than a mirror and lets you pause the swing at the top.
But it still leaves you interpreting.
To judge your wrist correctly, you need to compare your wrist at address to your wrist at the top.
Most golfers only look at the top position in isolation. They don’t measure how much extension or flexion changed and they don’t know what change is appropriate for their grip and swing pattern.
Video also can’t tell you what the ideal wrist angle should be for your swing. Not all elite players look the same at the top.
3. Measuring the Wrist Directly
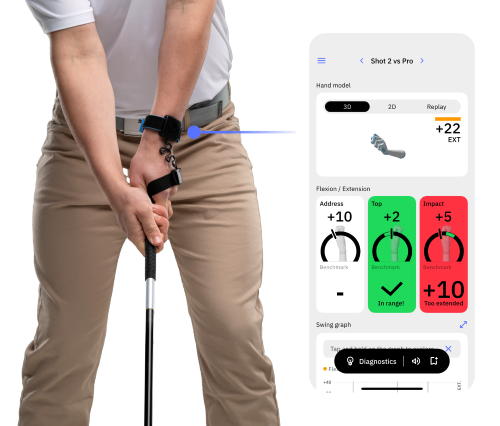
Instead of guessing, HackMotion measures your lead wrist throughout the swing and shows you exactly what position it’s in at the top.
There’s no camera angle to manage and no interpretation required. You can see whether your wrist is cupped, flat, or flexed, and by how much, immediately.
If you don’t know for sure whether your wrist is cupped, it’s impossible to know whether you’re fixing the right problem. Accurate diagnosis is what turns practice from guesswork into progress.
How to Practice Fixing a Cupped Wrist
Once you’ve confirmed that your lead wrist is cupped at the top, the next step is practicing a better wrist position and being able to confirm you’re actually doing it.
Here are three drills to get you started:
Drill 1: Credit Card / Ruler Awareness Drill
This is a simple awareness drill many golfers start with. Place a credit card, ruler, spoon, or tee along the back of your lead wrist and make slow rehearsals to the top of the backswing.
If you cup your wrist too much you’ll feel the pressure of the barrier you chose (ruler, spoon etc.). This drill can help you recognize what less cupping feels like.
The limitation is that a flat wrist at the top is relative, not absolute. Wrist position depends on grip and setup. With a stronger grip, a small amount of extension can be normal. With a weaker grip, the same position may already be too much.
The problem is you will have no way to know if you’re getting better once the object is removed. It’s simply an awareness-only drill.
How to do it
- Place a credit card, ruler, spoon, or tee along the back of your lead wrist (the side facing away from your palm).
- Take your normal setup and make a slow backswing to the top.
- At the top, check the feel: the goal is less “break back” in the lead wrist (less cupping).
- Make 5–10 slow rehearsals, stopping at the top each time.
- Then make a few slow swings without the tool and try to keep the same feel.
Drill 2: HackMotion Top Drill
The HackMotion Top Drill removes the guesswork from the same checkpoint you saw in the first drill.
You swing to the top and stop. HackMotion immediately shows whether your lead wrist is cupped, flat, or flexed. There’s no interpretation and no reliance on how it looks or feels.
You repeat this process until you can consistently reach a better wrist position at the top. Over time, this builds a clear reference for where your wrist actually needs to be.
HackMotion Top Drill
Swing to the top of the swing and stop. If you are in the green zone, your wrist is not cupped. If you are in the red zone, correct your position until it’s green.
How to do it
- Put on the HackMotion sensor and calibrate it as instructed.
- Take your normal setup.
- Swing to the top of the backswing and pause.
- Check your wrist reading at the top (cupped vs flat vs flexed).
- If you’re still cupped, adjust the wrist position until you reach your target range.
- Reset to address and repeat for 8–12 reps, aiming to hit the correct top position consistently.
Drill 3: HackMotion Motorcycle Drill
Reaching a better position at the top is the first step but it doesn’t guarantee a square clubface at impact. Many golfers add extension as soon as the downswing starts.
The Motorcycle Drill focuses on the transition from backswing to downswing. From the top, you rehearse a gradual move toward less extension as the club starts down, similar to revving a motorcycle throttle.
HackMotion provides continuous feedback as you move, not just a static checkpoint. You can see whether the wrist is improving through transition or slipping back into old habits.
HackMotion Motorcycle Drill
Focus on continuously adding flexion until the club reaches parallel, then smoothly complete your swing.
How to do it
- Start at the top of your backswing with the sensor on.
- Begin the downswing slowly and feel like you’re “revving” the lead wrist (motorcycle throttle feel) to reduce extension.
- Watch the feedback as you move down toward shaft-parallel (club roughly parallel to the ground).
- Repeat the move in slow motion until you can consistently reduce extension early in transition.
- Gradually speed it up while keeping the same wrist pattern.
Fixing a Cupped Wrist – Angles to Understand
When working on wrist position, it’s important to understand one thing upfront: there is no single “correct” wrist angle that every golfer should try to copy.
Wrist angles are relative, not absolute.
They change based on grip, setup, and how the club is delivered. That’s why chasing specific numbers usually creates more confusion than progress.
What actually matters is the pattern of change.
When HackMotion analyzed over one million swings, clear differences showed up between lower- and higher-handicap golfers:
- Lower-handicap players tend to reduce wrist extension from address to the top
- They continue managing extension through transition and impact
- This makes clubface control more predictable and less timing-dependent
Higher-handicap golfers often show the opposite pattern:
- Extension increases going back
- It’s harder to reduce later in the swing
- Timing-based compensations become necessary
The takeaway isn’t to copy a tour player’s numbers. It’s to train the right pattern for your swing, based on accurate feedback. You can’t get that kind of feedback unless you’re measuring and adjusting in real time.
Train the right wrist extension pattern at the top and build a more predictable, repeatable impact position.
Final Thoughts
A cupped wrist at the top isn’t hard to fix because it’s complicated. It’s hard to fix because it’s difficult to see, easy to misjudge, and almost impossible to train reliably without feedback.
If you’ve been reacting to weak or inconsistent shots with guesswork, it’s because you haven’t had a reliable way to confirm what your wrist is actually doing when it’s behind your head.
HackMotion removes that guesswork. It shows you whether your wrist is cupped, helps you practice a better pattern, and confirms the change is holding up as your swing speeds up.
If you’re serious about fixing a cupped wrist instead of chasing symptoms, do it with the help of HackMotion.