
")
Body weight with riding kit
Include bags, bottles, tools
Labeled width on tire sidewall
Check your wheel specs
Most modern gravel wheels are hookless
Heavier casings can handle rougher surfaces
Loaded bikes need more support
Recommended Pressure
Front: — bar · — kPa
Rear: — bar · — kPa
Enter your gravel bike details and hit Calculate Pressure for a personalized recommendation.
Gravel riding covers more ground than any other cycling discipline. One route might be half pavement, half loose dirt, with a chunky rock garden in between. Your tire pressure has to work across all of it. Run it too high and you’ll bounce off every rock. Too low and you’ll pinch flat or burp a tubeless tire on the first big hit.
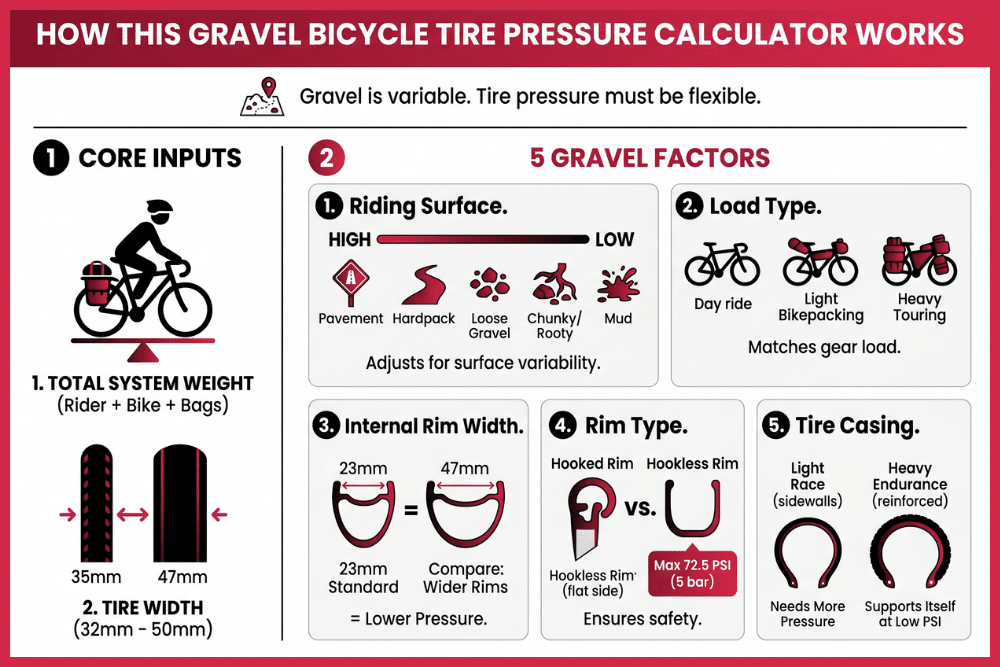
This gravel bike tire pressure calculator uses a weight-based formula adjusted for tire width, internal rim width, rim type (hooked or hookless), tire casing, riding surface, load type, and tubeless or tubed setup to deliver personalized front and rear PSI for tires from 32mm to 50mm.
Below, I break down PSI ranges by tire width, how surface changes the number, why loaded bikes need more air, and the mistakes I made that cost me tires.
How This Gravel Bicycle Tire Pressure Calculator Works
Gravel is the most variable discipline in cycling. One ride might start on pavement, cross a section of loose dirt, climb a chunky fire road, and end on a smooth hardpack. Your tire pressure should probably change along with it. No other cycling category demands this much flexibility.
The calculator starts with your total system weight (rider + bike + any bags or bottles) and factors it against your tire width. Gravel tires run from 32mm to 50mm, which is a huge range. A 35mm tire needs noticeably more PSI than a 47mm tire at the same rider weight.
From there, it adjusts for five gravel-specific inputs:
Riding surface. Pavement gets the highest calculated pressure. Hardpack drops a few PSI. Loose gravel drops more. Chunky and rooty terrain drops further. Mud needs the lowest pressure for float and grip.
Load type. Day ride, light bikepacking, or heavy touring. More gear means more support required, especially on the rear wheel.
Internal rim width. 23mm is the modern gravel standard. Wider rims let you drop a couple PSI without the tire feeling mushy.
Rim type. Hooked rims handle higher pressure safely. Hookless rims cap at 72.5 PSI (5 bar). Most modern carbon gravel wheels are hookless.
Tire casing. Light race casings need slightly more pressure than heavy endurance casings, which support themselves better at low PSI.
Gravel Bike Tire PSI Ranges by Width
These ranges assume a 75 kg rider on a tubeless setup with hooked rims, riding unloaded on mixed hardpack. Lighter riders go lower. Heavier riders and loaded bikes go higher. Use the calculator above for your exact numbers.
32-35mm (Fast Gravel / All-Road)
Front: 45 to 55 PSI. Rear: 48 to 58 PSI.
These narrower widths live in the overlap between road and gravel. If your rides are 70% pavement and 30% smooth dirt, this is your range. They roll fast, but they don’t absorb much. On chunky terrain, you’ll feel every rock.
Fast gravel races like the Belgian Waffle Ride see a lot of 32-35mm setups on smoother courses. For mixed-surface commuting, they’re ideal.
38-42mm (Standard Gravel)
Front: 35 to 45 PSI. Rear: 38 to 48 PSI.
This is where most gravel riders live. It’s the sweet spot that handles hardpack, loose dirt, and the occasional rocky section without feeling compromised on pavement. If you own a gravel bike and haven’t modified it, you’re probably running tires in this range.
A 40mm tire at 38 PSI on a 23mm internal rim feels planted, rolls reasonably fast, and forgives bad line choices. That’s why it’s the default setup for brands like Specialized, Cannondale, and Trek.
45-50mm (Adventure / Bikepacking)
Front: 25 to 38 PSI. Rear: 28 to 42 PSI.
The big rubber. These widths are made for rough stuff: rocky backcountry roads, singletrack, and long bikepacking routes. The extra air volume soaks up impacts that would rattle your teeth on narrower tires.
For heavy bikepacking, add 3 to 5 PSI on top of these numbers to support the load. The calculator handles this automatically when you select a loaded profile.
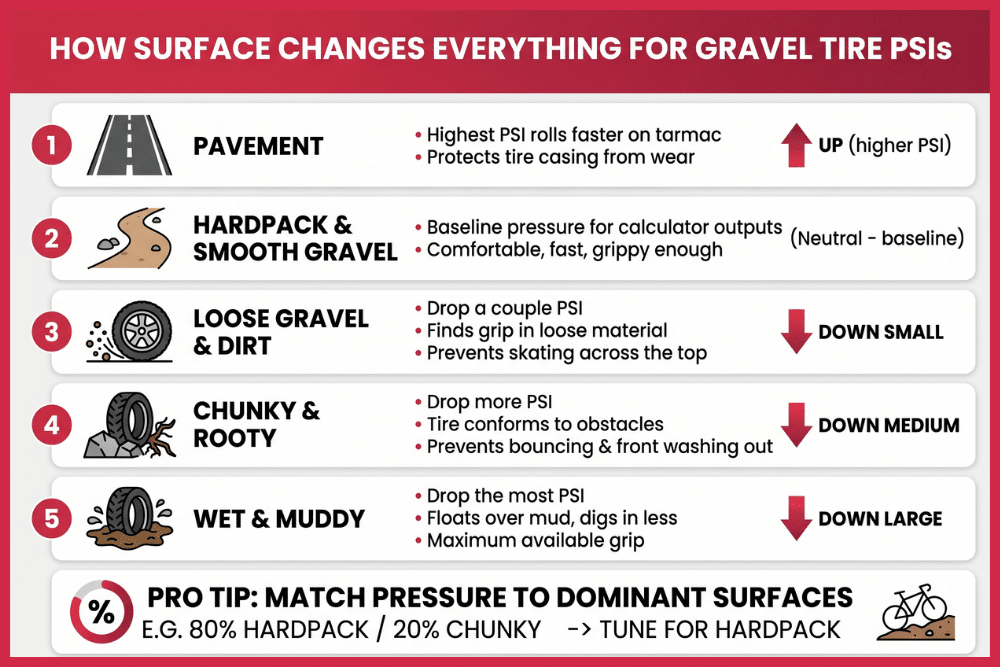
How Surface Changes Everything for Gravel Tire PSIs
Gravel pressure isn’t a set-and-forget number. The same 40mm tire wants a very different PSI on smooth hardpack versus a chunky rock garden. This is where most riders get it wrong. They pick one pressure at the start of the ride and live with whatever the terrain throws at them.
The calculator adjusts for five surface types:
Pavement. If you’re linking gravel routes together with road sections, pressure sits at the top of your range. Higher PSI rolls faster on tarmac and protects the tire casing from wear.
Hardpack and smooth gravel. This is the baseline. Most calculator outputs are tuned for this surface. Comfortable, fast, grippy enough.
Loose gravel and dirt. Drop a couple PSI. Lower pressure creates a larger contact patch, which helps the tire find grip in loose stuff instead of skating across the top.
Chunky and rooty. Drop more. You want the tire conforming to rocks and roots instead of bouncing off them. Too high here and you’ll lose the front end in corners.
Wet and muddy. Drop the most. Low pressure lets the tire “float” over mud rather than digging in, while giving you every bit of grip available.
The trick is matching pressure to what you’ll actually ride. If your route is 80% hardpack and 20% chunky, tune for the hardpack and accept the rougher bits.
Bikepacking: Why Loaded Bikes Need More Pressure
Strap a seat bag, frame bag, and handlebar roll to your gravel bike and you’ve just added 5 to 15 kg. That’s a huge jump in total system weight, and your tires feel every gram.
An underinflated loaded tire sags, squirms in corners, and is way more likely to pinch flat on rocks. The fix is simple: add pressure. For light bikepacking (under 10 kg of gear), bump up 2 to 4 PSI from your unloaded numbers. For heavy touring (10 kg+), add 4 to 7 PSI.
Most bikepacking setups skew rear-heavy. A loaded seat pack puts more weight on the rear wheel, so the rear tire needs extra pressure more than the front. The calculator adjusts for this when you select the loaded profile.
One mistake I made on my first bikepacking trip: I set my pressure at home with an empty bike, then loaded up 12 kg of gear and rode off without rechecking. Burped my rear tire 40 km in.
Common Gravel Tire Pressure Mistakes
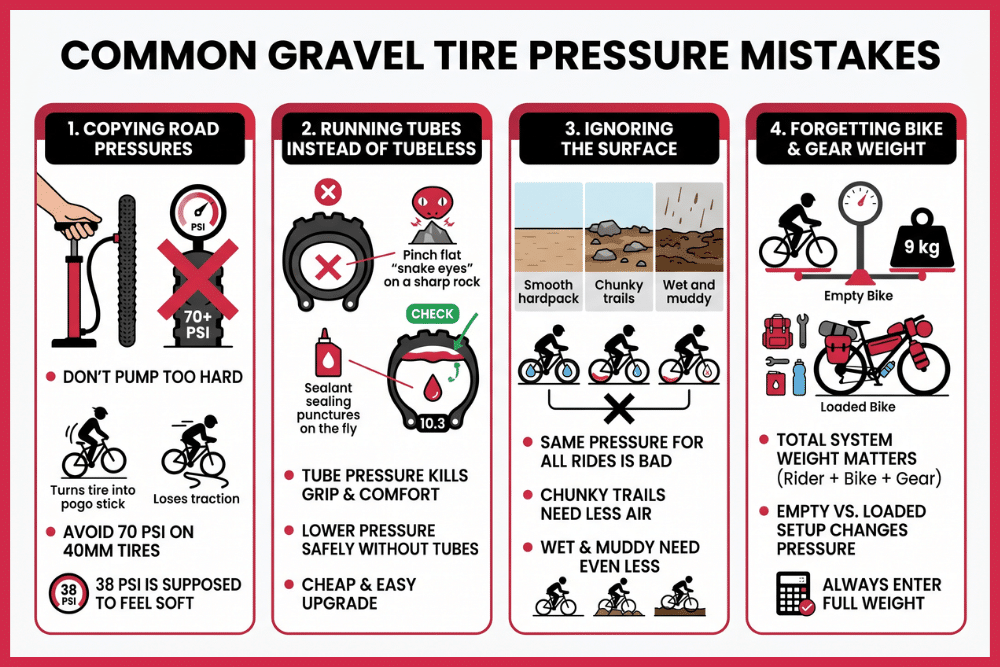
Copying Your Road Pressures
If you came to gravel from road cycling, your instinct is to pump hard. Don’t. Running 70 PSI on a 40mm gravel tire turns it into a pogo stick. You’ll bounce off every rock, lose traction in corners, and wonder why everyone else is having more fun. Trust the calculator. 38 PSI is supposed to feel soft.
Running Tubes Instead of Tubeless
This is the biggest upgrade you can make to a gravel setup. Tubes force you to run 5 to 8 PSI higher to avoid pinch flats, which kills grip and comfort. Tubeless eliminates the tube entirely, lets you run lower pressure safely, and seals most small punctures on the fly. If your wheels and tires are tubeless-ready, the conversion is cheap and immediate.
Ignoring the Surface
Pumping the same pressure for every ride is the single fastest way to have a bad time on gravel. Chunky trails need less air than hardpack. Wet and muddy sections need even less. Before a ride, think about what you’ll actually be riding and pick your pressure accordingly.
Forgetting Bike and Gear Weight
The calculator has a bike weight field for a reason. A 9 kg bike with empty bottles hits very different numbers than the same bike loaded with 12 kg of bikepacking gear. Always enter your full system weight, including bags, tools, and a full water supply.
Frequently Asked Questions (FAQs) About Gravel Bike Tire Pressure
What PSI should a gravel bike tire be? For a typical 75 kg rider on 40mm tubeless tires riding hardpack, around 38 PSI front and 42 PSI rear. Narrower tires need more, wider tires less. Use the calculator above for your exact numbers.
Can I run different pressures for different rides? Yes, and you should. The same 40mm tire wants more pressure for pavement-heavy routes and less for chunky backcountry. Adjust before every ride based on terrain.
How much should I lower pressure for wet conditions? Drop 2 to 3 PSI from your dry setup. Lower pressure increases the contact patch, which genuinely helps grip on wet rocks, roots, and muddy sections.
Should I use tubes or tubeless for gravel? Tubeless, almost always. It lets you run lower pressure safely, seals small punctures automatically, and handles rocky terrain without pinch flats. Converting is one of the best upgrades you can make.