
Gear Ratio
Gear inches: —”
Development: — m
Gain ratio: —
Speed: — km/h
Enter your chainring and cog, then hit Calculate to see the full breakdown.
Picking the right gears can be the difference between spinning happily up a climb and grinding to a painful stop halfway up. But gear numbers confuse almost everyone. Gear ratio, gear inches, gain ratio, development. They sound like four different things, but they’re really four ways of describing the same gear. Once you understand them, choosing the right setup gets easy.
A bike gear ratio is your chainring teeth divided by your cog teeth, showing how many times the rear wheel turns per pedal stroke. This calculator converts that into gear inches, gain ratio, development, and speed at any cadence, for single gears or your full drivetrain, using Sheldon Brown’s trusted methodology.
Below, I explain what each number means in plain English, what gearing suits climbing versus racing versus gravel, and how to use it all to pick your setup.
How This Bicycle Gear Ratio Calculator Works
This bike gearing calculator runs in two modes, depending on what you need.
Single gear mode takes one chainring and one cog and breaks down that exact combination. Enter 50 teeth up front and 14 in the back, and you’ll see what that gear actually does.
Full drivetrain table mode maps every chainring against every cog in your setup. Pick your crankset and cassette, and you get a color-coded table of all your gears at once. This is how you spot overlapping gears, big jumps, and whether your range actually fits your riding.
Either way, the calculator gives you five outputs for each gear:
- Gear ratio: the raw number (chainring divided by cog)
- Gear inches: the old-school standard for comparing gears
- Gain ratio: Sheldon Brown’s metric that factors in your crank length
- Development: how far you travel per pedal stroke, in meters
- Speed: how fast you’re going at a given cadence
The math follows the methodology laid out by Sheldon Brown, the most trusted reference in cycling mechanics. One detail that matters: the wheel sizes use measured rolling circumference, not theoretical tire diameter. That’s the same number your bike computer uses, so the speed and gear inches match what you see on your head unit.
Bike Gear Ratio vs Gear Inches vs Gain Ratio vs Development
Here’s where most riders get lost. Your calculator spits out four different ways to describe the same gear, and they all sound similar. Let me break down what each one actually means and when to use it.
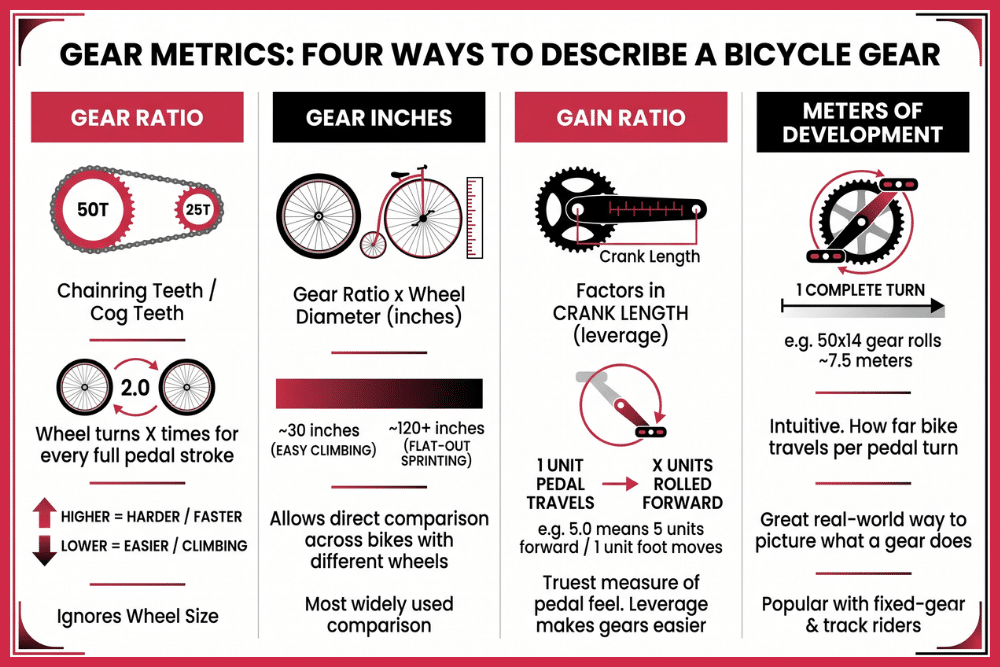
Gear Ratio
This is the simplest one. It’s just your chainring teeth divided by your cog teeth. A 50-tooth chainring with a 25-tooth cog gives you a 2.0 ratio. That means the wheel turns twice for every full pedal stroke.
Higher ratio equals harder gear and more speed. Lower ratio equals easier gear and better climbing. It’s quick to calculate, but it ignores your wheel size, so you can’t compare across bikes with different wheels.
Gear Inches
Gear inches fix that problem. The number represents the diameter of an equivalent direct-drive wheel, a holdover from the old penny-farthing days. The formula multiplies your gear ratio by your wheel diameter in inches.
Typical road gears run from about 30 inches (easy climbing) to 120+ inches (flat-out sprinting). Because gear inches factor in wheel size, you can compare a 700c road bike to a 26-inch mountain bike directly. This is the most widely used comparison metric in cycling.
Gain Ratio
Gain ratio is Sheldon Brown’s invention, and it’s the most complete of the four. It factors in something the others ignore: your crank length. Longer cranks give you more leverage, which effectively makes a gear easier.
The number tells you how far you roll for each unit your pedal travels. A gain ratio of 5.0 means you move 5 units forward for every 1 unit your foot moves through the pedal circle. It’s the truest measure of how hard a gear actually feels to your legs.
Meters of Development
Development is the most intuitive of the bunch. It’s simply how far your bike travels with one complete turn of the pedals, measured in meters.
A 50×14 gear on a road bike rolls about 7.5 meters per pedal stroke. It’s a great real-world way to picture what a gear does, and it’s popular with fixed-gear and track riders who care about exactly how far each rotation takes them.
What’s a Good Gear Ratio?
There’s no single best gear ratio. The right setup depends entirely on where and how you ride. What matters most is your range: the spread between your easiest and hardest gear. Here’s what works for each type of riding.
For Climbing
For steep climbs, you want a low gear, ideally around 1:1 or lower. That means a gear like 34×34, where your chainring and cog have roughly the same number of teeth. A compact 50/34 crankset paired with an 11-32 or 11-34 cassette gives most riders a climbing gear they can actually spin up a wall without blowing up their legs.
If you’re constantly grinding and standing on climbs, your gearing is too tall. Go lower.
For Flat Roads and Racing
Flat terrain and racing reward high gears for top-end speed. A standard 53/39 crankset with an 11-28 cassette is the classic race setup. The big 53×11 combo gives you a gear ratio near 4.8, enough to keep pedaling well past 60 km/h in a sprint.
Most riders rarely use the very hardest gear except in sprints or fast descents, so don’t obsess over having the tallest possible top end.
For Gravel and Mixed Terrain
Gravel demands the widest range of all. You need a low gear for steep, loose climbs and enough up top for fast hardpack. A 1x setup like a 40T chainring with a 10-44 cassette covers most of it simply. Riders who want more range often go 2x with a sub-compact 48/32 or 46/30 crankset.
The goal is range, not closely spaced gears. On gravel, having an easy bailout gear beats having tight jumps.
1x vs 2x: Which Drivetrain Is Right for You?
This is the biggest gearing debate in cycling right now. 1x (pronounced “one by”) means a single chainring up front. 2x means two. Both have real trade-offs.
1x is about simplicity. One chainring, no front derailleur, no shifting between rings. Less to maintain, less to go wrong, and a cleaner-looking bike. It dominates mountain biking and is hugely popular for gravel. The downside is bigger jumps between gears, since one chainring has to cover your whole range with just the cassette.
2x is about range and tight jumps. Two chainrings give you more total gears and smaller steps between them, so you can fine-tune your cadence on long road rides. The cost is complexity: a front derailleur, more shifting decisions, and a bit more maintenance.
Here’s my take after riding both. For road riding where you hold a steady pace for hours, 2x wins on those small, smooth gear steps. For mountain biking and most gravel, 1x is the better call. The simplicity is worth more than the perfect cadence, and you’re shifting constantly anyway as the terrain changes.
If you mostly ride one type of terrain, pick the system built for it. If you ride everything, 2x gives you more flexibility.
How to Use Gear Ratios to Pick Your Setup
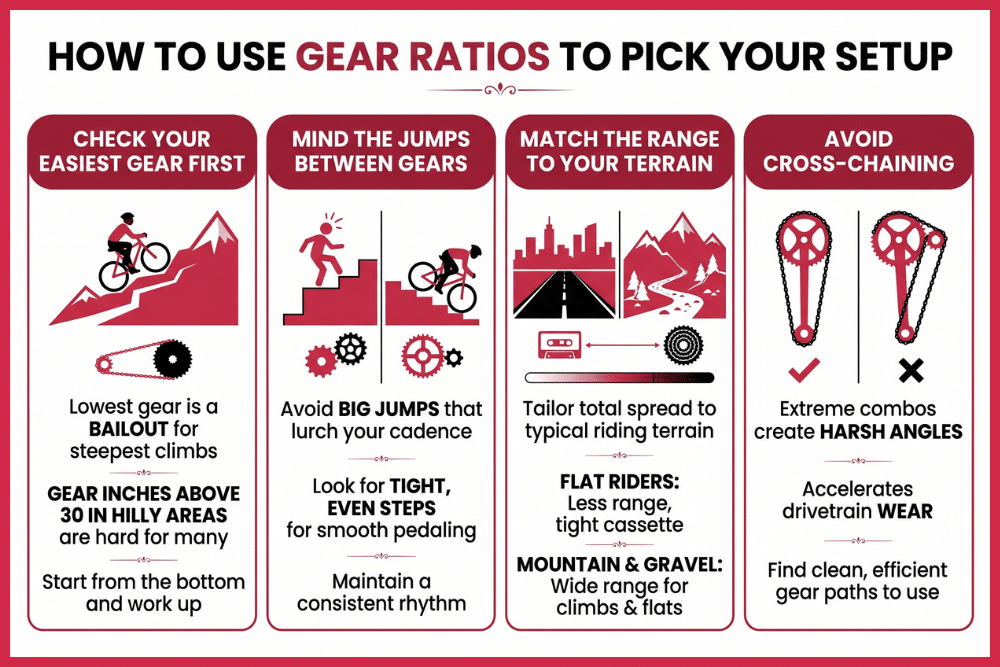
Check Your Easiest Gear First
Before anything else, look at your lowest gear in the calculator. This is your bailout for the steepest climb you’ll face. If the gear inches sit above 30 and you live somewhere hilly, you’ll struggle. Most riders set up their hardest gear fine but leave themselves short on the climbing end. Start from the bottom and work up.
Mind the Jumps Between Gears
Run the full drivetrain table and look at how much the ratio changes from one gear to the next. Big jumps mean your cadence lurches every time you shift, which is annoying on long efforts. Tight, even steps let you hold a smooth pedaling rhythm. This is where 2x setups and closer-range cassettes shine.
Match the Range to Your Terrain
Add up your total spread from easiest to hardest. Flat riders need less range and can run a tight cassette. Mountain and gravel riders need a wide range to handle both steep climbs and fast flats. Don’t pay for a range you’ll never use, and don’t run out of gears where you ride most.
Avoid Cross-Chaining
The table also shows you overlapping and extreme gear combos. Running your big chainring with your biggest cog (or small ring with smallest cog) puts the chain at a harsh angle. It wears your drivetrain faster and shifts poorly. Use the table to find the clean, efficient gears and live in those.
Frequently Asked Questions (FAQs) About Cycle Gear Ratios
What gear ratio is best for steep hills?
Aim for a ratio of 1:1 or lower, like a 34-tooth chainring with a 34-tooth cog. That gives you a gear around 27 to 28 gear inches, low enough to spin up steep grades without grinding. The bigger your easiest cog and the smaller your chainring, the easier the climb.
Is a higher or lower gear ratio better?
Neither. They do different jobs. A higher ratio (like 4.0) gives you speed on flats and descents. A lower ratio (like 1.0) gives you easy climbing. A good bike has a wide enough range to cover both.
What does 50/34 mean on a crankset?
Those are the tooth counts of the two chainrings. 50 is the big ring, 34 is the small ring. It’s called a compact crankset, and it’s the most popular road setup because it balances decent top speed with easy climbing gears.
Gear inches or gain ratio: which should I use?
Gear inches for comparing bikes and talking with other riders, since it’s the common standard. Gain ratio if you want the most accurate feel, especially when comparing different crank lengths. For most people, gear inches is plenty.