

In today’s Tinker Tantrum, Travis explains the flawed genius behind his hideous head-tube-mounted handlebar cradle.
I don’t ride motorcycles. I can’t afford another expensive sport. Also, I don’t have a garage. Though I did borrow a motorcycle once. I spent a few weeks on a Honda XR650L dual-sport bike, and it was magic. Its power, speed, and range were of course intoxicating. But what created the most lasting sense memories was its mass. The bike would drift while accelerating around loose corners, but not frantically. It was floaty in a way that I could predict and control despite my very limited experience with a throttle. It always maintained its composure, especially compared to a 36lb, 130mm-travel mountain bike. That also applied to its behavior over bumps. It took a lot to deflect all that inertia. I found the experience oddly calming. Ever since letting go of that XR over a decade ago, the best way I’ve found to scratch that itch is full-suspension bikepacking.
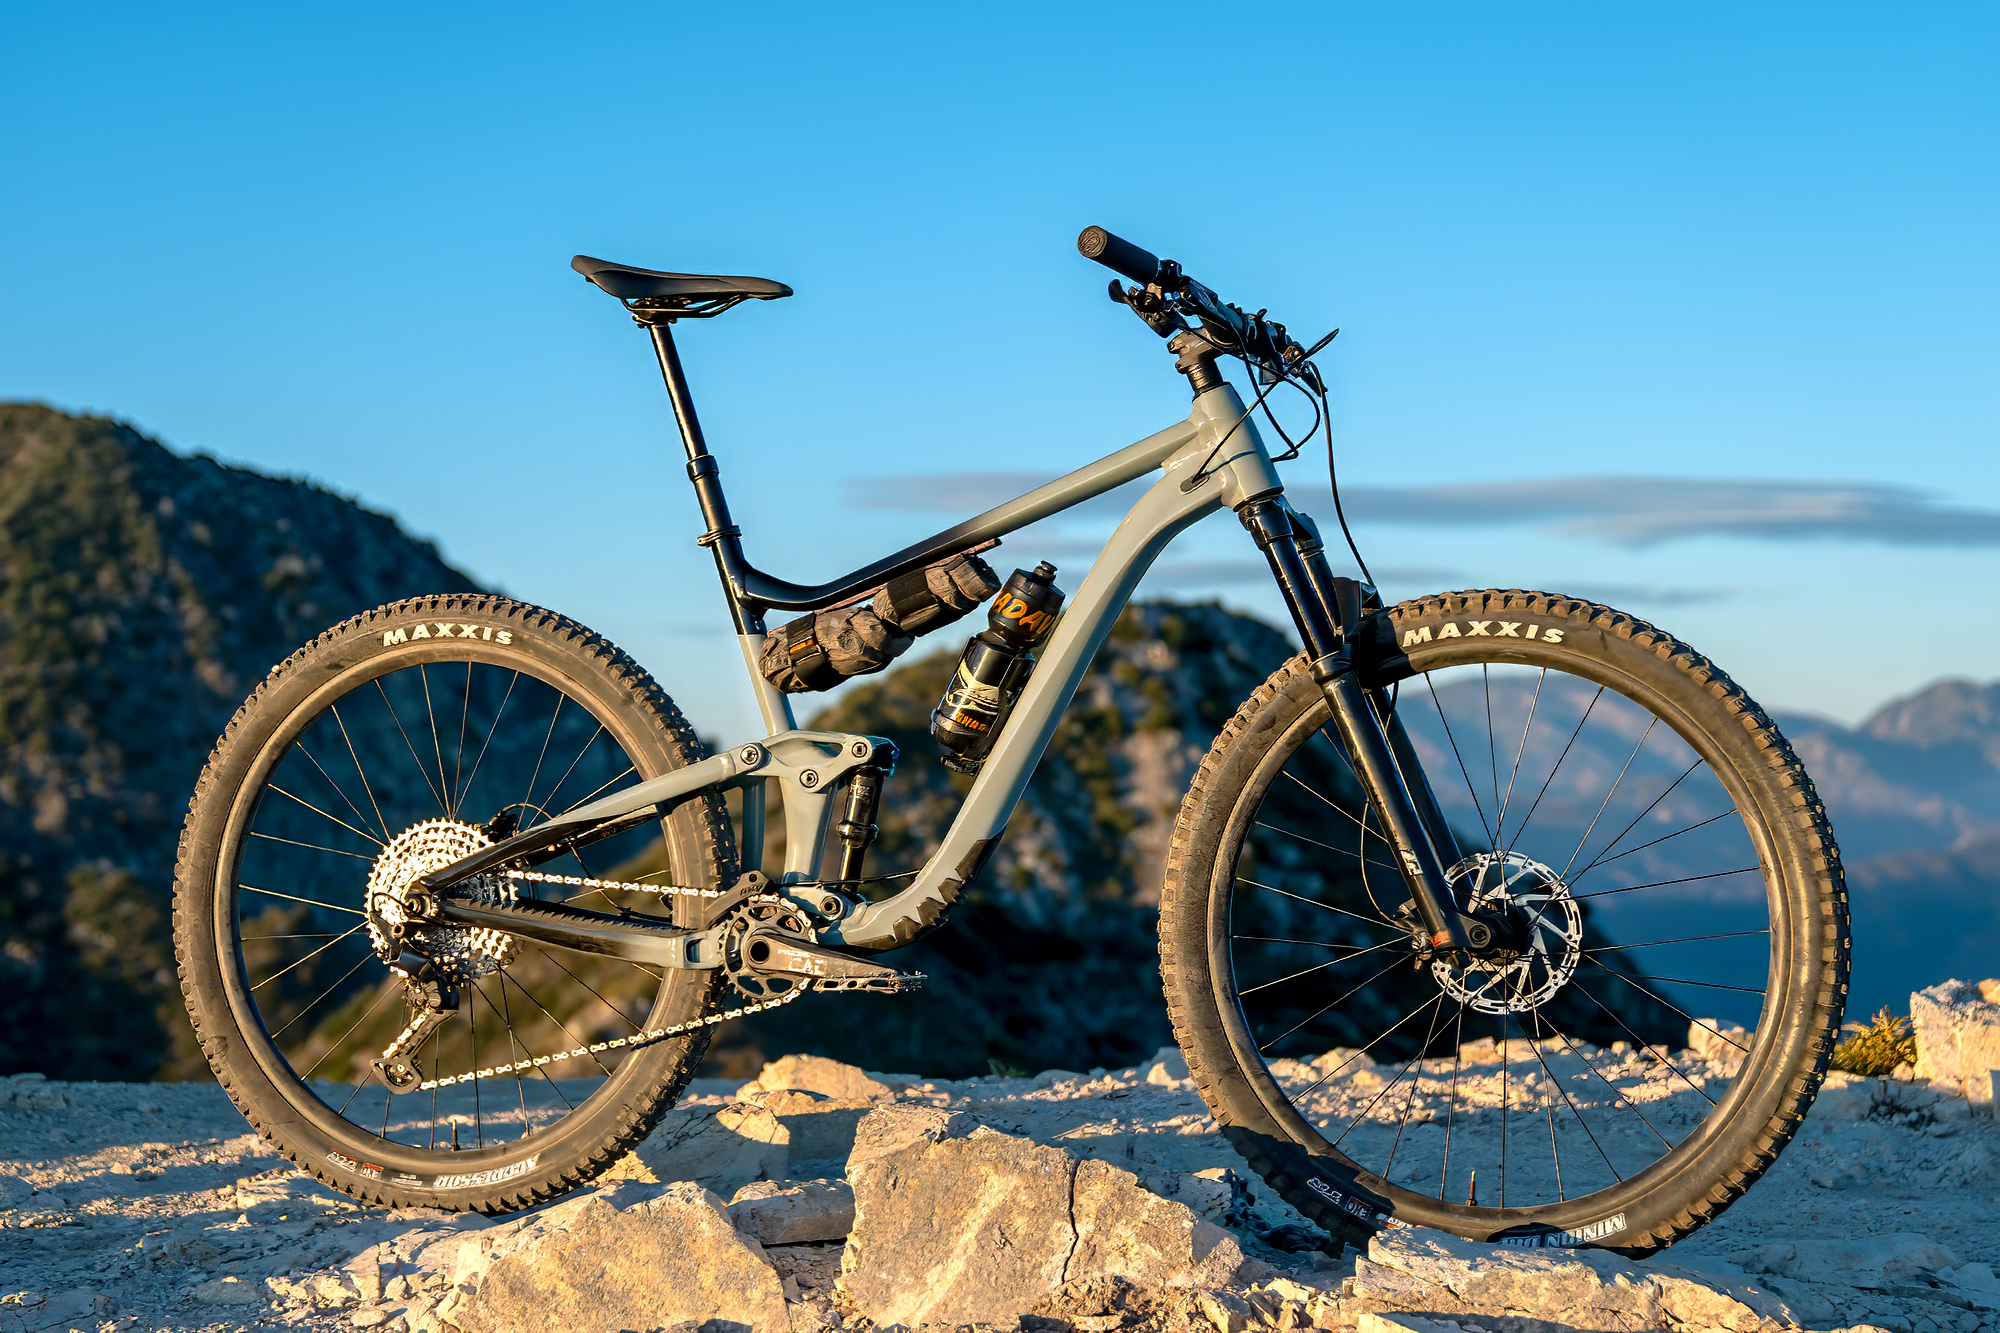
On multi-day rides, I just want to be comfortable. Even though rear suspension adds weight and complexity while also displacing valuable storage space, I think it’s worth it. The Trek CheckOUT leaves me less fatigued when I get to camp. It’s also more fun and more safe when descending. It’s got better traction for better predictability. When the bike is fully loaded, all that sprung mass helps offer a taste of the moto life. Its ingenious linkage-supported rear rack is largely to thank for that. But I had already been chasing that dragon in my own pet projects, long before I checked out the CheckOUT.
The Mission
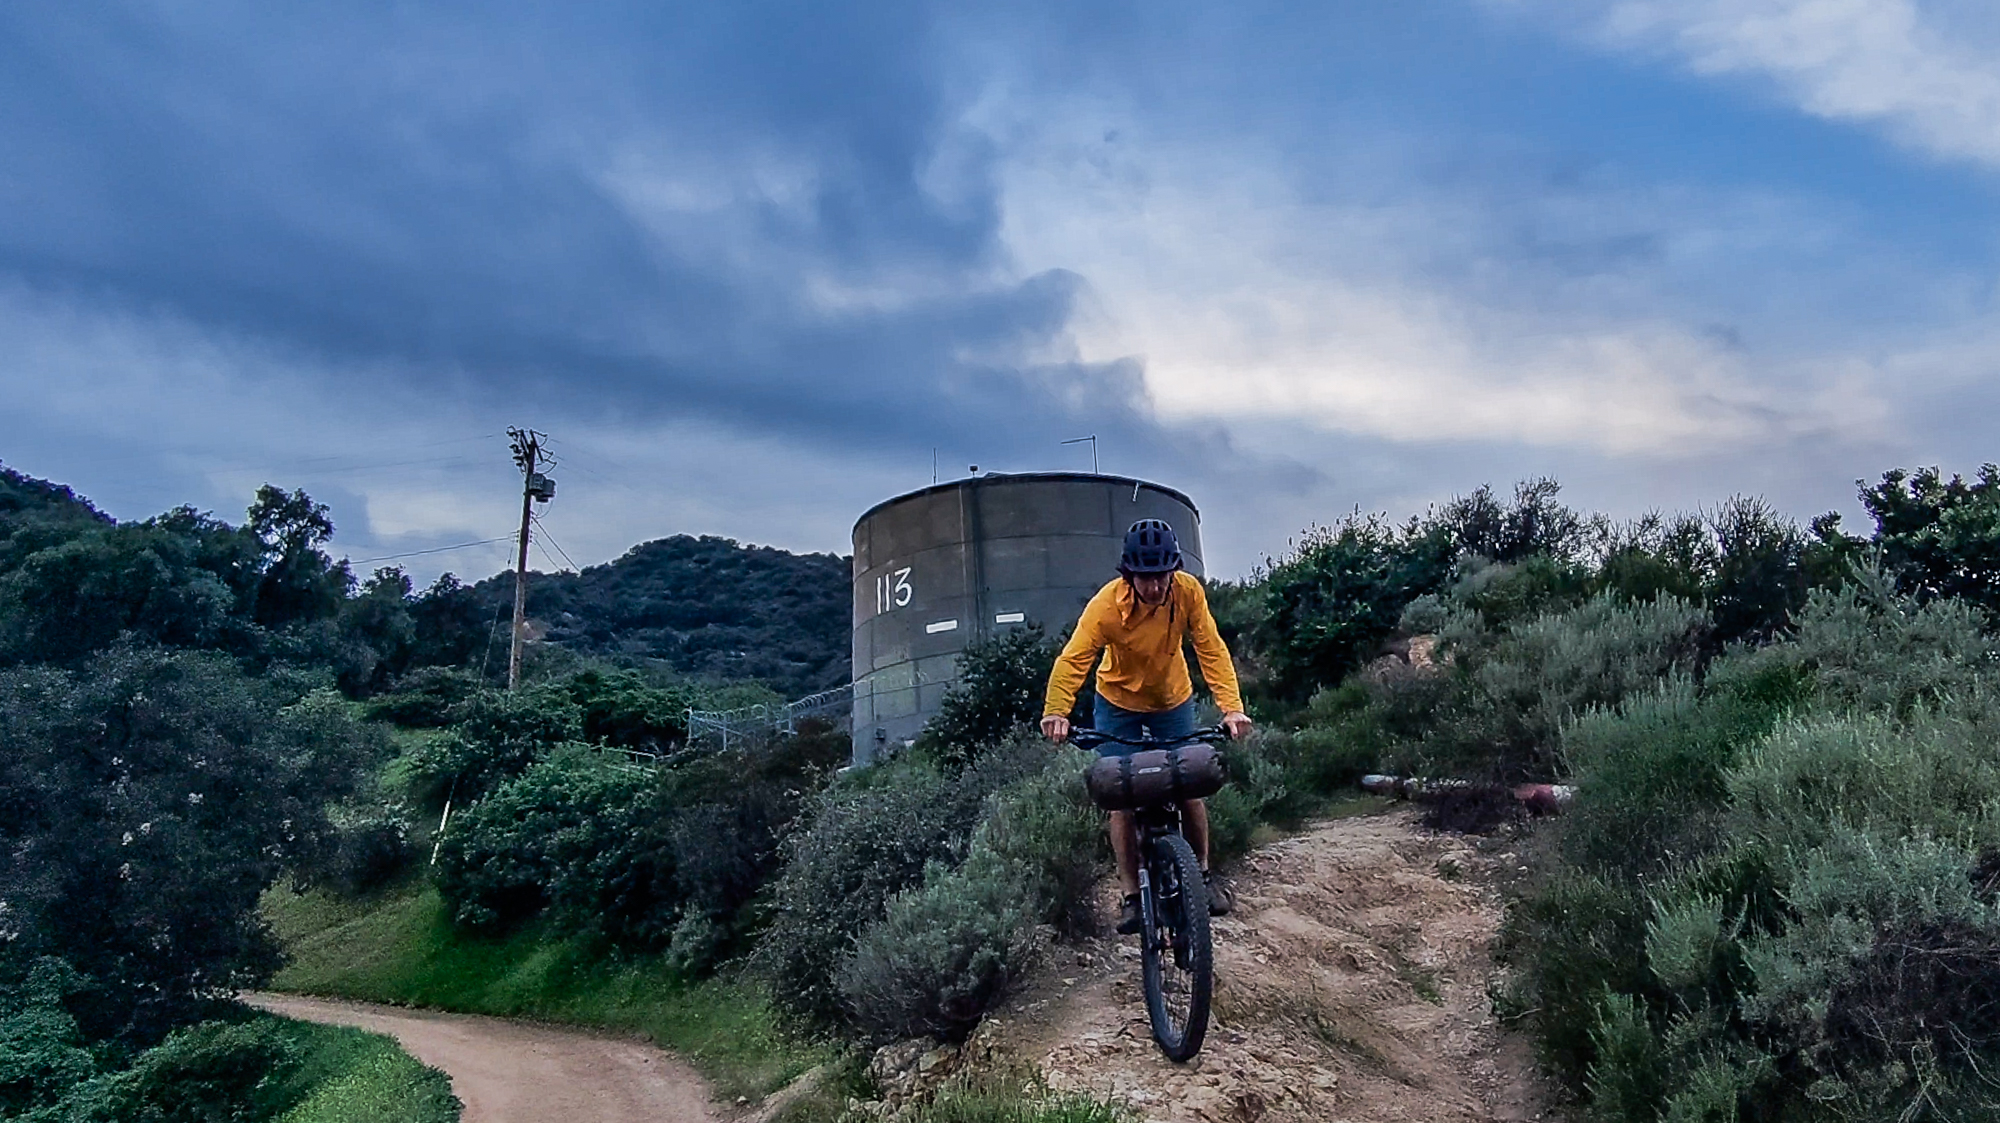
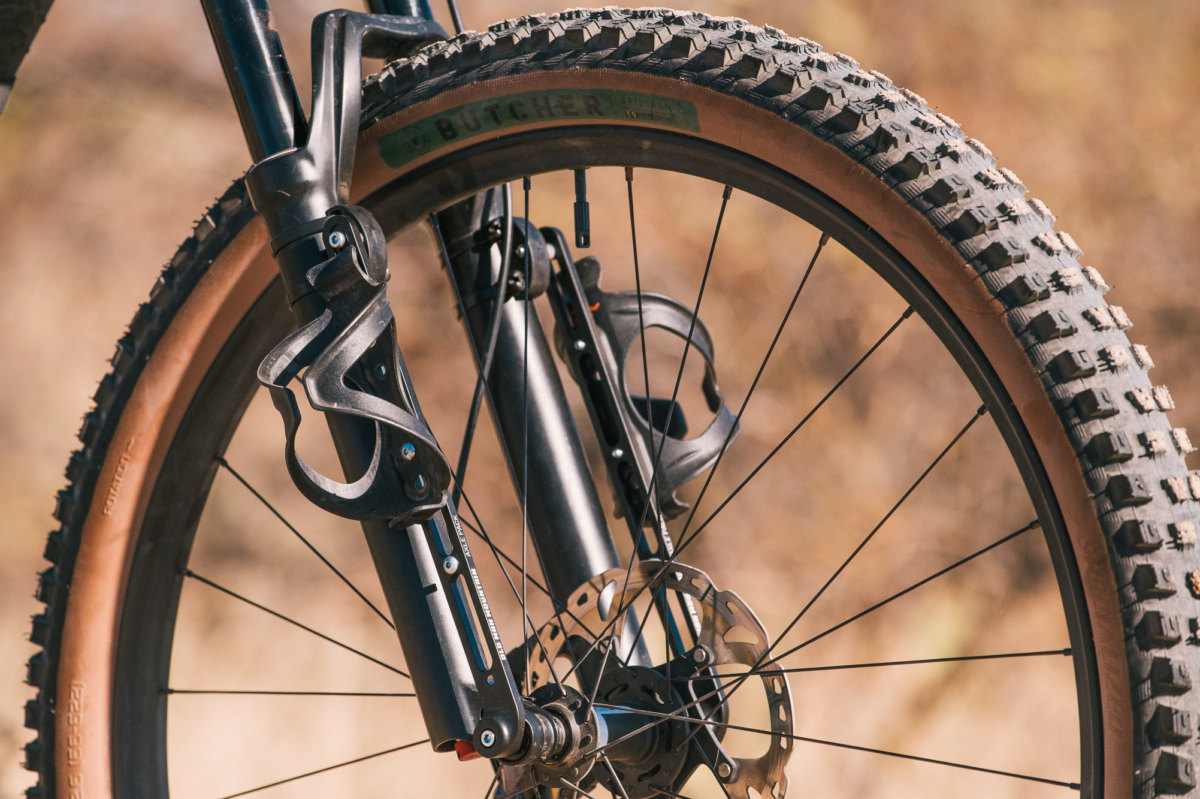
My custom seat-tube-mounted rack made by Riley Ogden of Souvenir Cycles makes me wonder how I ever toured with a saddle bag. My gear is lower, more secure, and it doesn’t interfere with my dropper post. And although axle-mounted racks are strong and versatile, my approach suspends the mass to make for a smoother, more damped ride. Suspending the mass was also my goal when hacking a rack to fit my Trust Message linkage fork. It put the weight a little lower and more out-of-the-way than a handlebar bag, and it accommodated side panniers.
But that extra capacity was a problem. It was a lot to swing around when swerving through rocks or maintaining balance at slow speeds. I reckoned that struggle was simply a fact of life when carrying a load. I had previously felt it on the handlebar cradles I used before experimenting with linkage forks. But then I saw the Rose Bikes Hobo, and I knew what I needed to do.
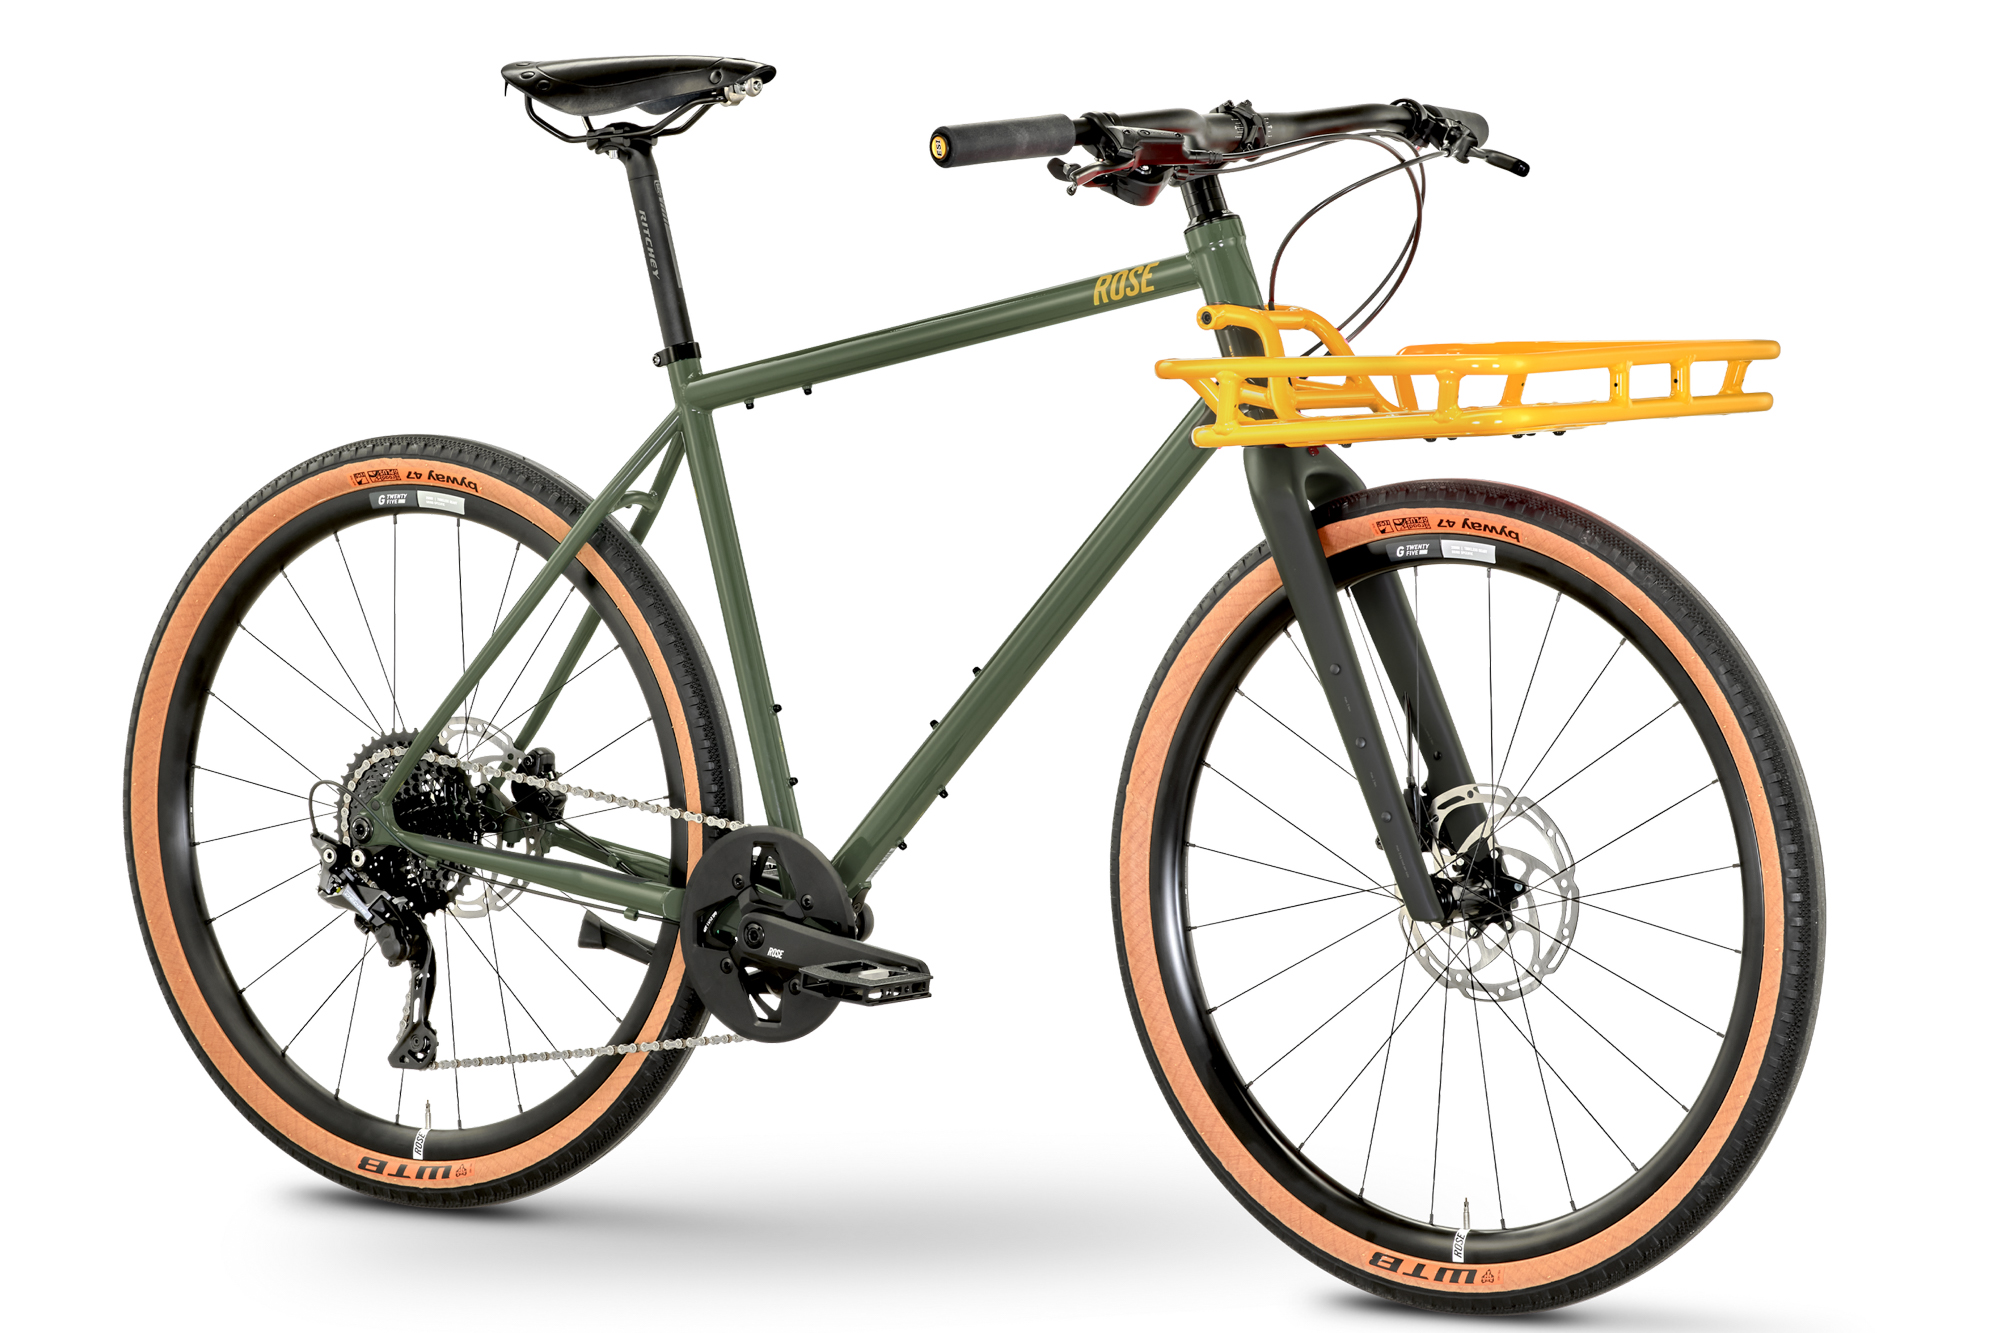
The Inspiration
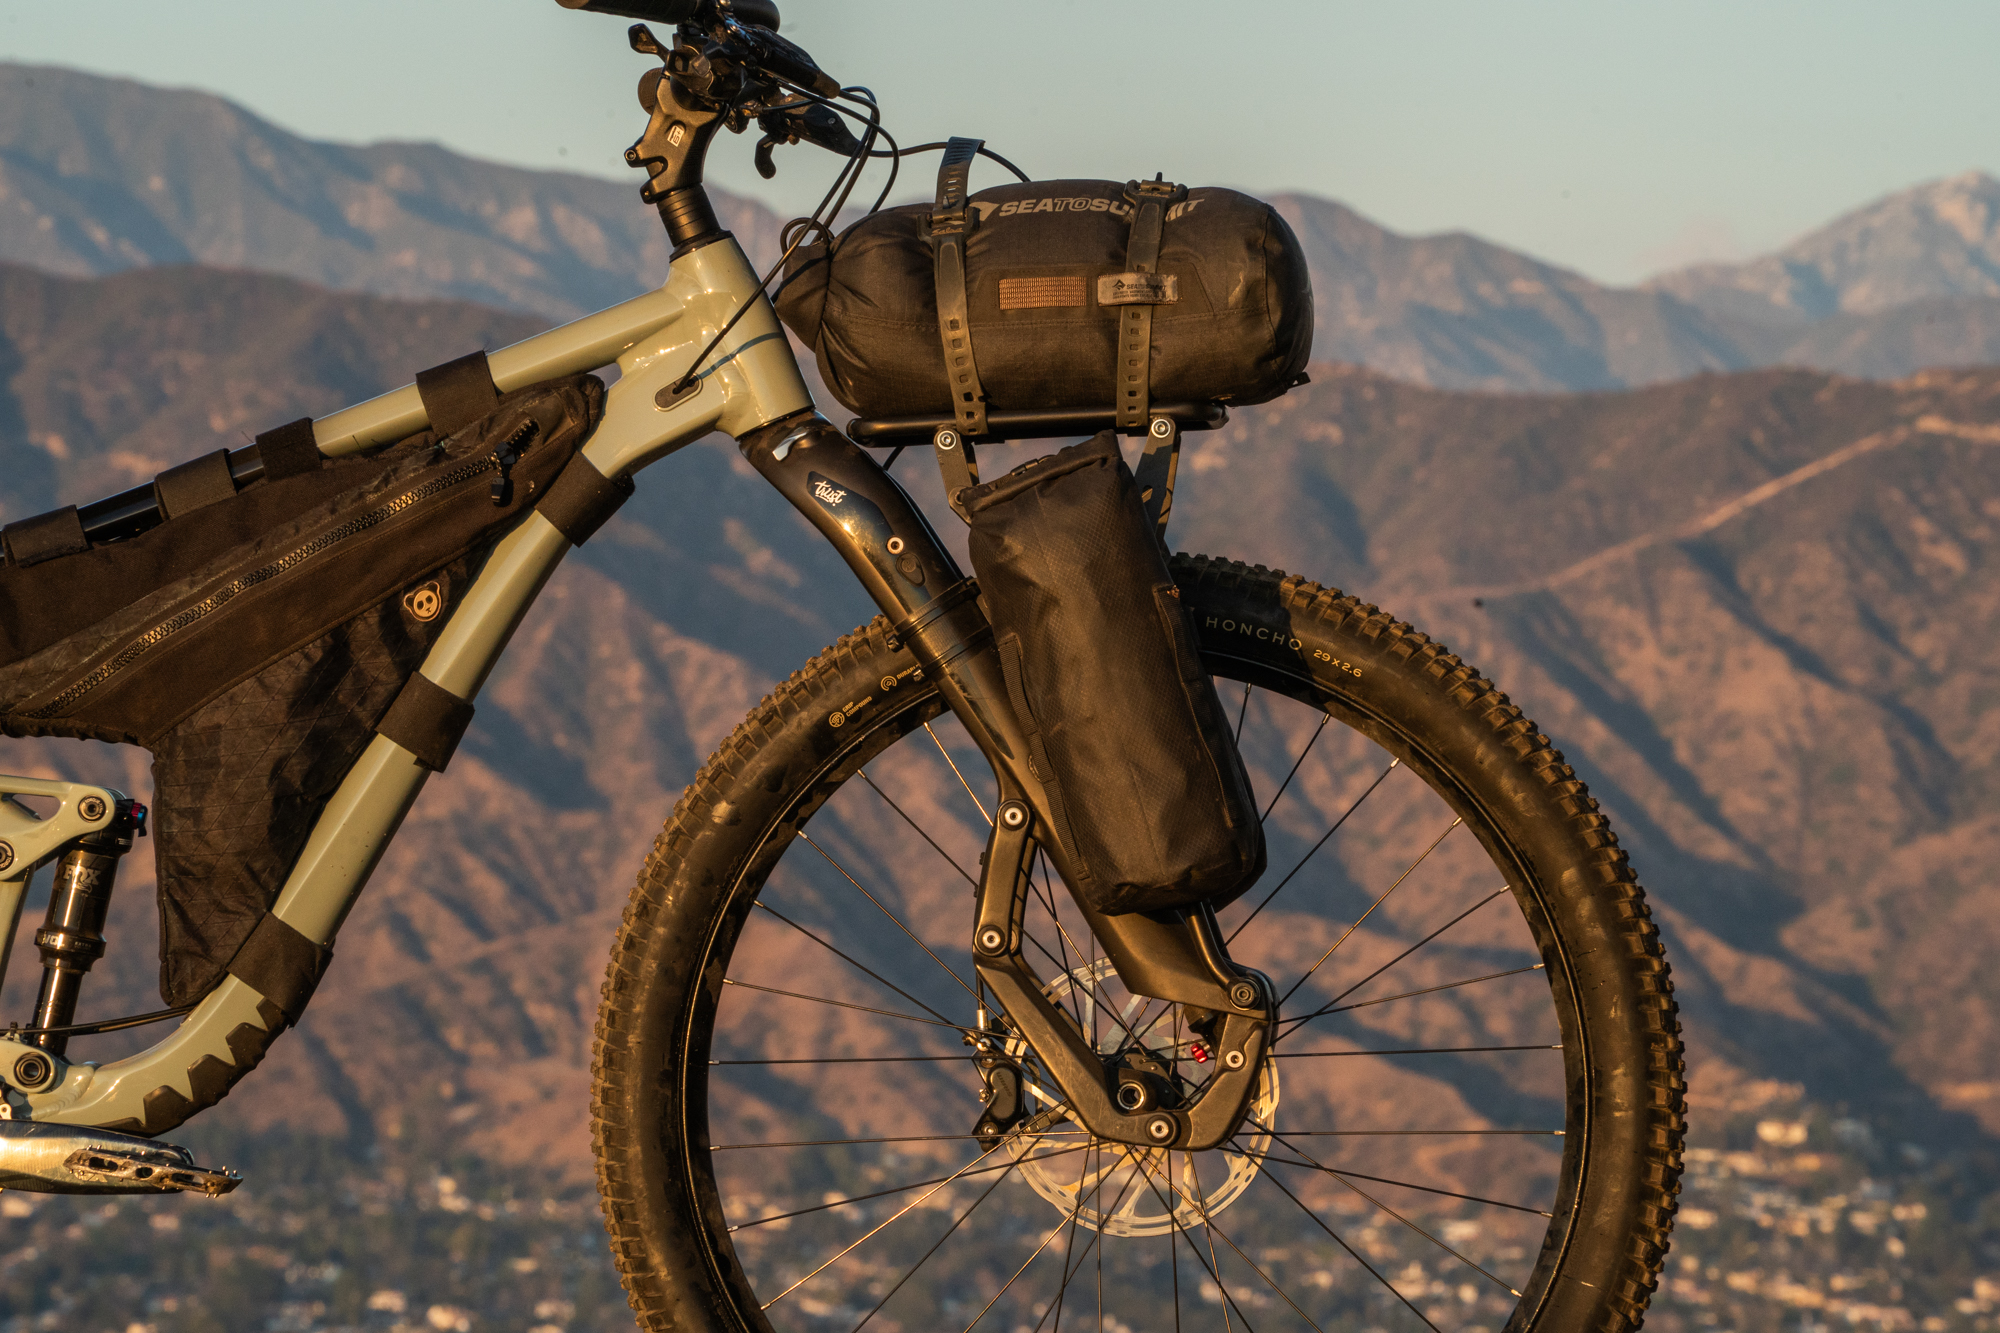
I had never seen a head-tube-mounted rack on an otherwise normal bike with a normal front-wheel size. But there should be more of them. Affixing the load to the frame keeps steering action light. And if the bike has suspension, it allows for more of that sweet, sweet sprung mass. The concept is perfect for a bikepacking mountain bike like mine, but I didn’t think Rose’s “rack” was the right approach. It’s a lot of specialty hardware to hold what likely will be one self-contained dry bag. And there are already simple ways to carry those.
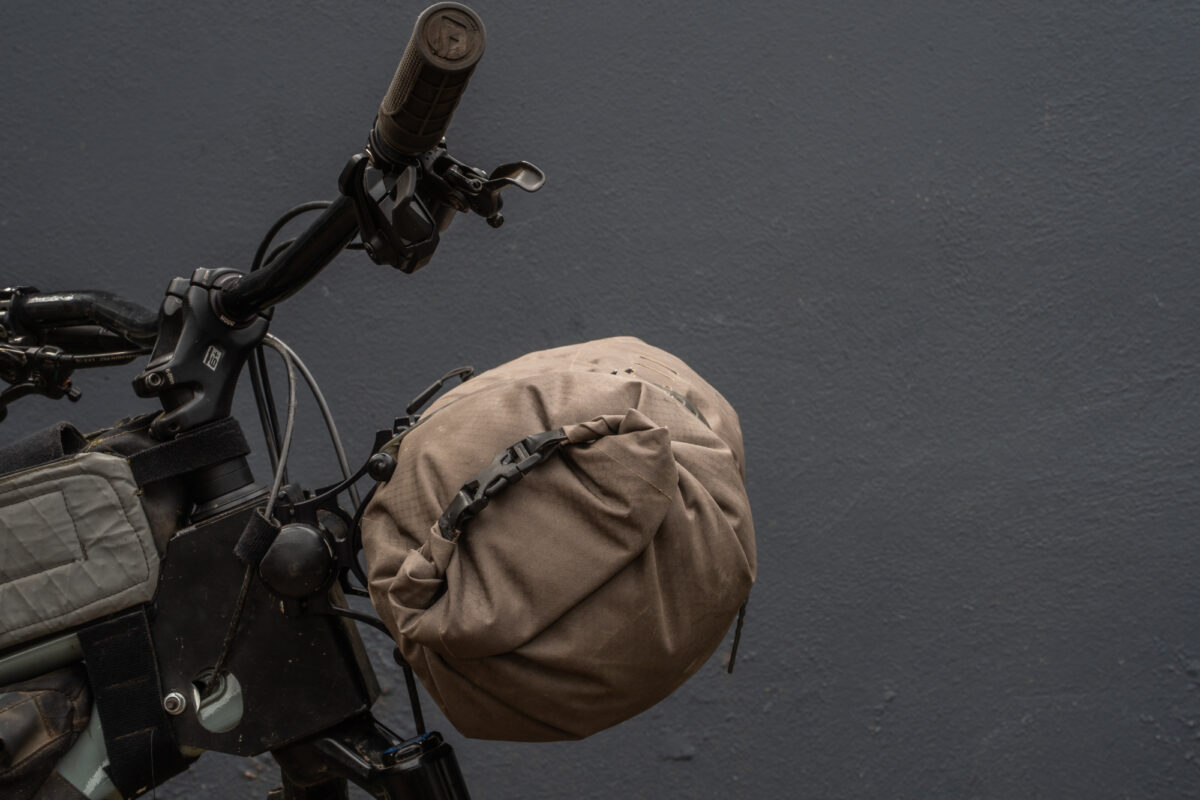
I just needed something like the Salsa Anything Cage or Rogue Panda Blue Ridge Harness. It’s simple, light, and compact. With JPEGs of the Rose Hobo still open on my cluttered desktop, I started brainstorming ways to combine its head-tube mount with a handlebar cradle. That’s when it hit me: Handlebar cradles already exist. I actually just needed a way to mount one directly to the head tube.
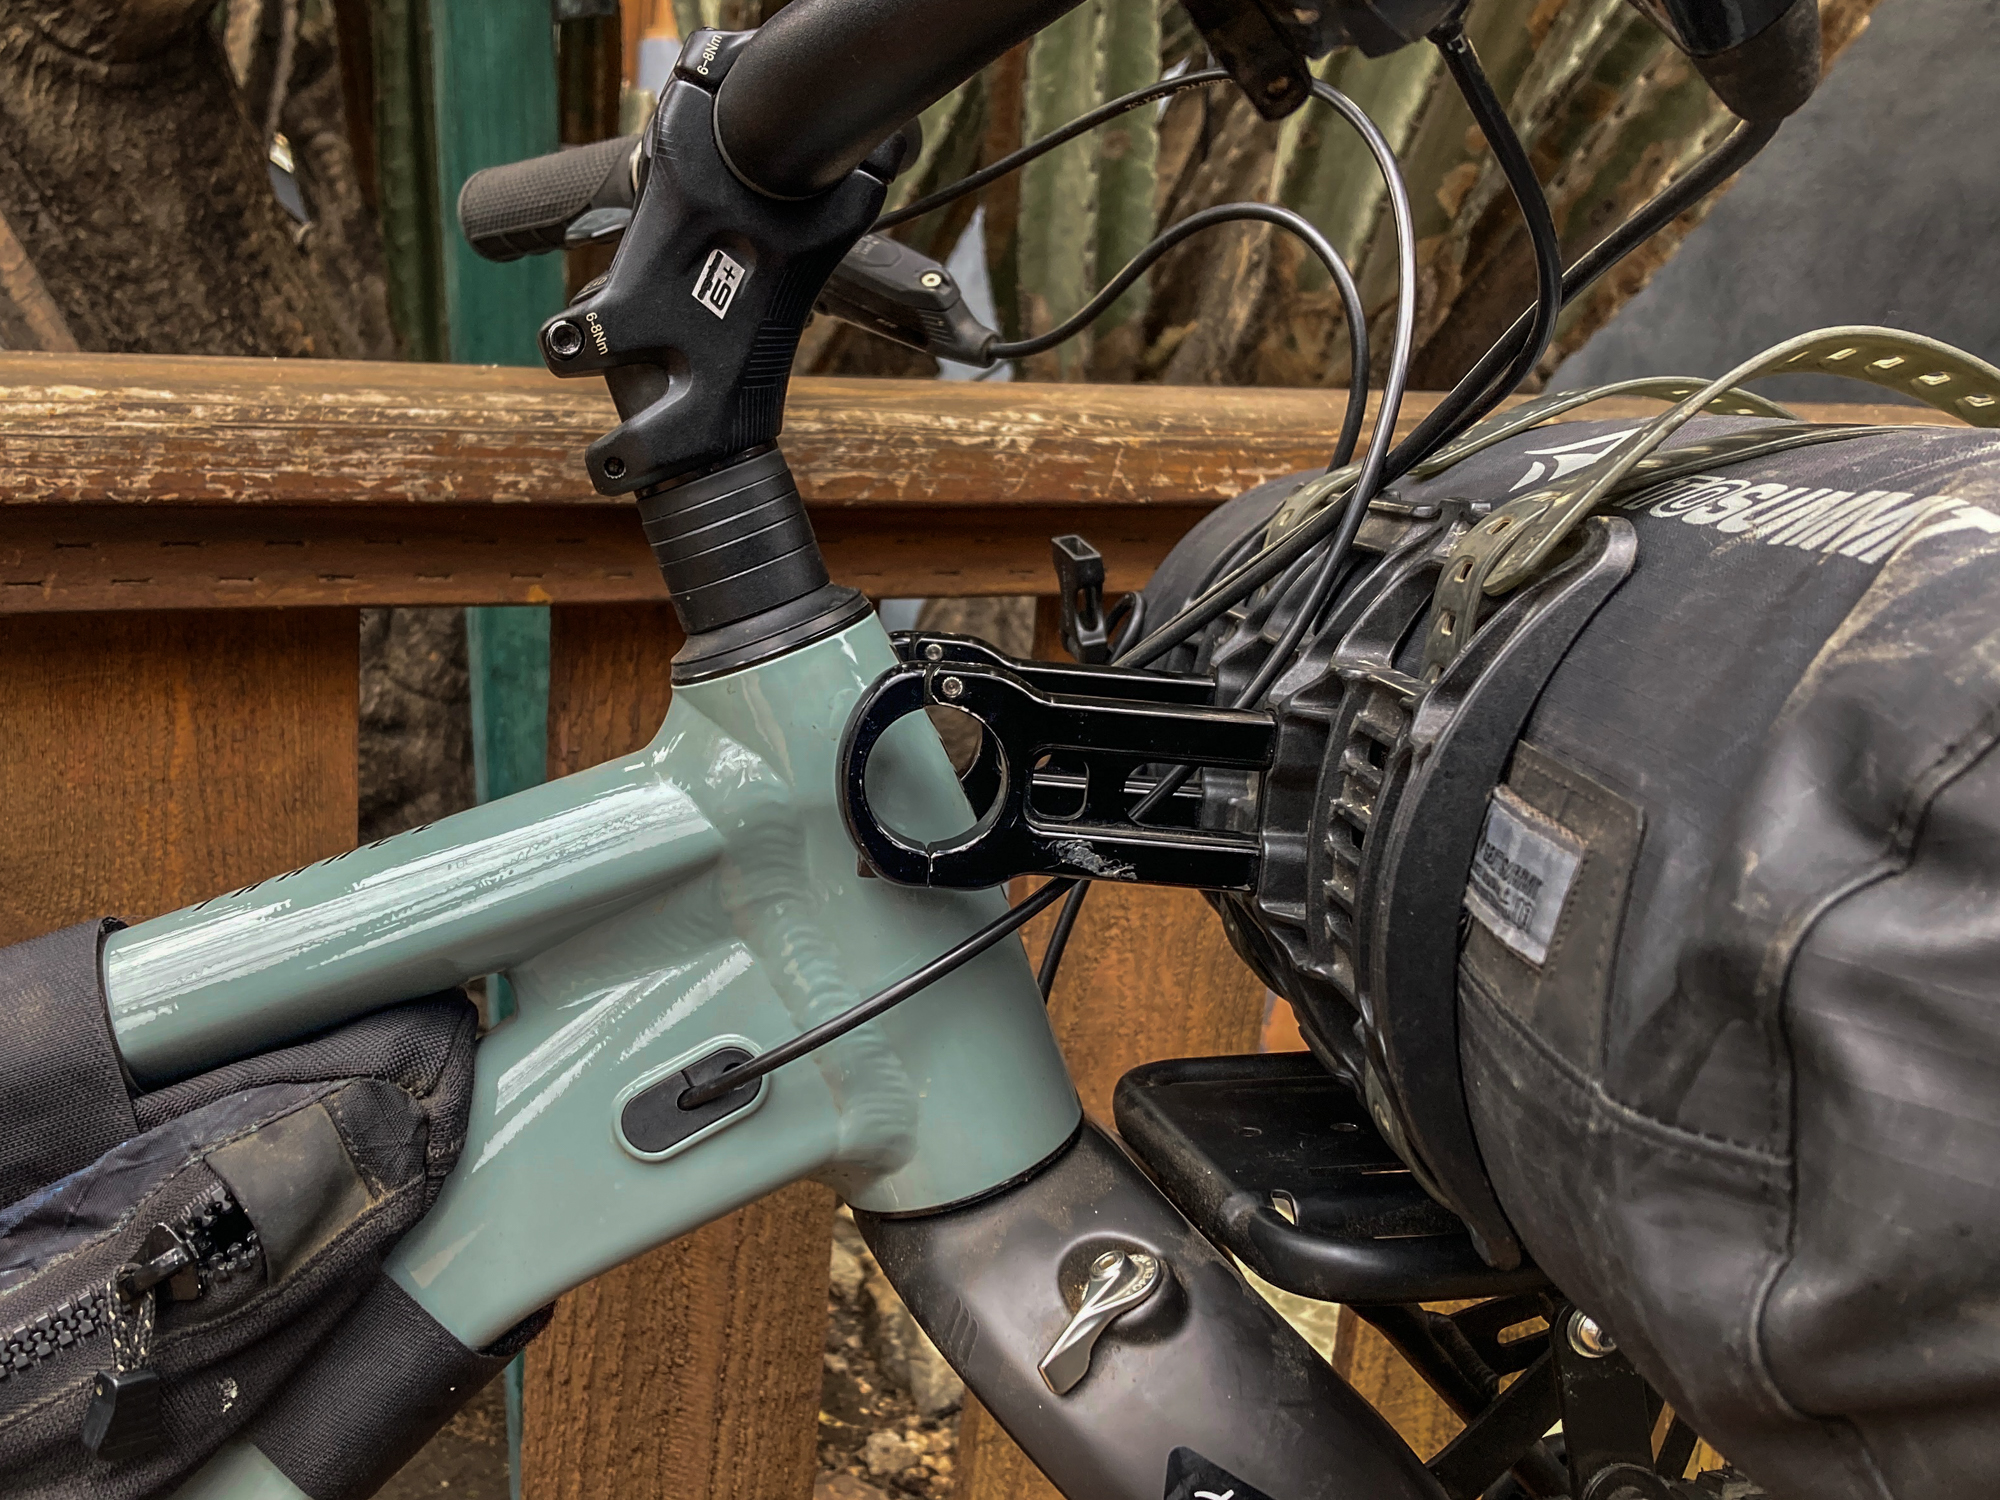
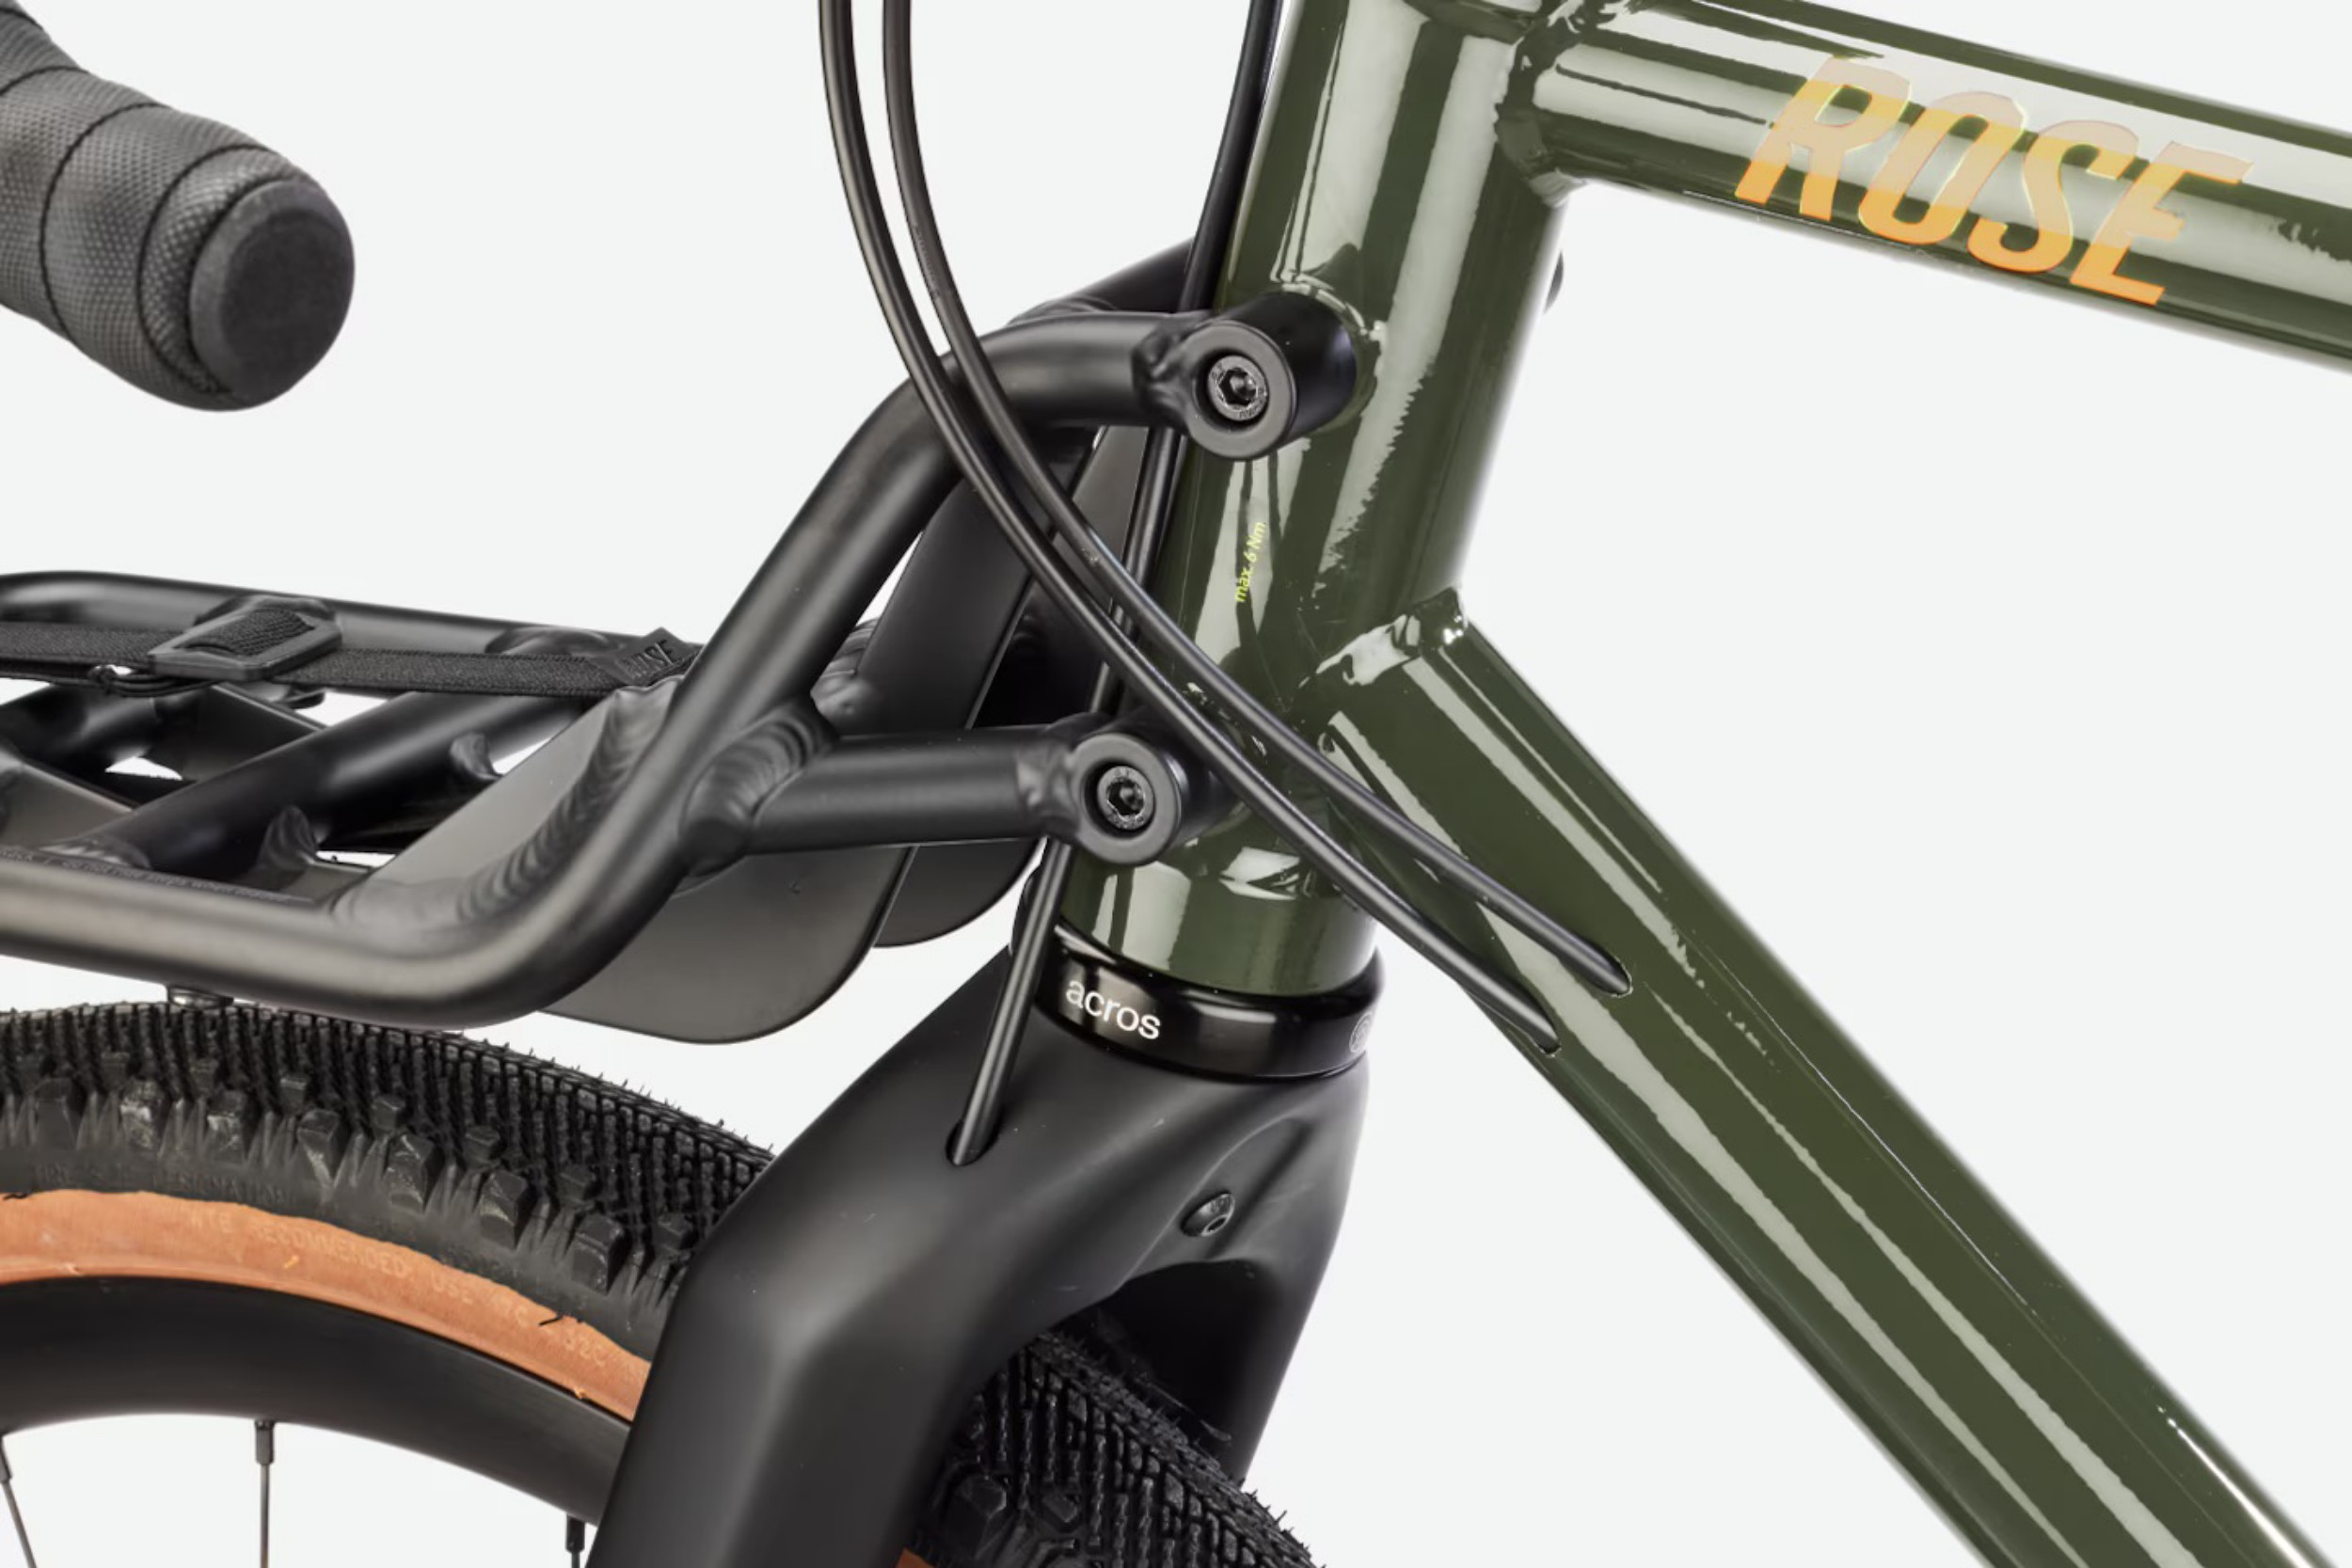
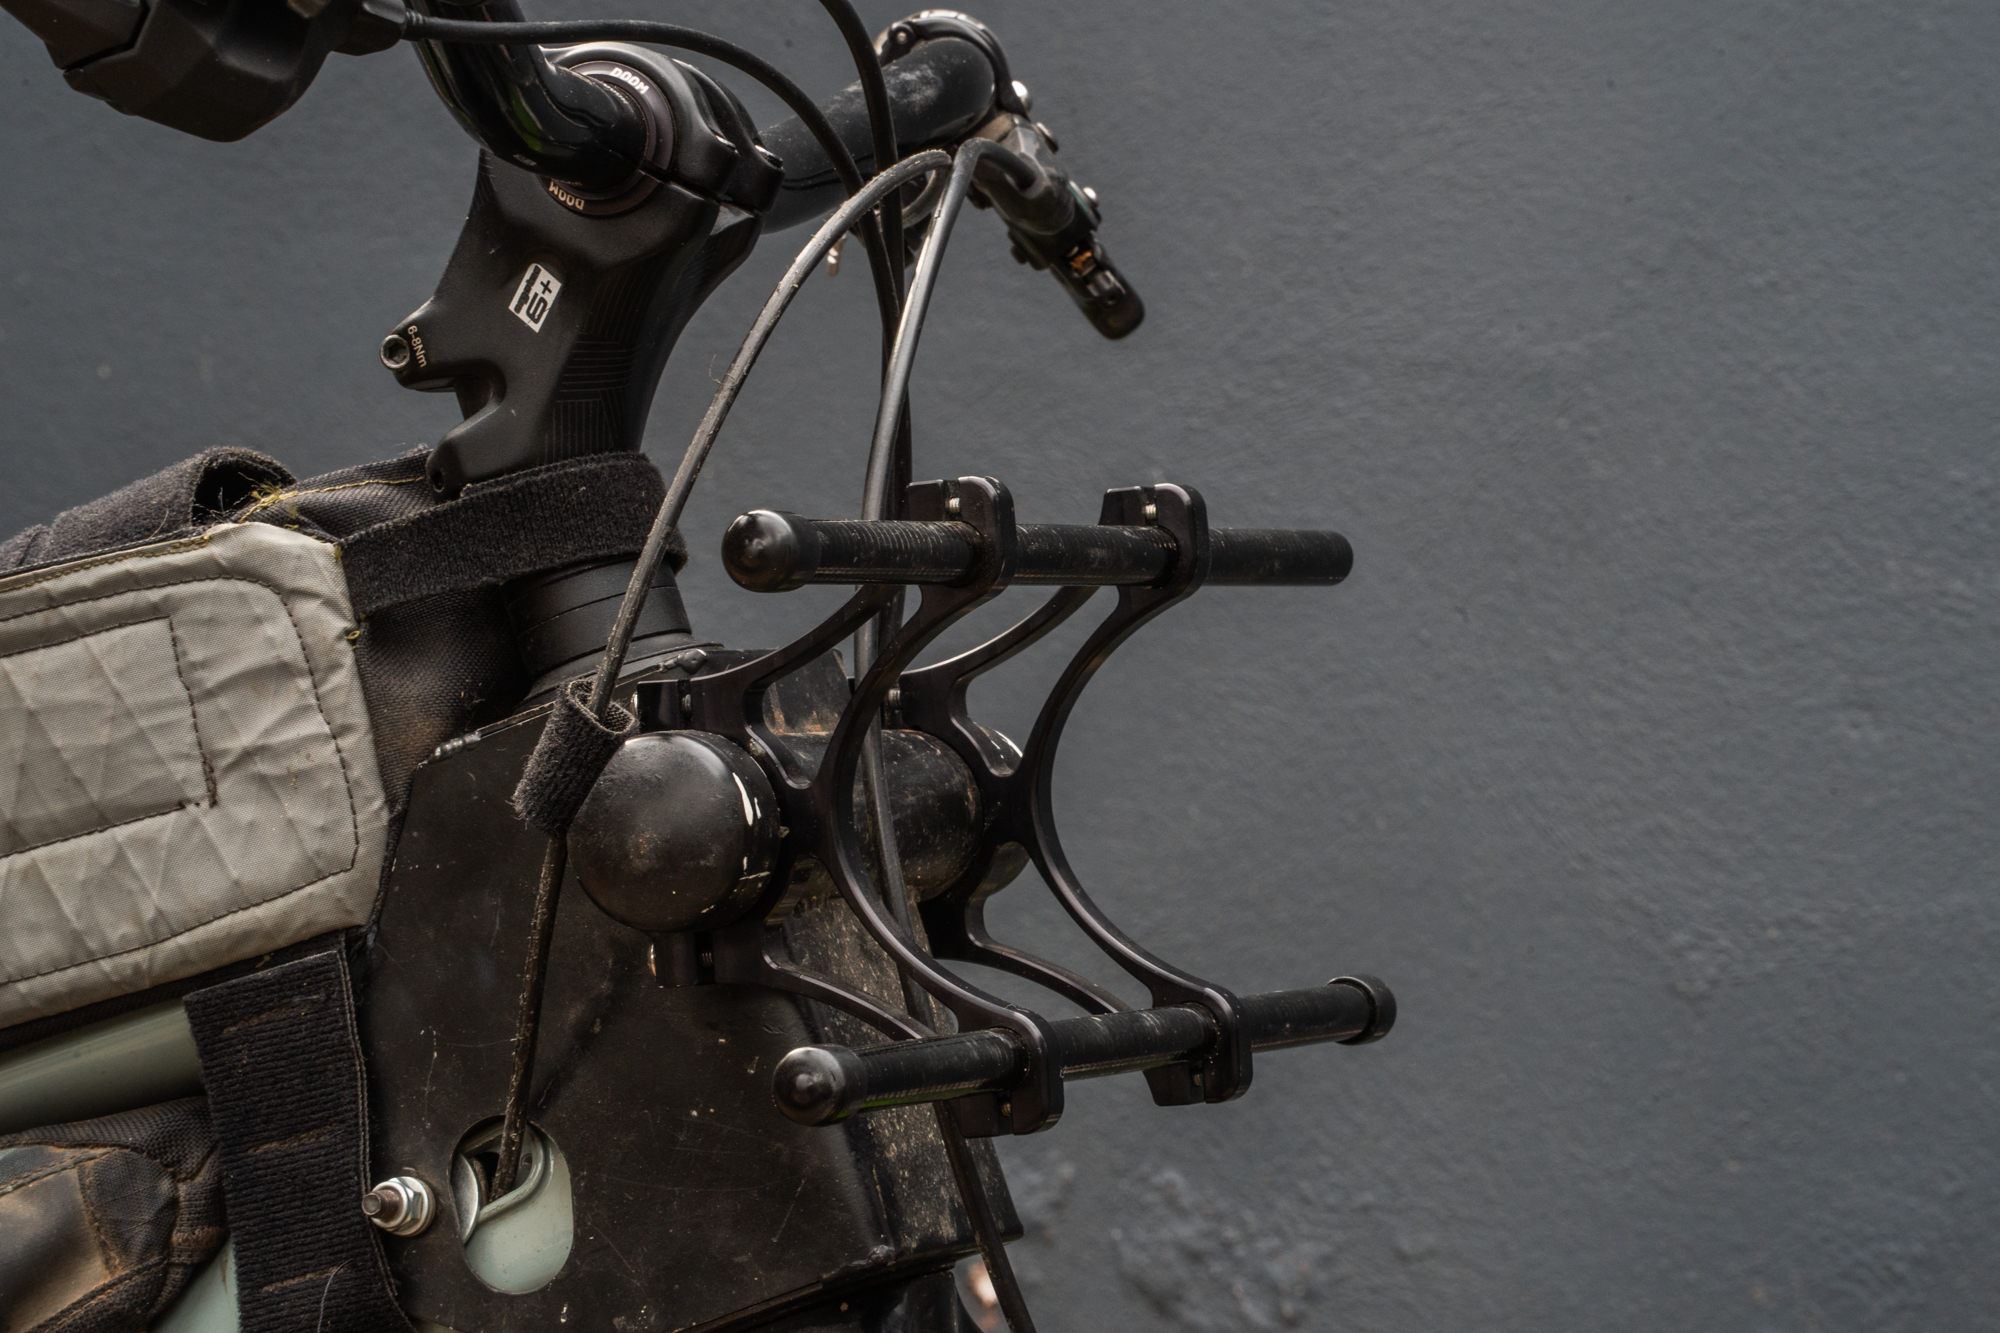
A couple 31.8mm-diameter “tabs” welded on either side of the head tube should be plenty strong to carry a few pounds of gear. And thanks to my preference for high stack heights, my bike should have adequate room below its handlebars without crowding the front wheel at bottom-out. Plus, this concept would allow me to adjust the load position because the handlebar cradle could tilt. Just like it would if it were up where the manufacturer intended.
The problem was, the Giant Trance I use for bikepacking is made of 6011 aluminum. I reached out to alloy guru, Frank the Welder, about adding tabs to my head tube, but he doesn’t have the kind of equipment that could weld and heat-treat that grade of metal. He reckoned neither would anyone else in the US. So, I started thinking of ways to attach an external structure to my head tube. The headset seemed like a logical mounting point. My Trance’s 44/56 press-in cups are held in by a lot of force spread across a lot of surface area. I just needed something thin but strong. Like sheet metal.
The Application
Send Cut Send is an online service that will cut and bend sheet metal (or plastic or carbon) to your exact specifications. Their prices scale down as order volume goes up, but it’s still pretty cheap to commission one single item. I just had to work out some geometry for where the holes and bends would go. This required a bit of research on what happens to various types of sheet metal when you bend it, and what accommodations have to be made so everything still lines up. Send Cut Send has some easy-to-follow instructions. In fact, that part was kinda fun. It combined the satisfaction of solving an algebra equation, with the pride of knowing it’ll actually become a tangible, functional object.
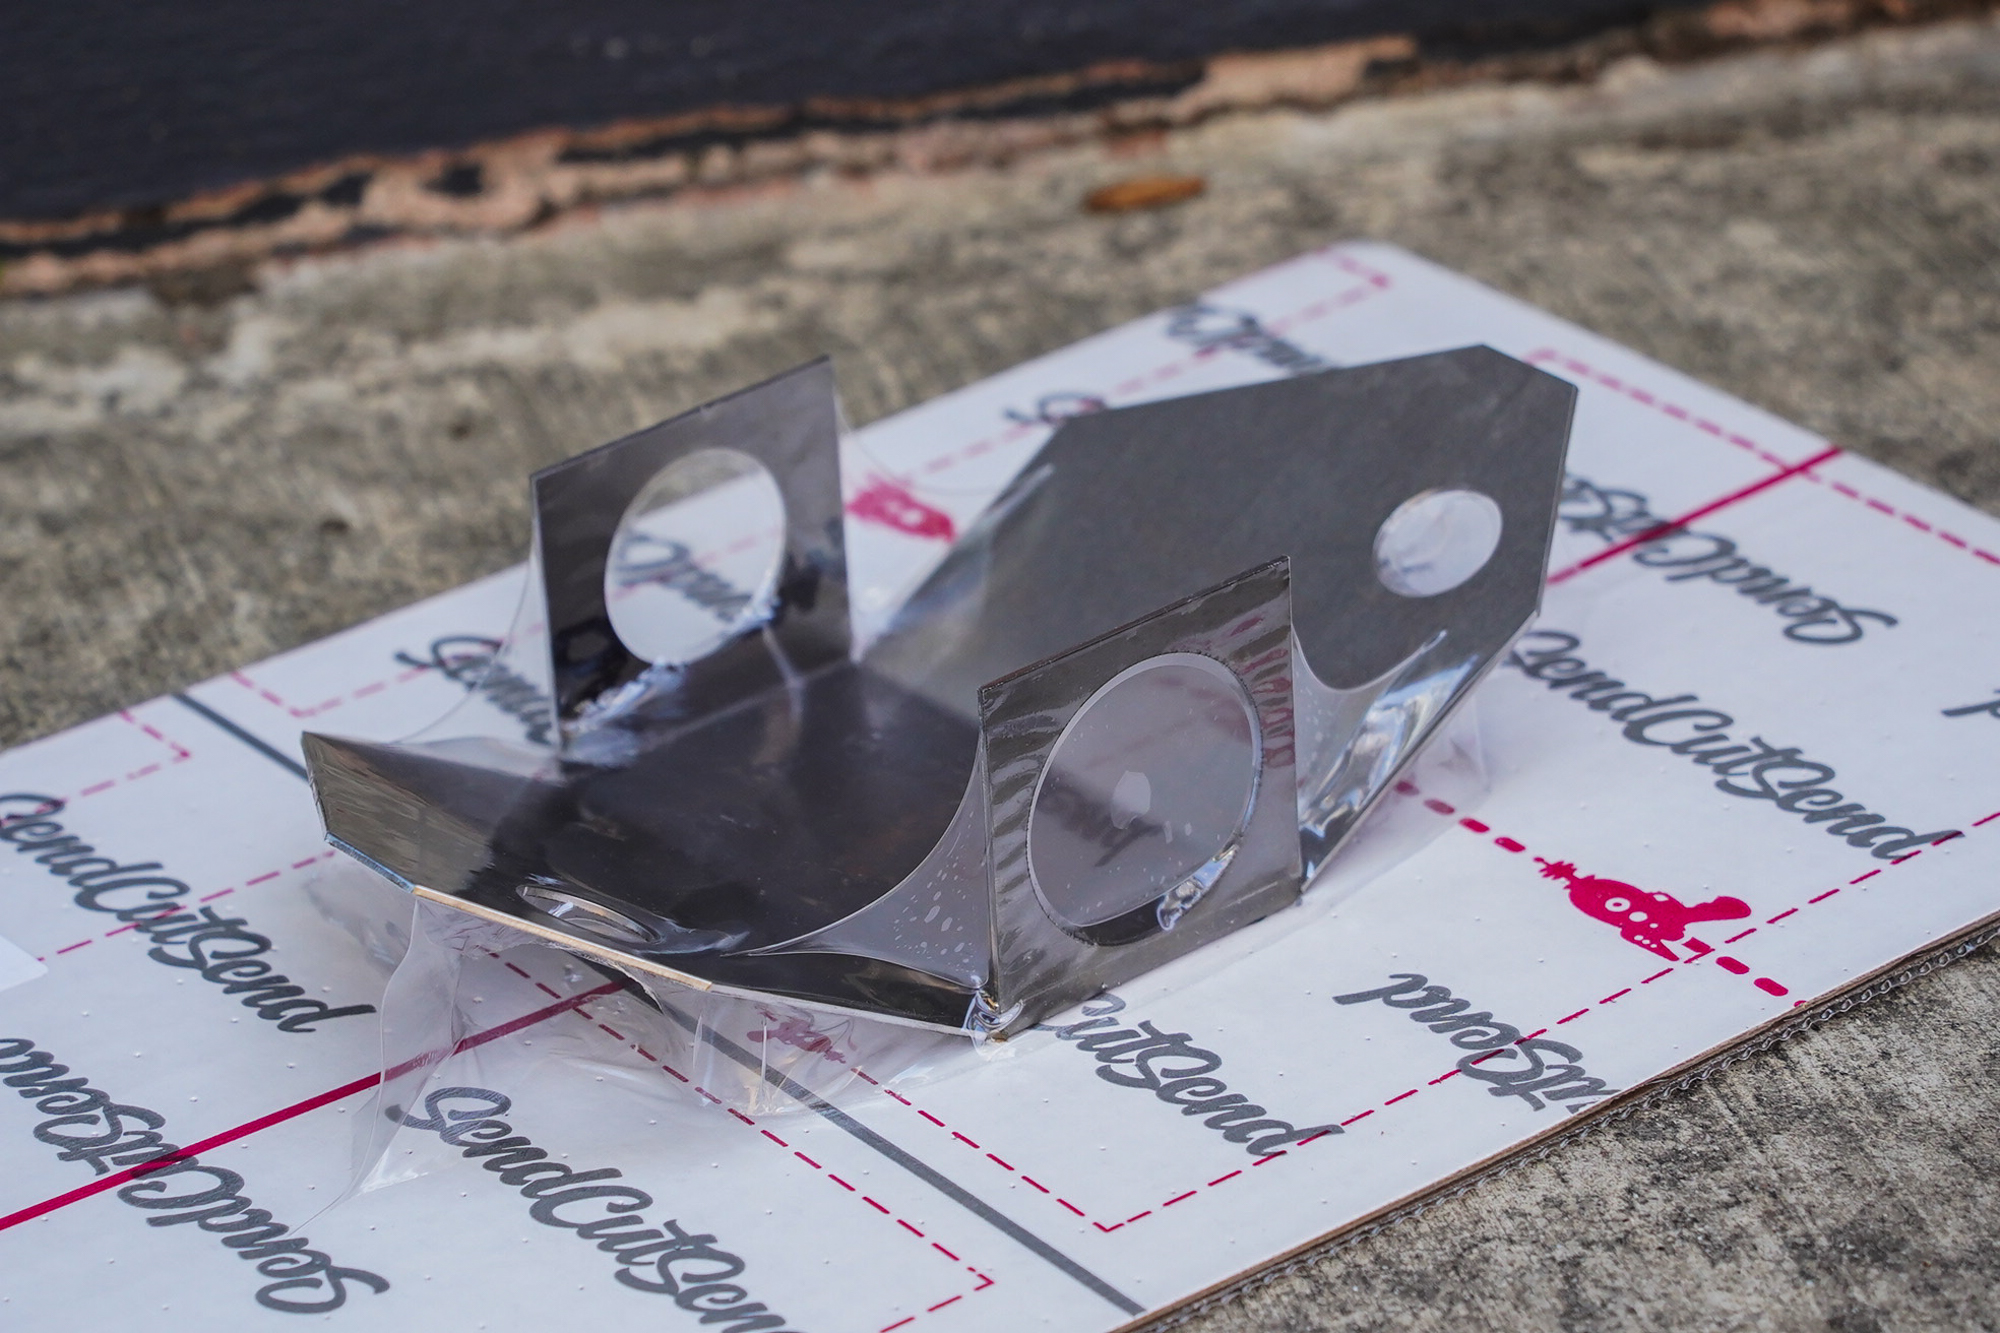
The design I came up with was a sort of “box” that would go around the head tube. It would be held in by the headset cups and stabilized by bolts fed through the cable-routing ports. I opted for .065” chromoly because I didn’t want to sacrifice too much cup-insertion depth. I couldn’t find any deep-cup internal headsets, though I did swap out my upper aluminum cup for a steel one.
For the “tabs” that would mount the cradle, I picked up some chromoly tubing. Instead of cutting off two pieces, I mitered it so it would slot over the front of the box in one piece. I figured that’d make it easier to keep each end aligned, and would add some strength. The sheet-metal part cost about $90 from Send Cut Send, and the chromoly tube cost $20 from McMaster-Carr. Riley Ogden, who made my rear rack, agreed to weld my creation together. He wouldn’t accept payment, but I gave him a six-pack of Sierra Nevada that cost $10.99 from Trader Joe’s.
The Assembly
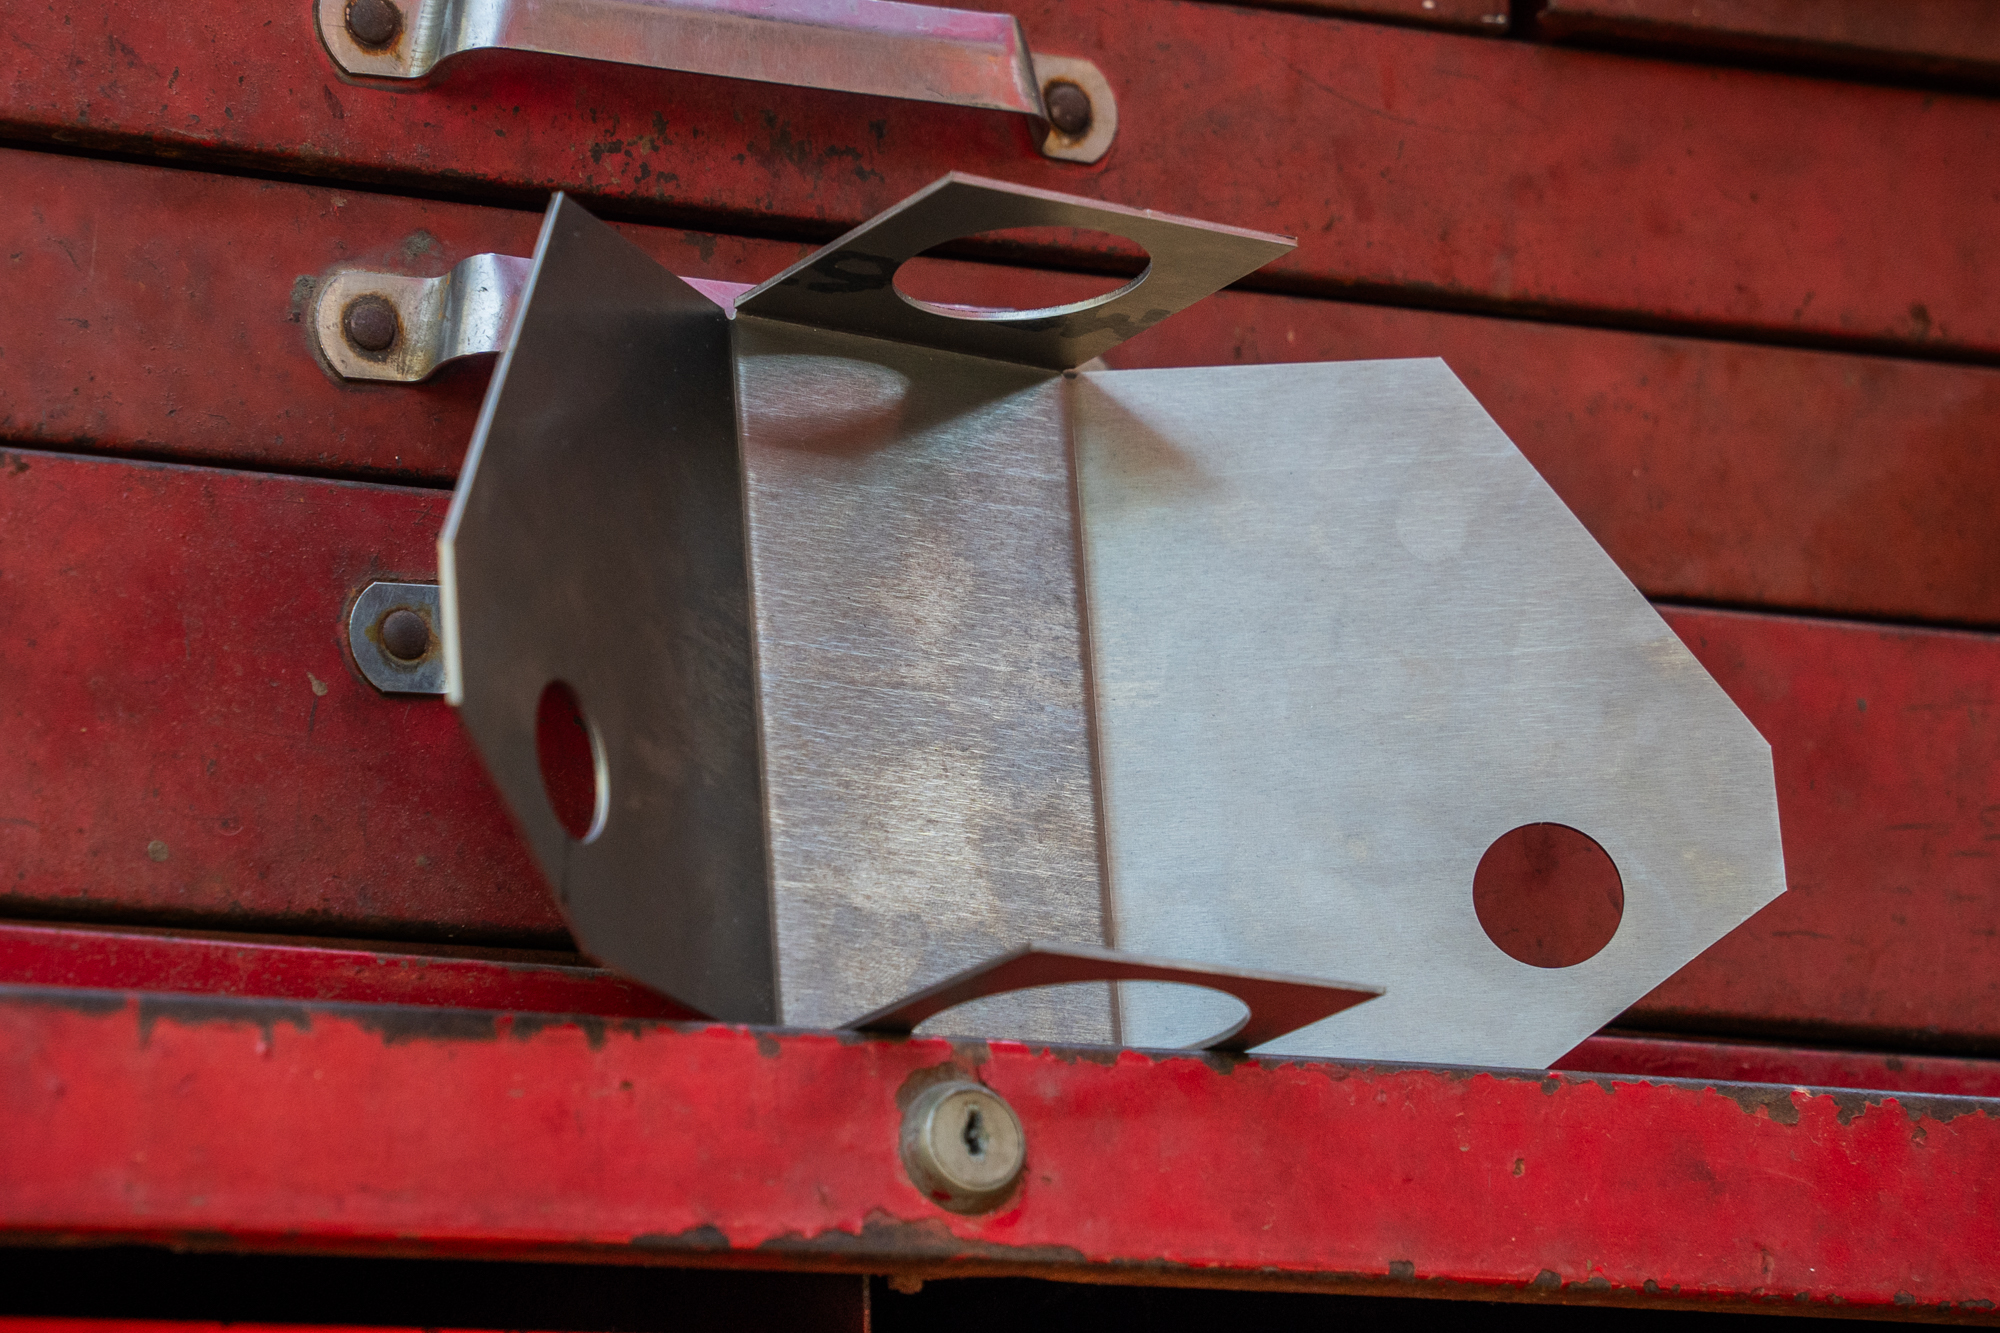
You’ll notice the part I got from Send Cut Send was not a “box,” at first. Depending on the dimensions of what you’re bending, there can be collision issues with standard linear presses. Too sharp a bend with too tall a flap, and the part won’t clear the tooling. So, I specified partial bends on the side flaps, planning to finish the job myself when it arrived. That part turned out to be much more difficult than I expected. Steel is real, after all. At least that eliminated any doubts that .065″ chromoly would be strong enough for my application.
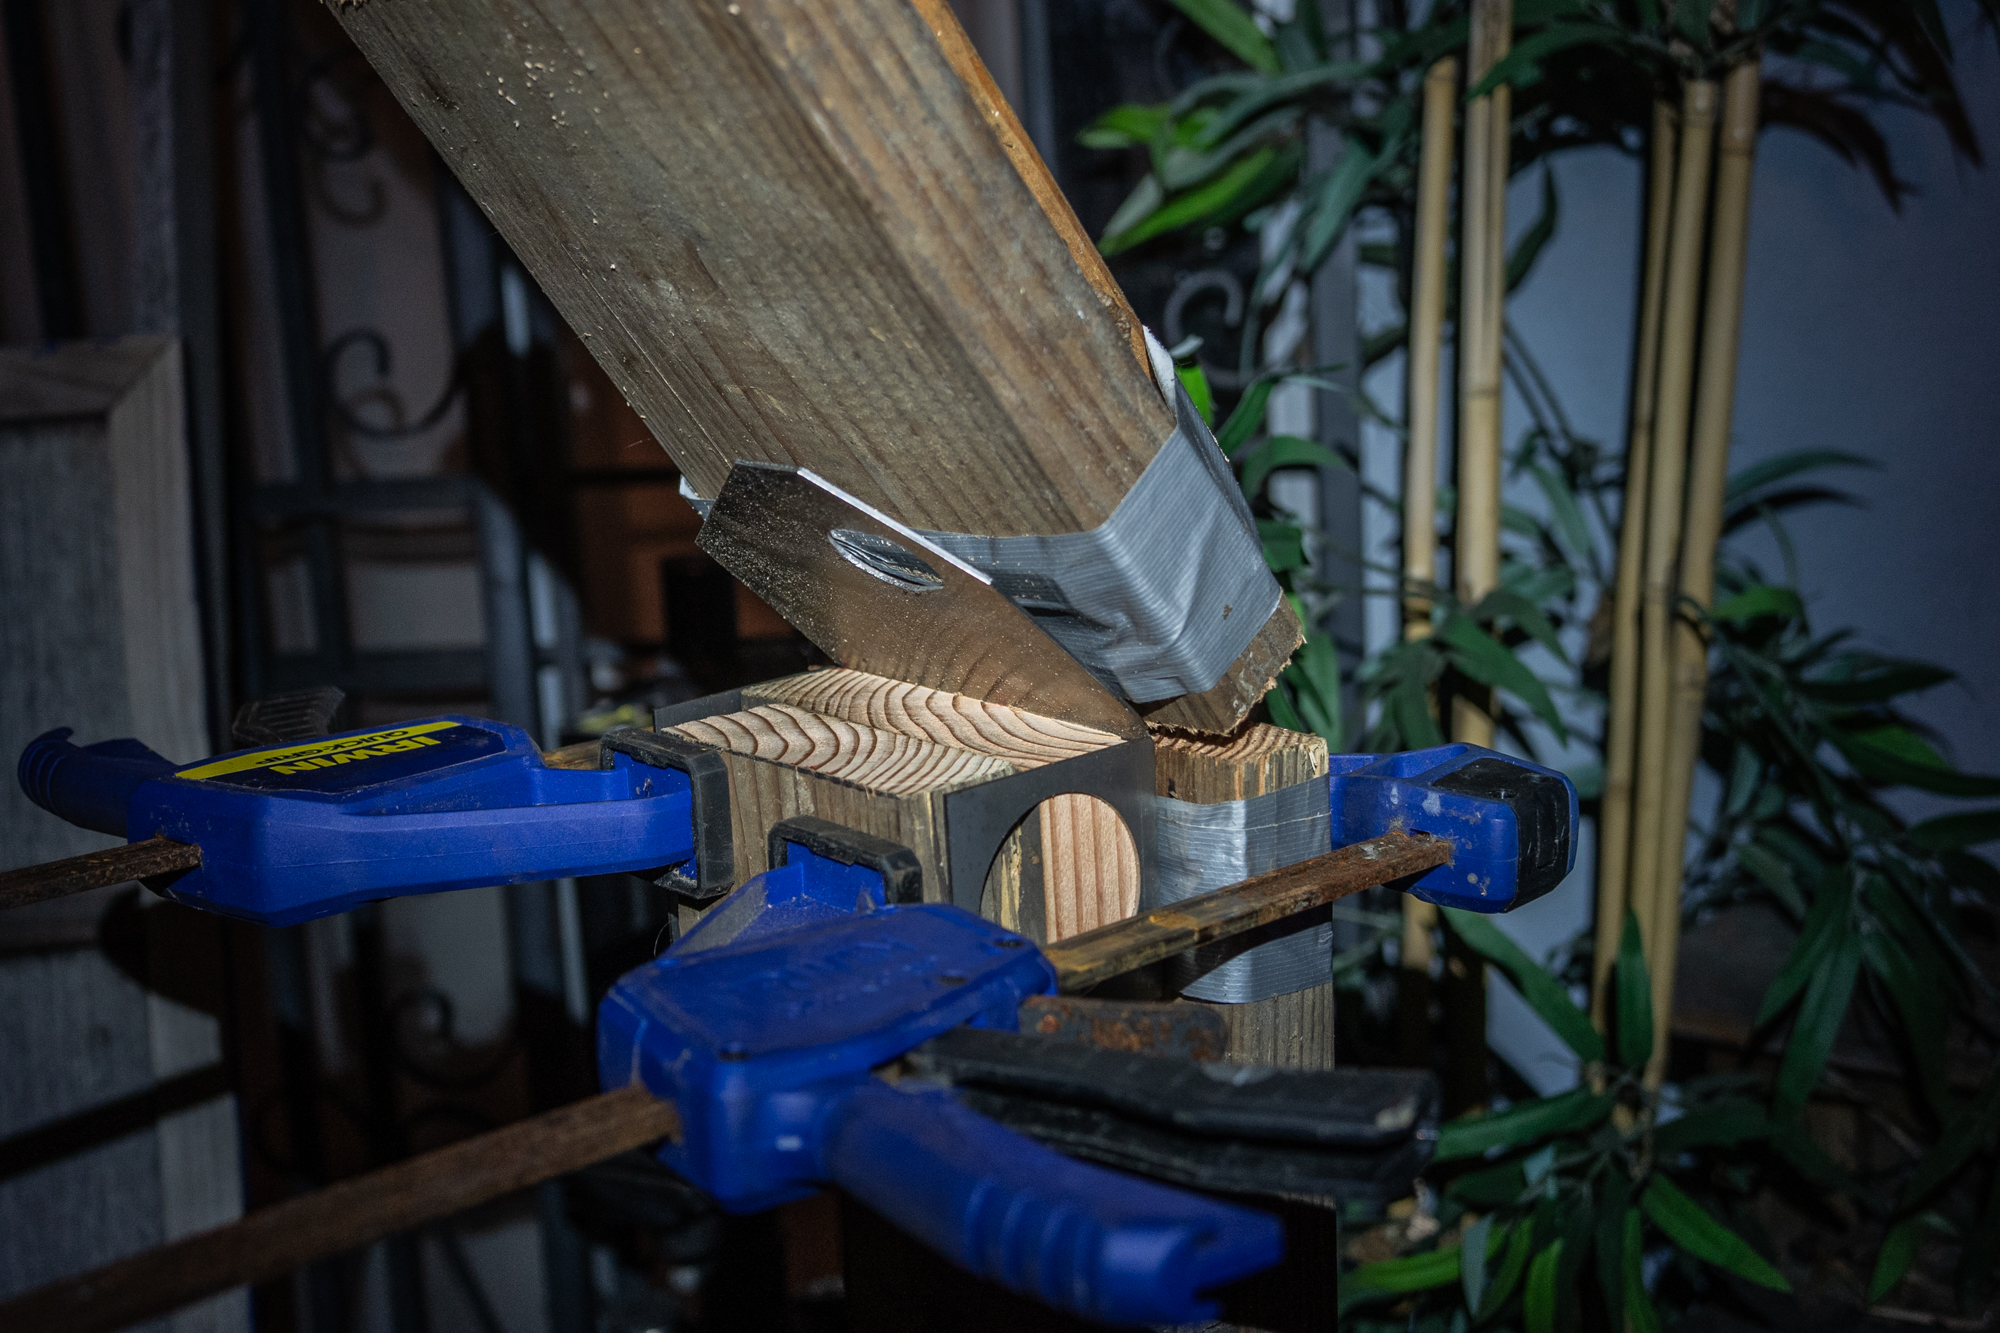
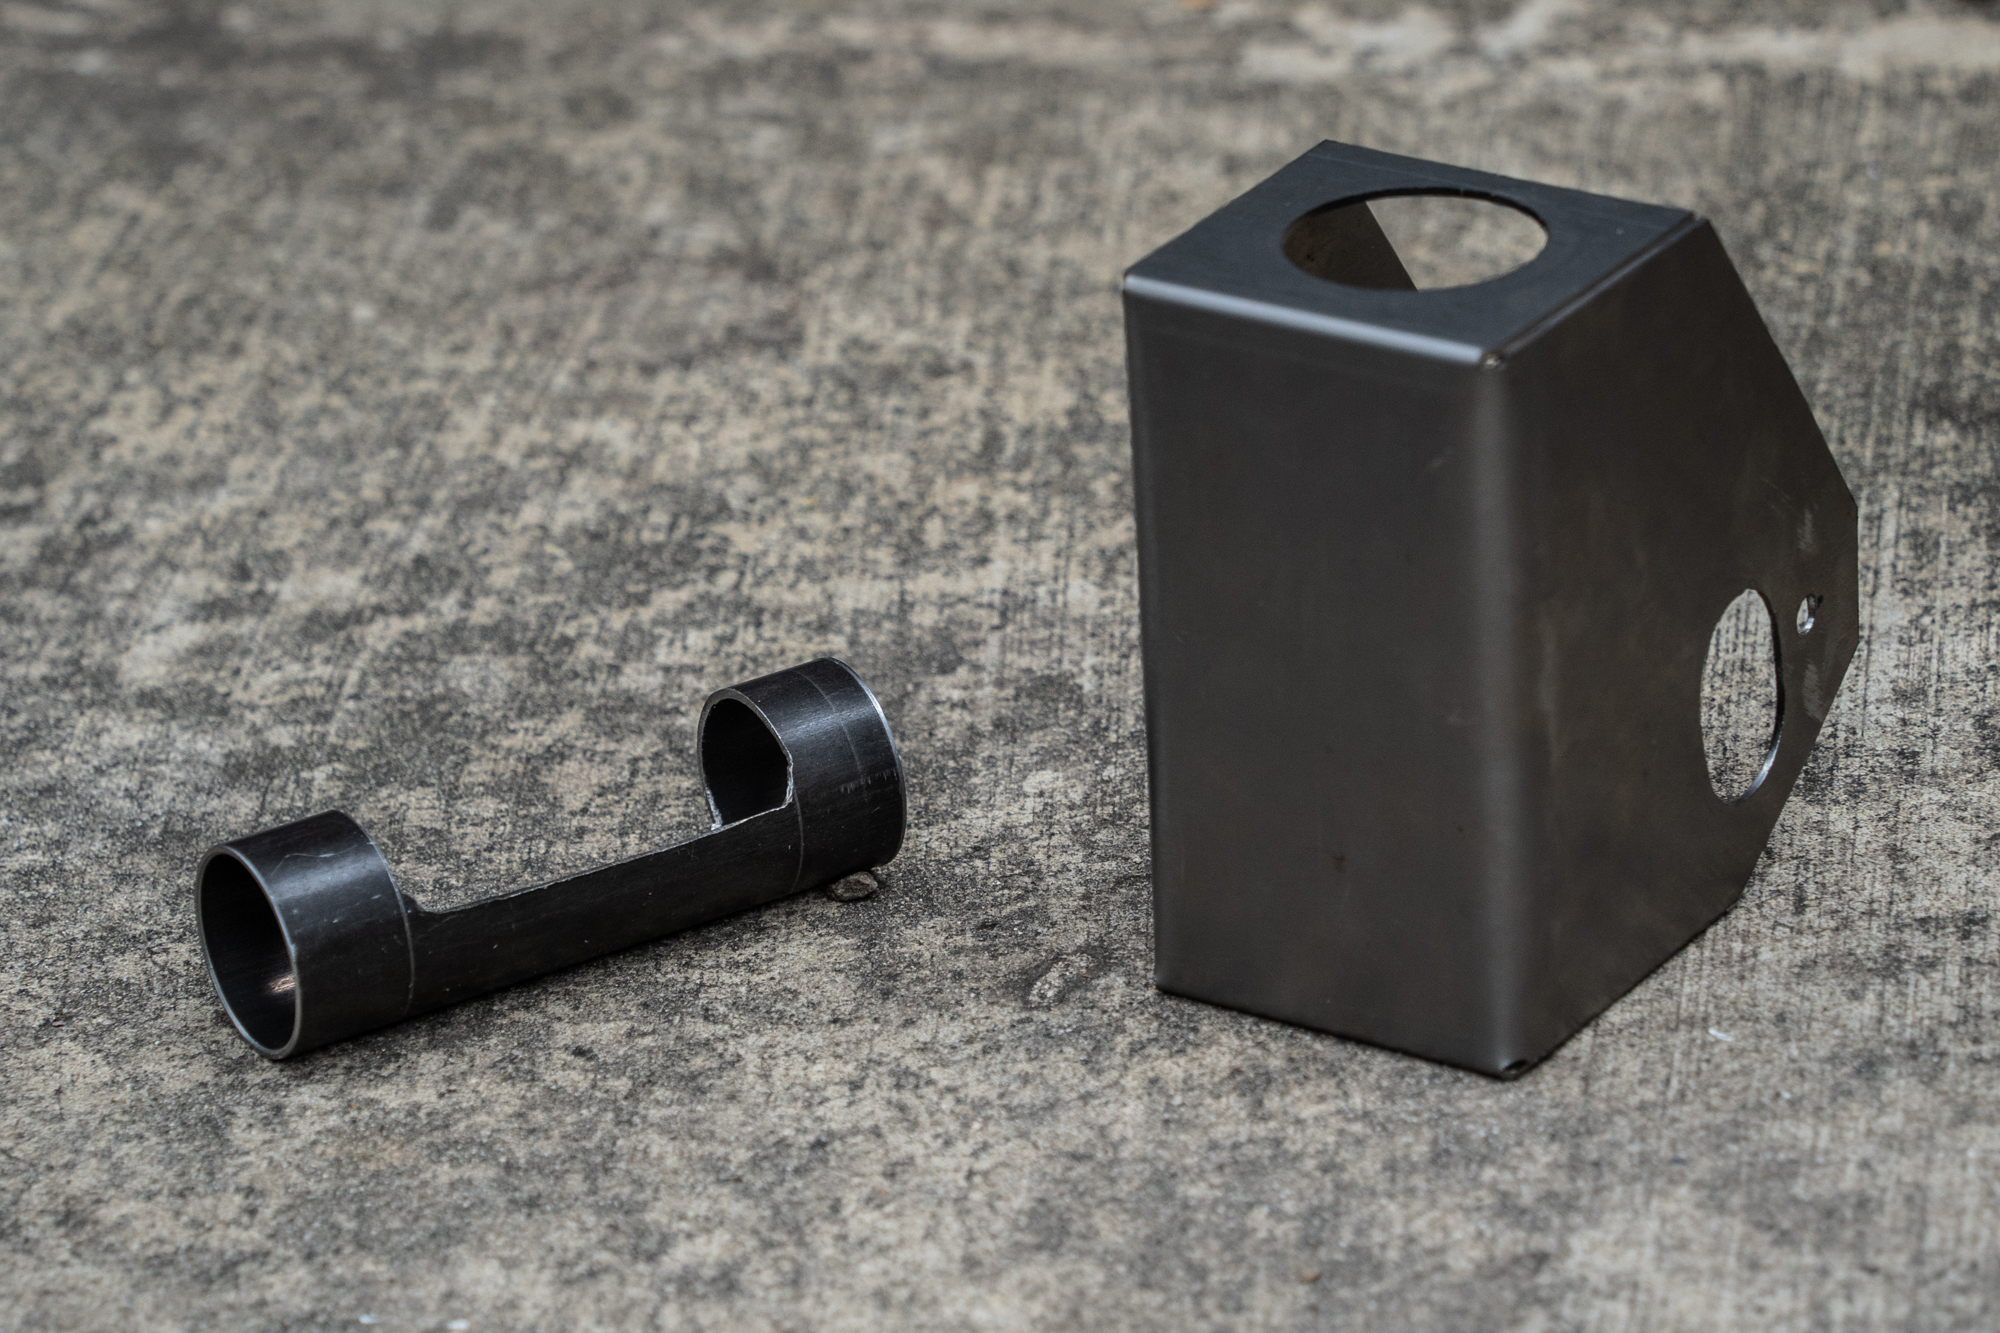
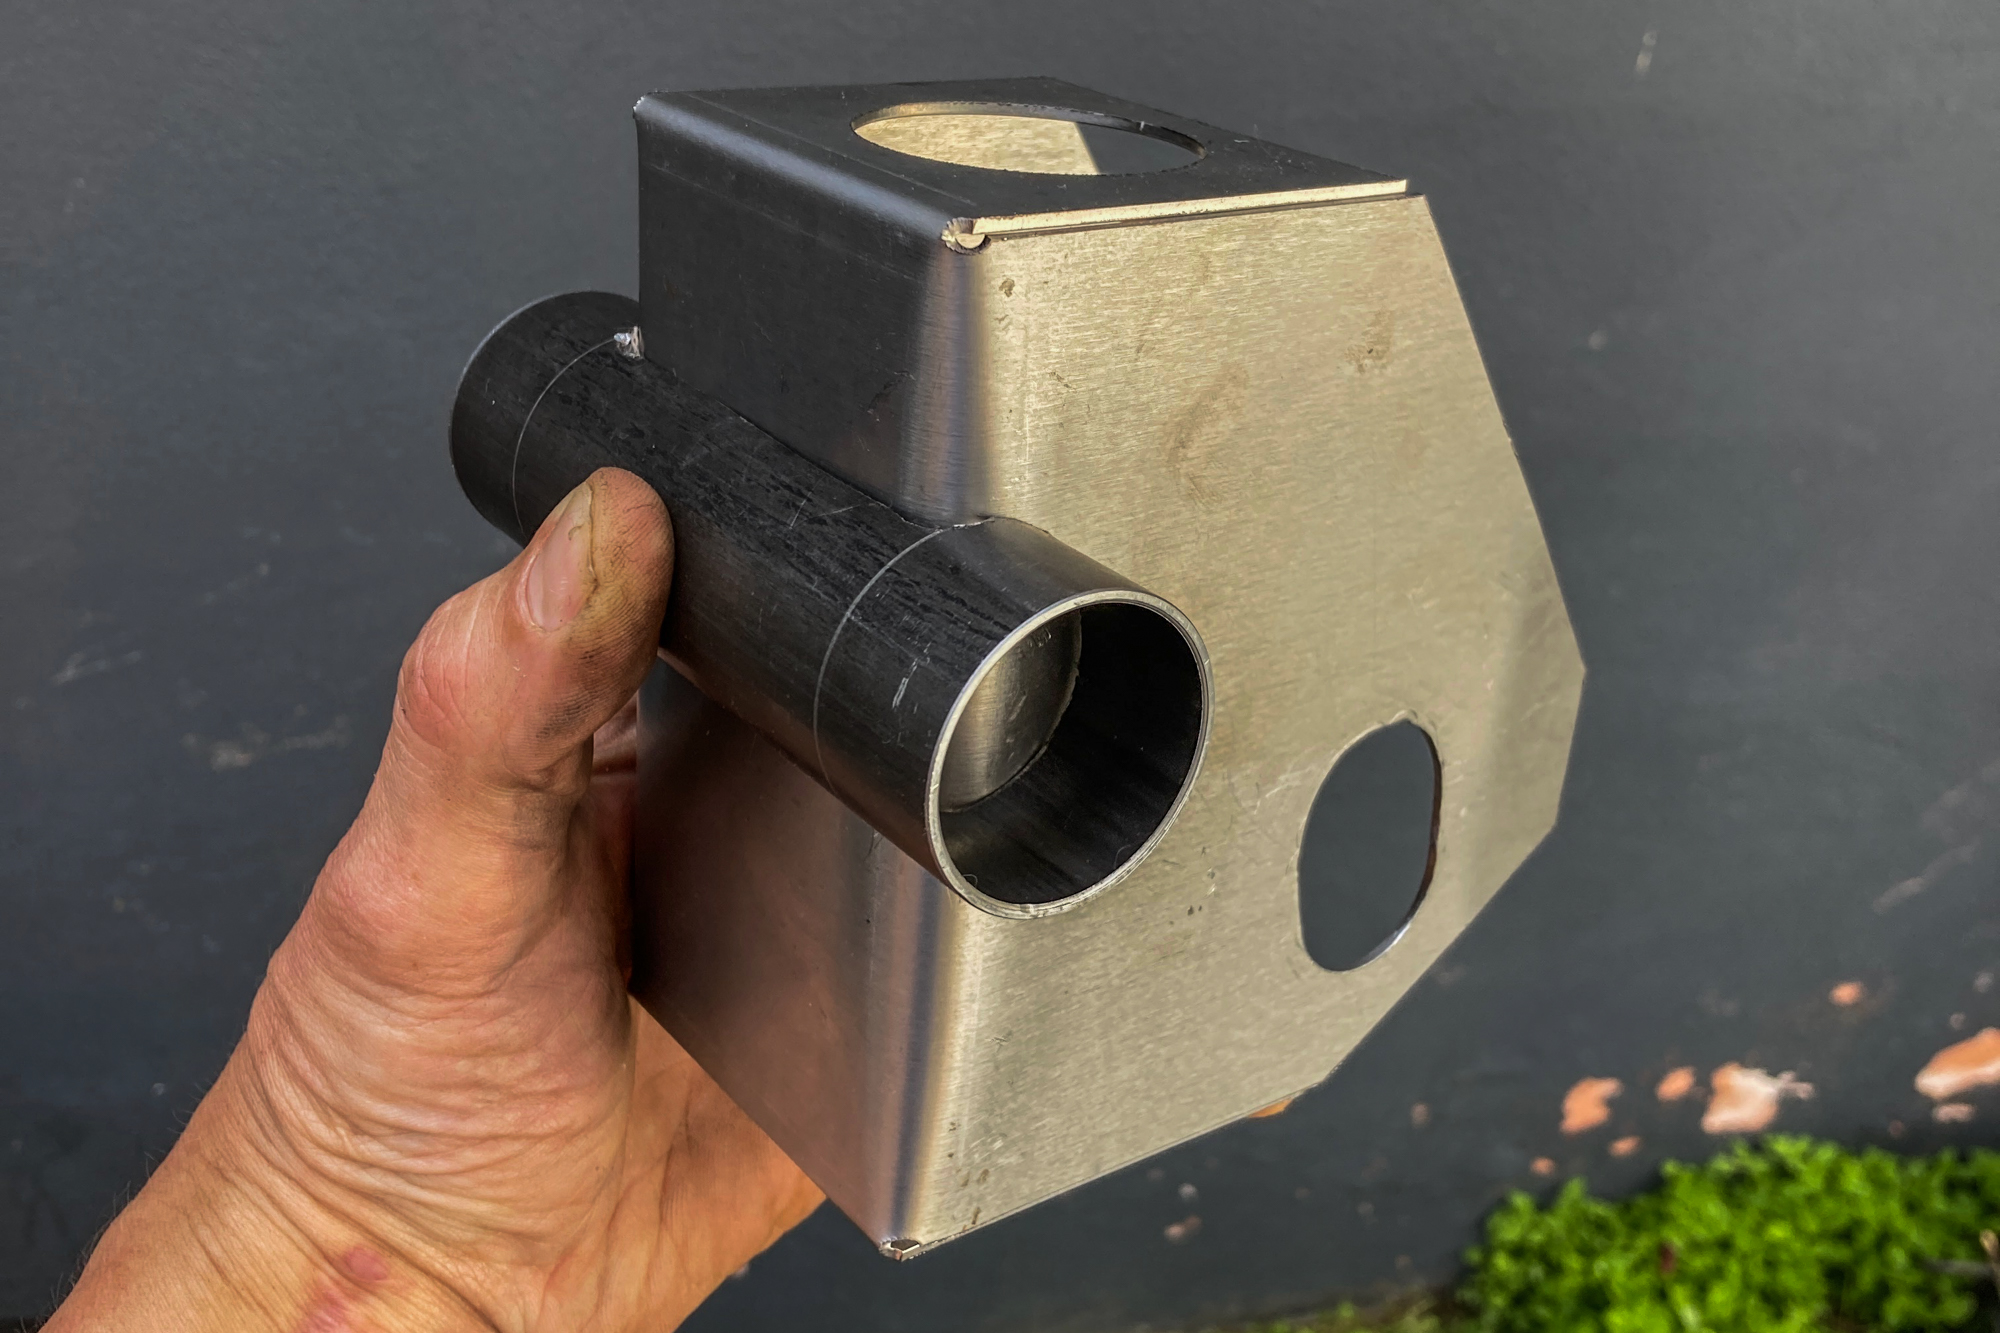
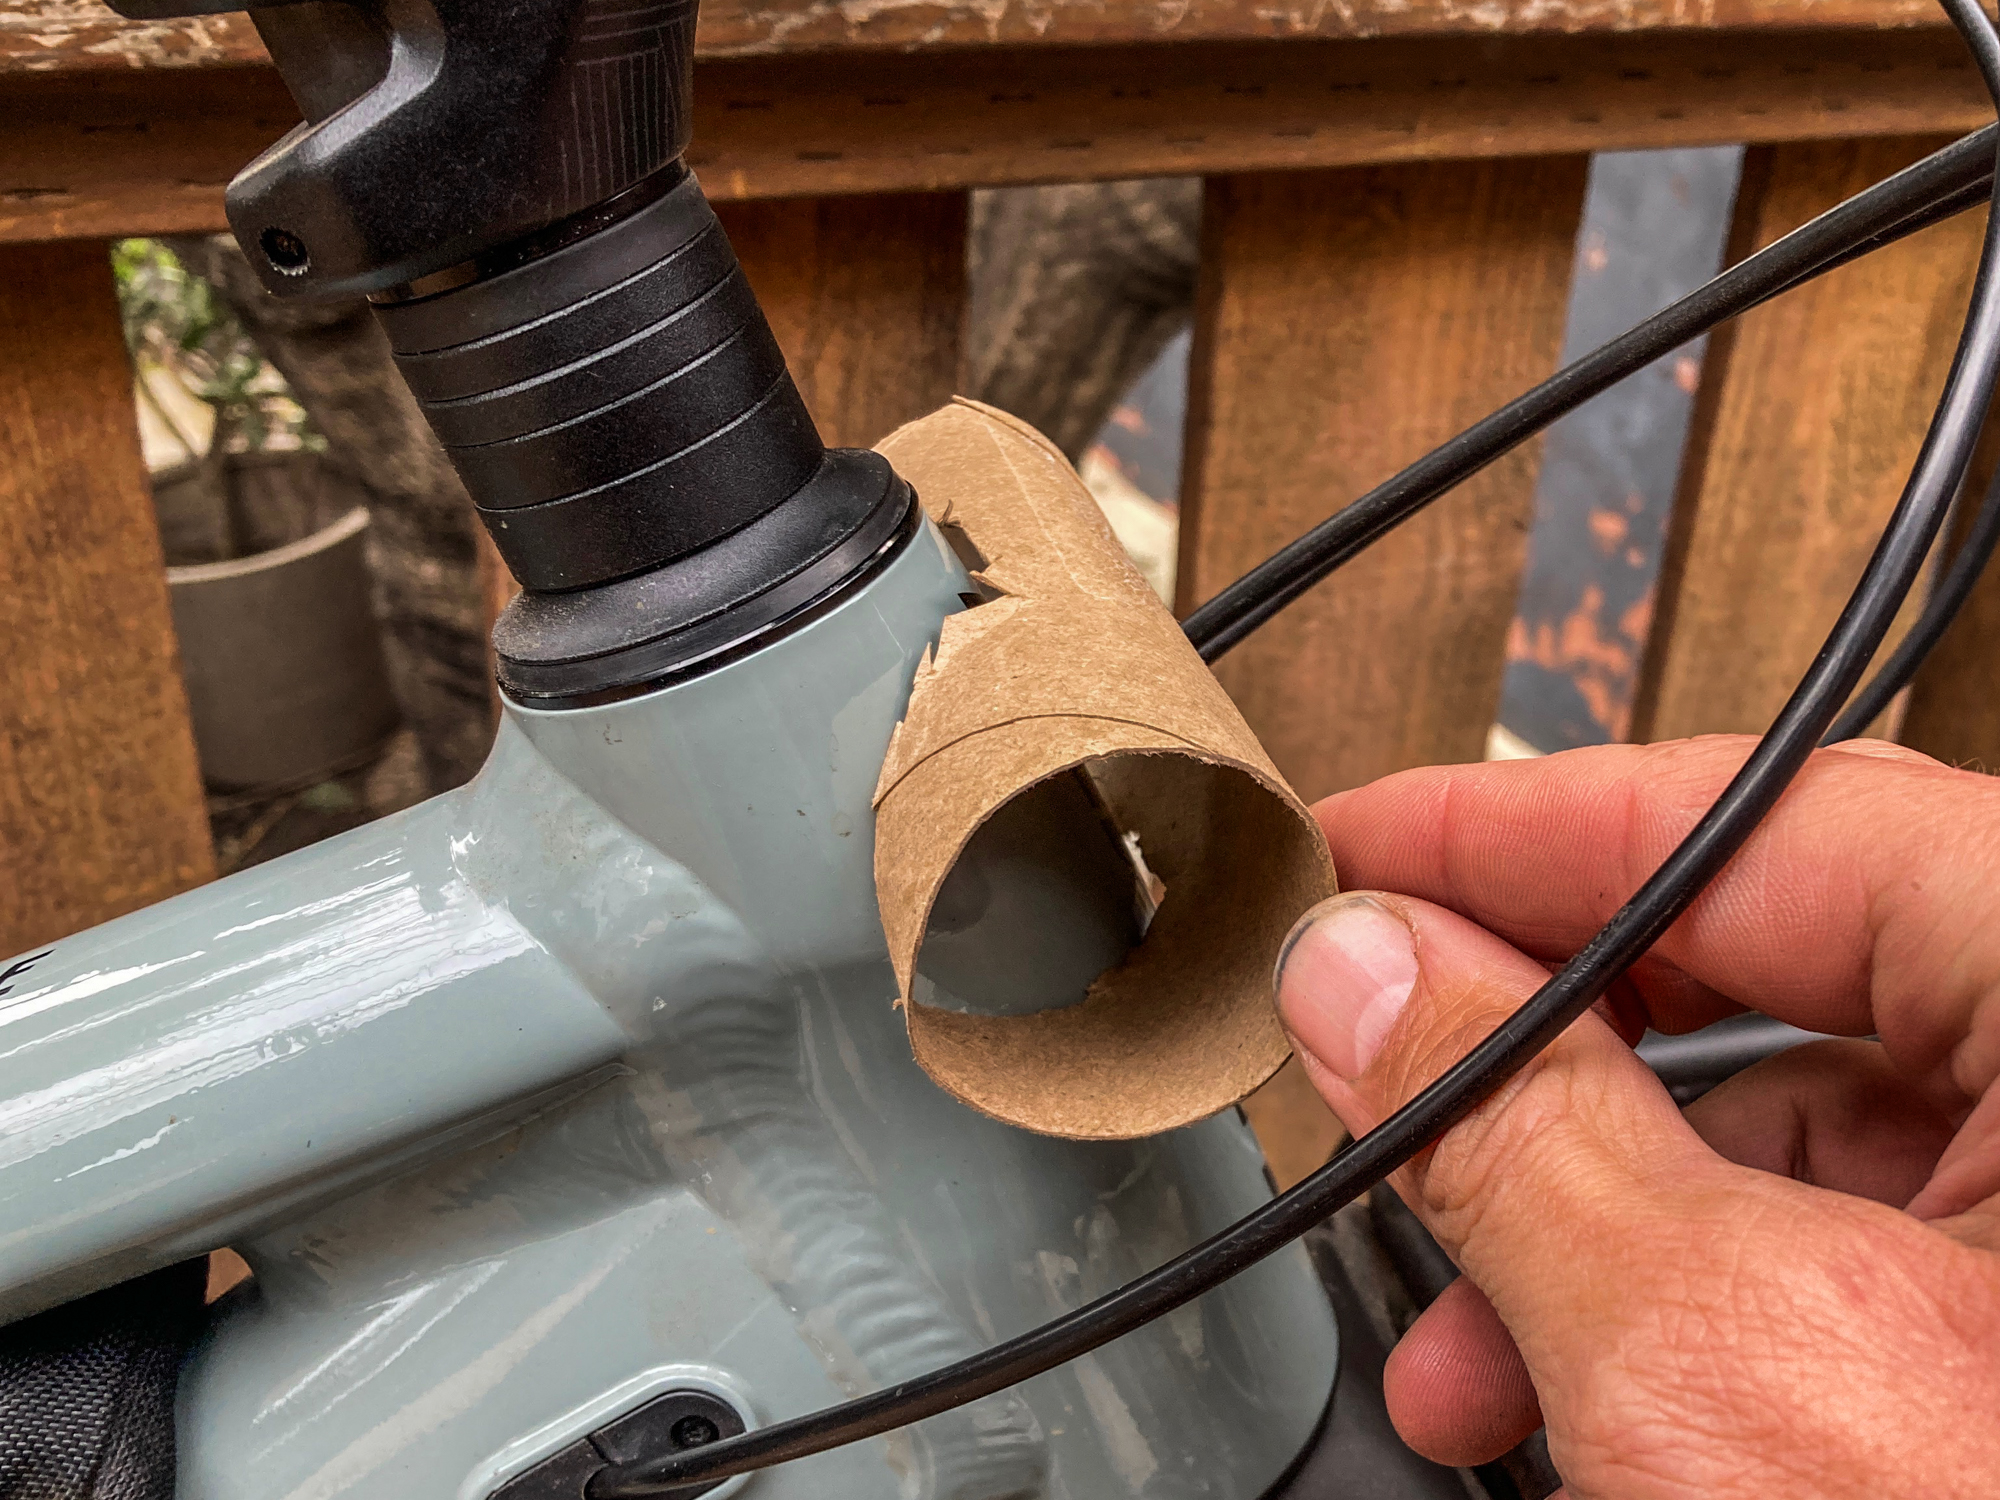
I fabricated something out of door hinges and 2x4s that helped me get the sides flat. But the force required almost tore my contraption apart. Then, once the sides were parallel, it still took a fair bit of hammering to get the creases lined up with the tube I’d mitered. Finally, once the edges were welded together, this thing felt pretty burly. I didn’t weigh it, but I didn’t care. It’s sprung mass.
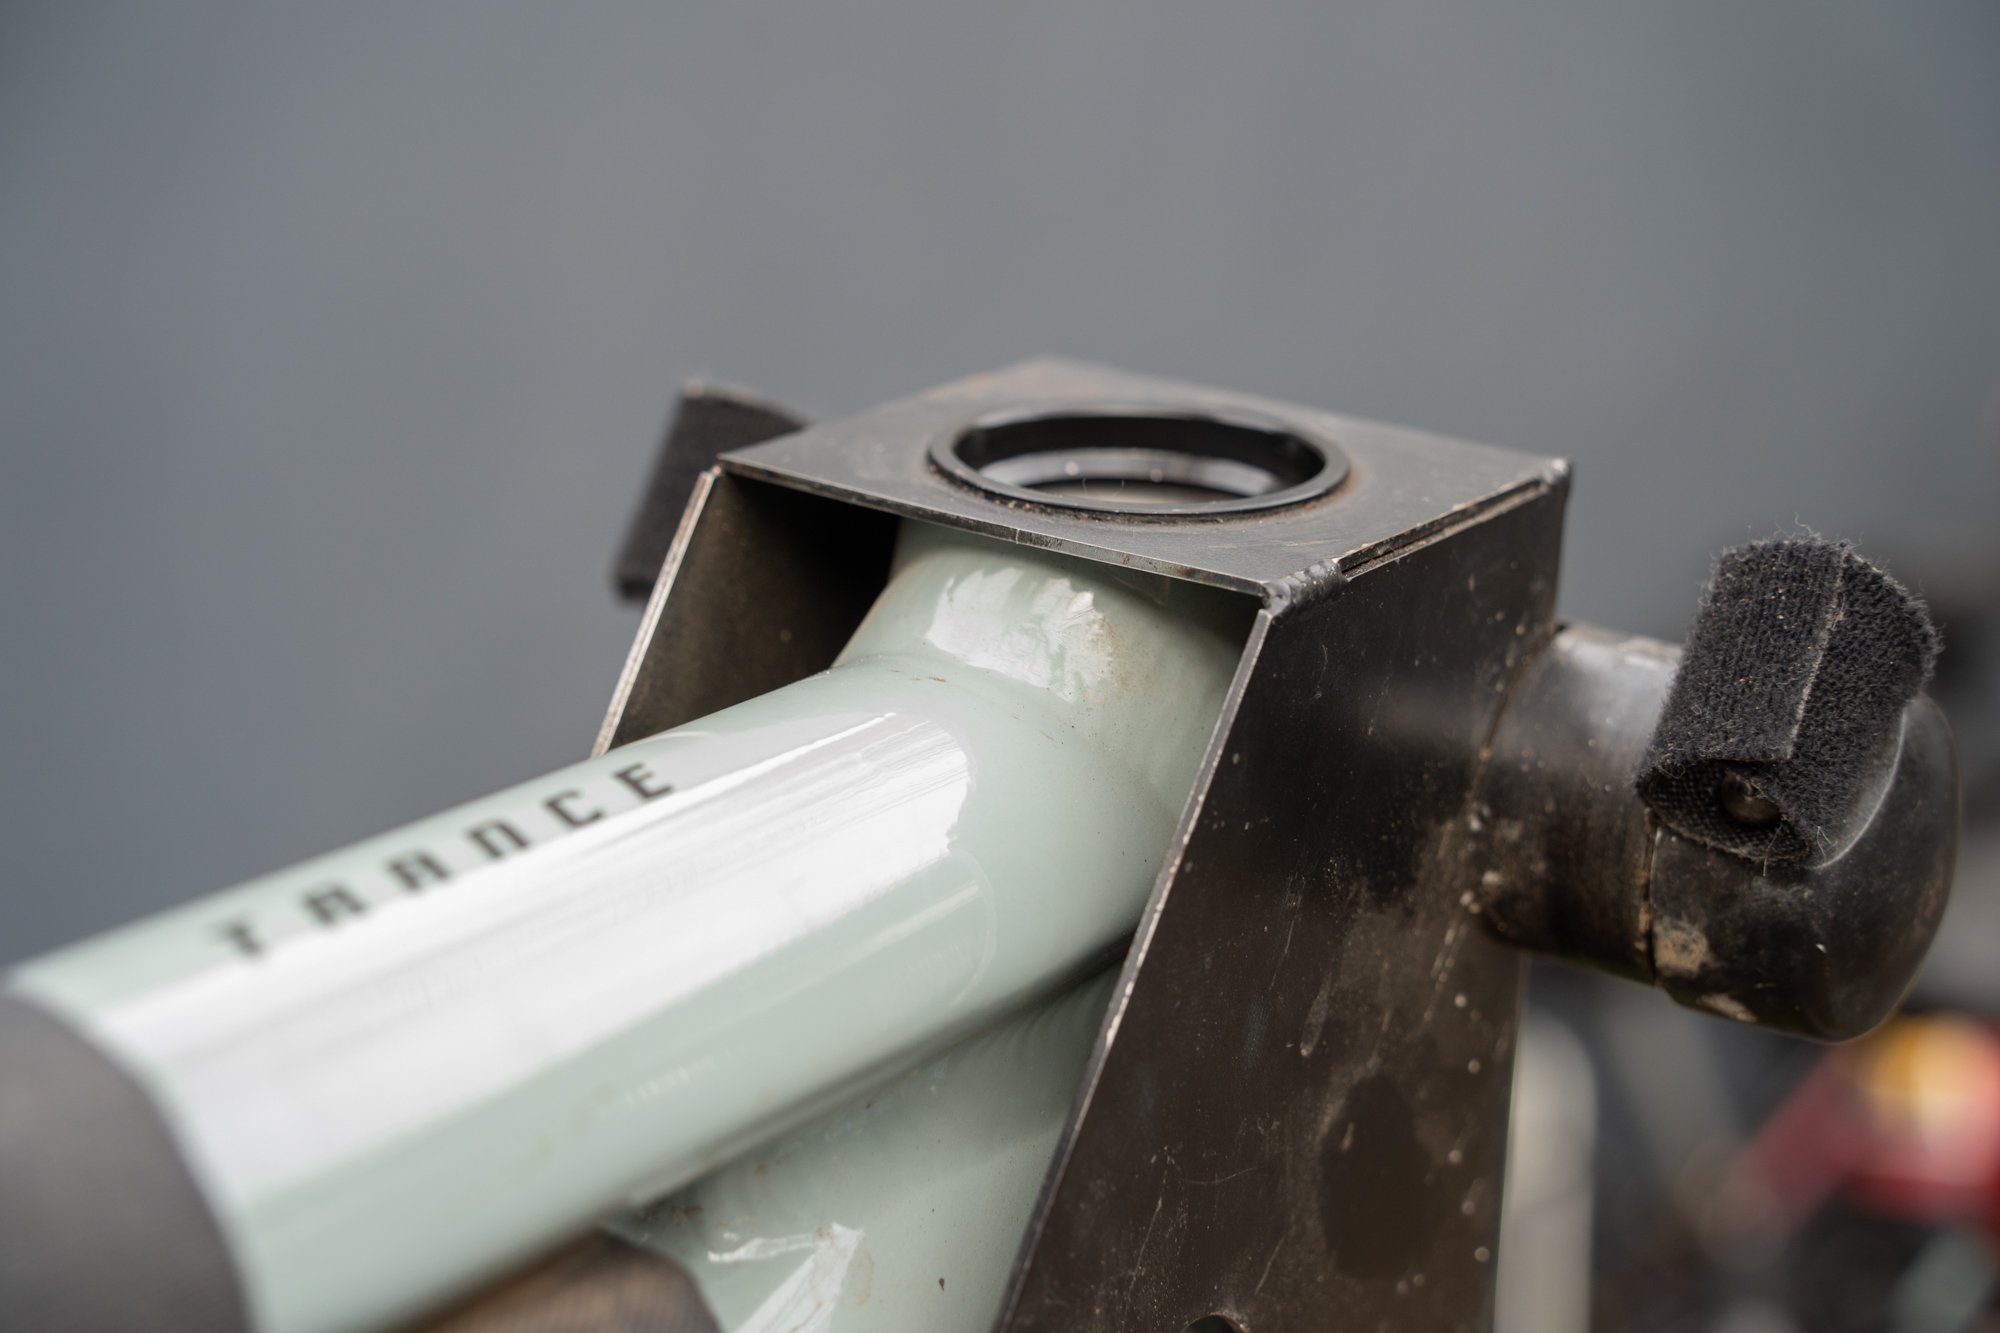
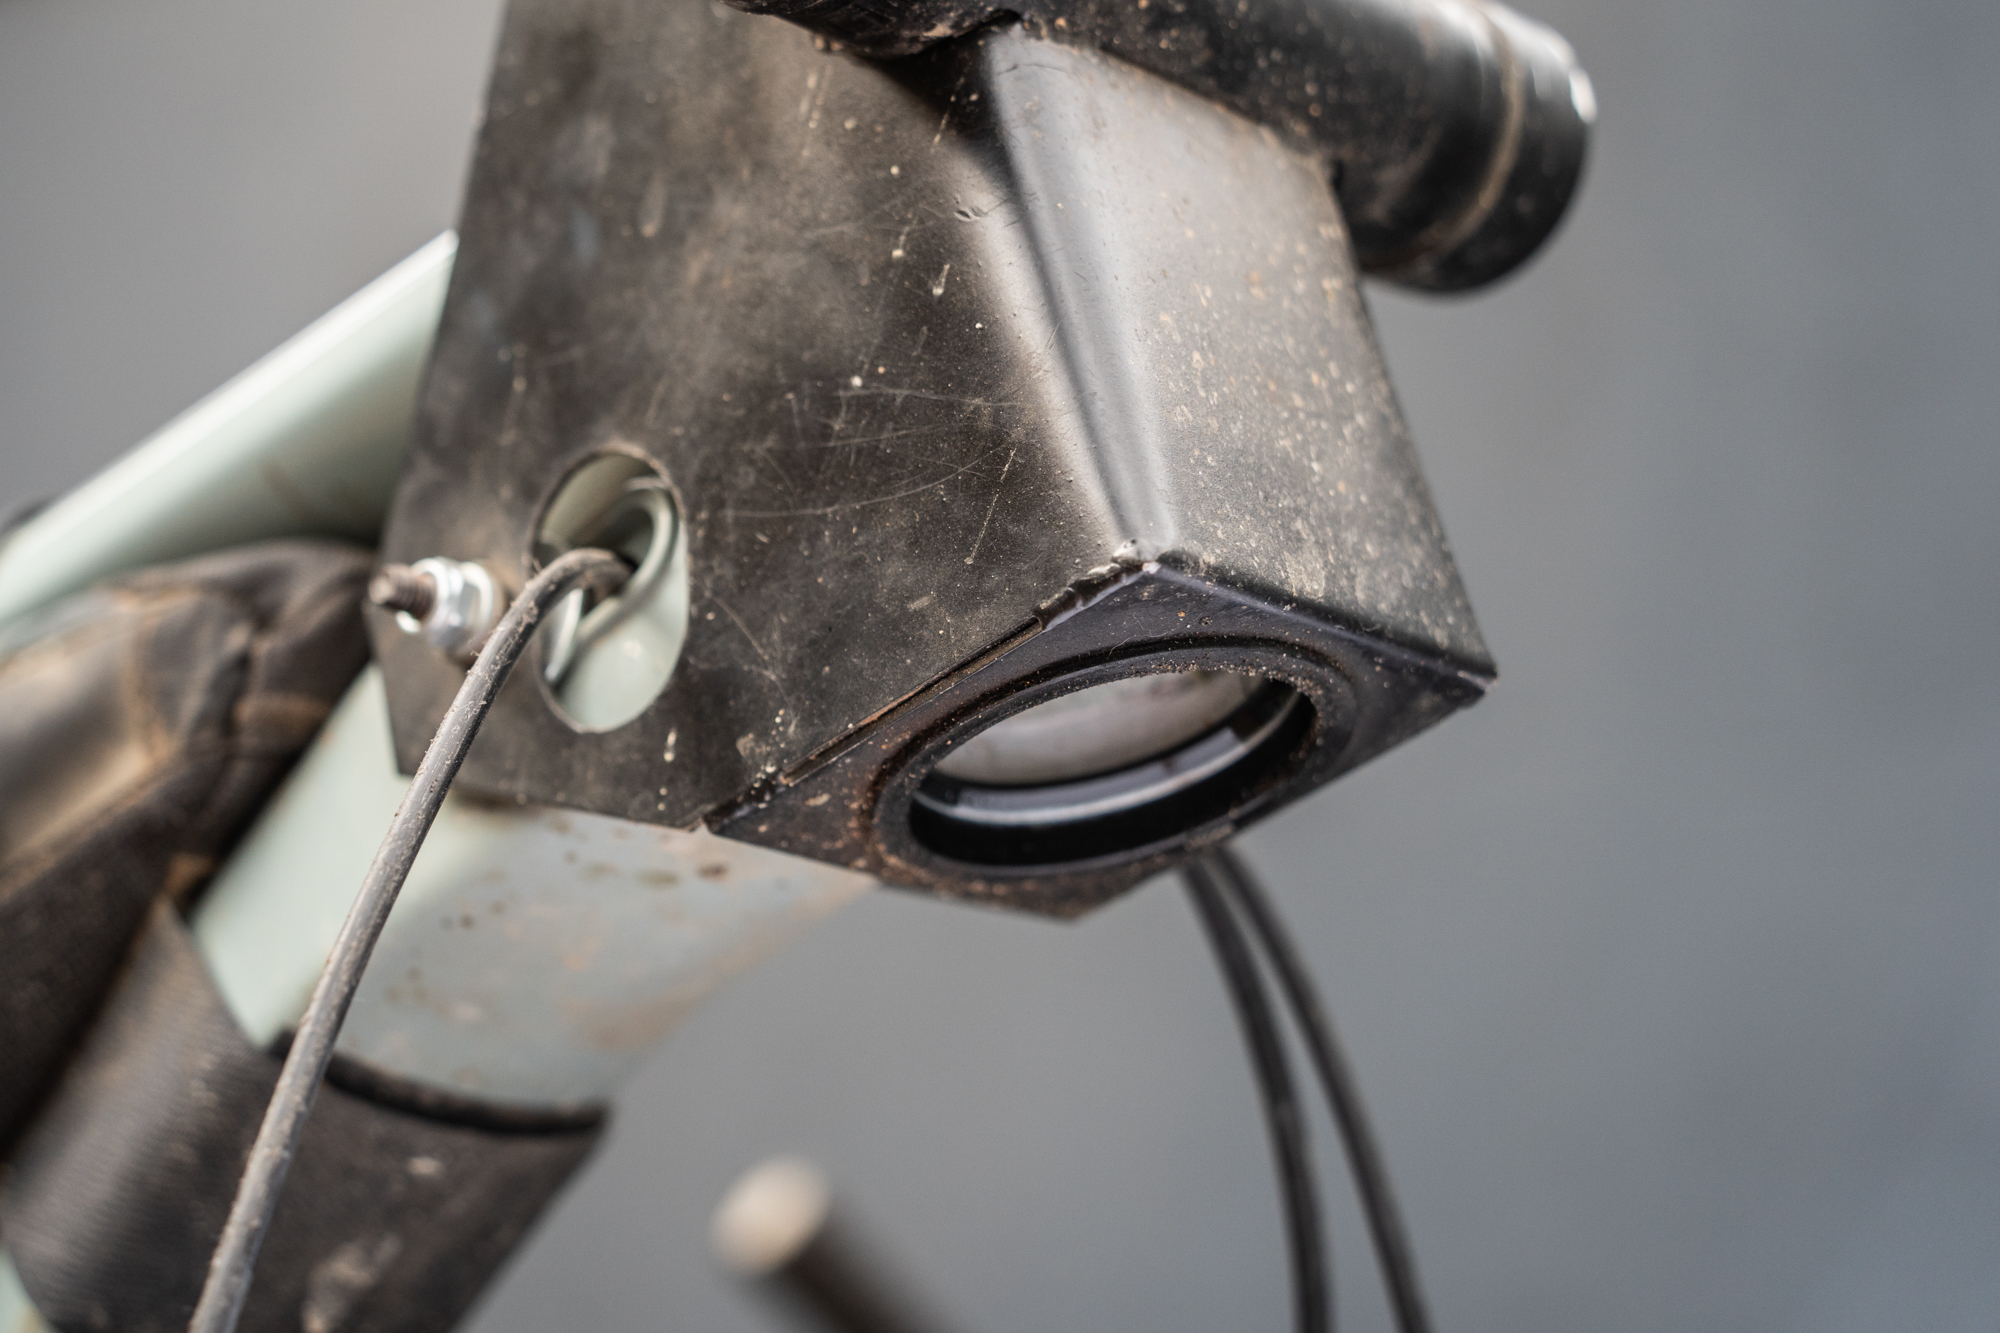
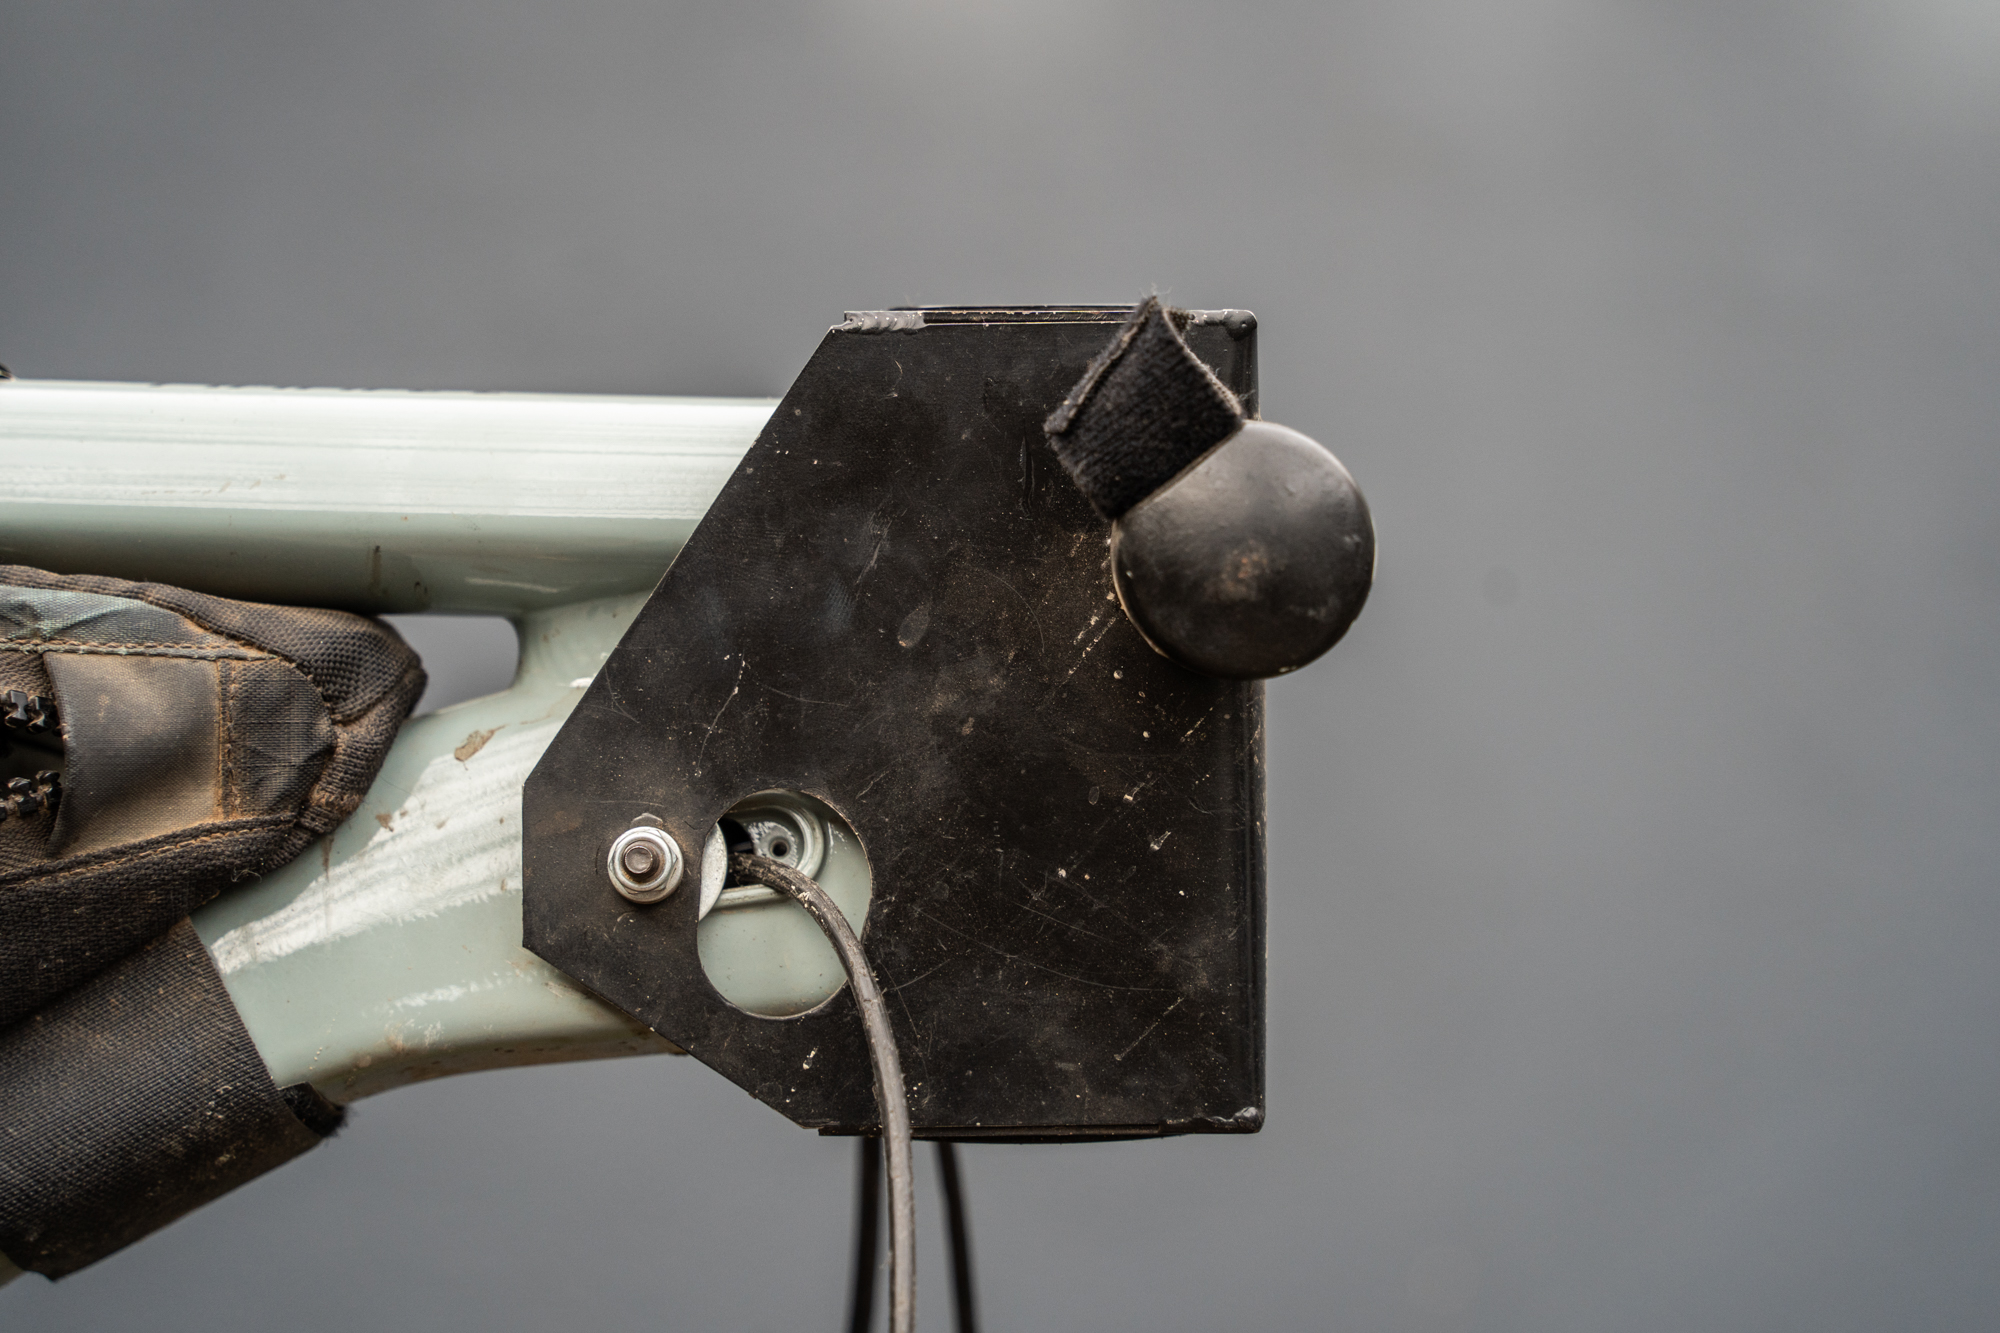
To my amazement, the cups and holes lined up perfectly. I did notice the cables wanting to snag on the tabs while turning, so I made some nubs out of PVC hardware and Velcro to keep the cables out of trouble. The only real struggle was the ship-in-the-bottle process of fishing bolts and washers through the cable ports. I needed some sort of lateral bracing because I didn’t want the thing to twist on me, but I’d have taken a different route if I had to do this over again. It wasn’t easy to rescue those bolts from inside the downtube when I fumbled. So, this thing is never coming off. And that’s fine, because damn, it’s pretty … in an ugly sort of way.
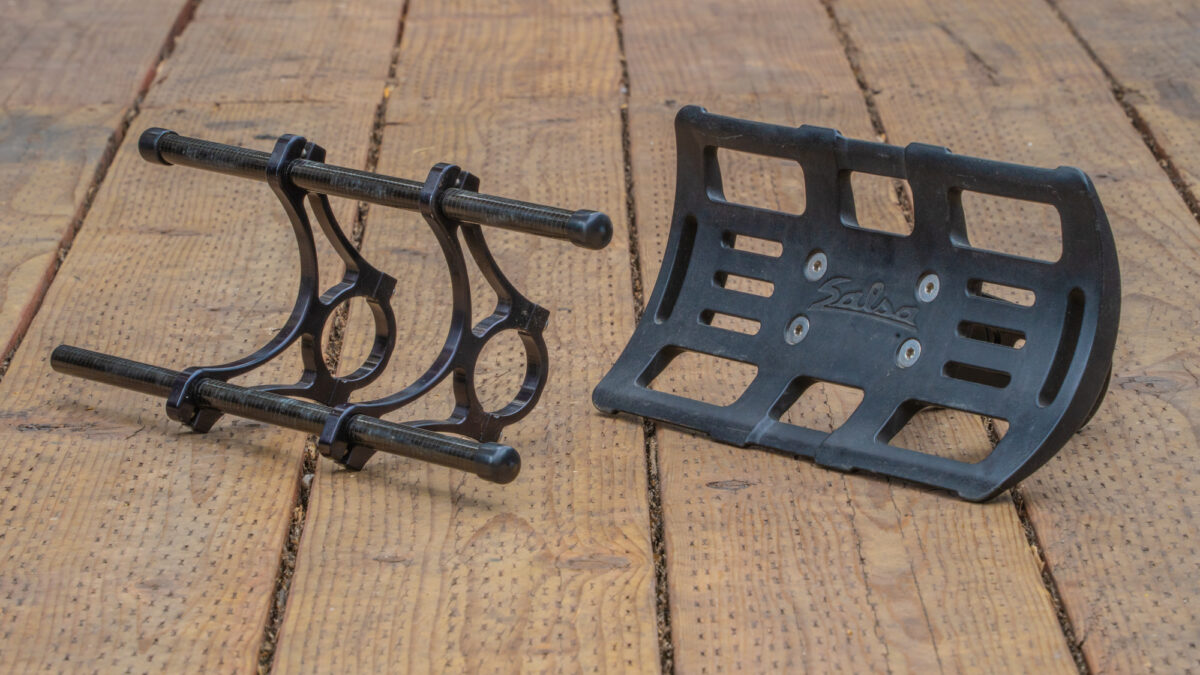
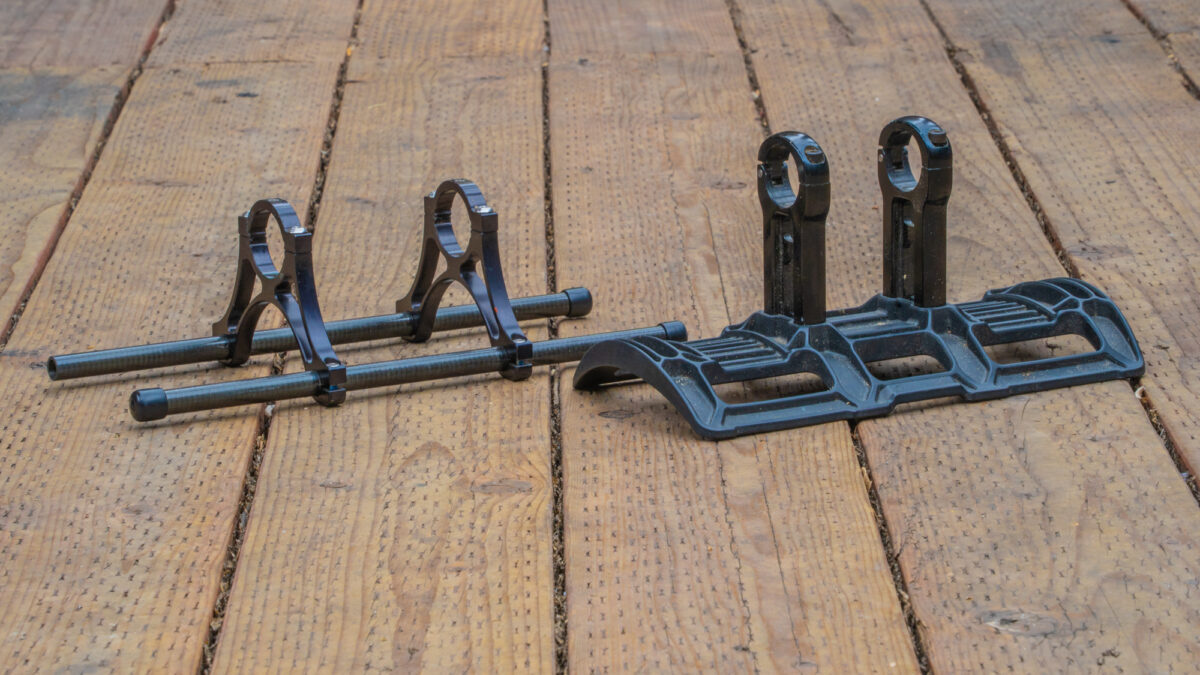
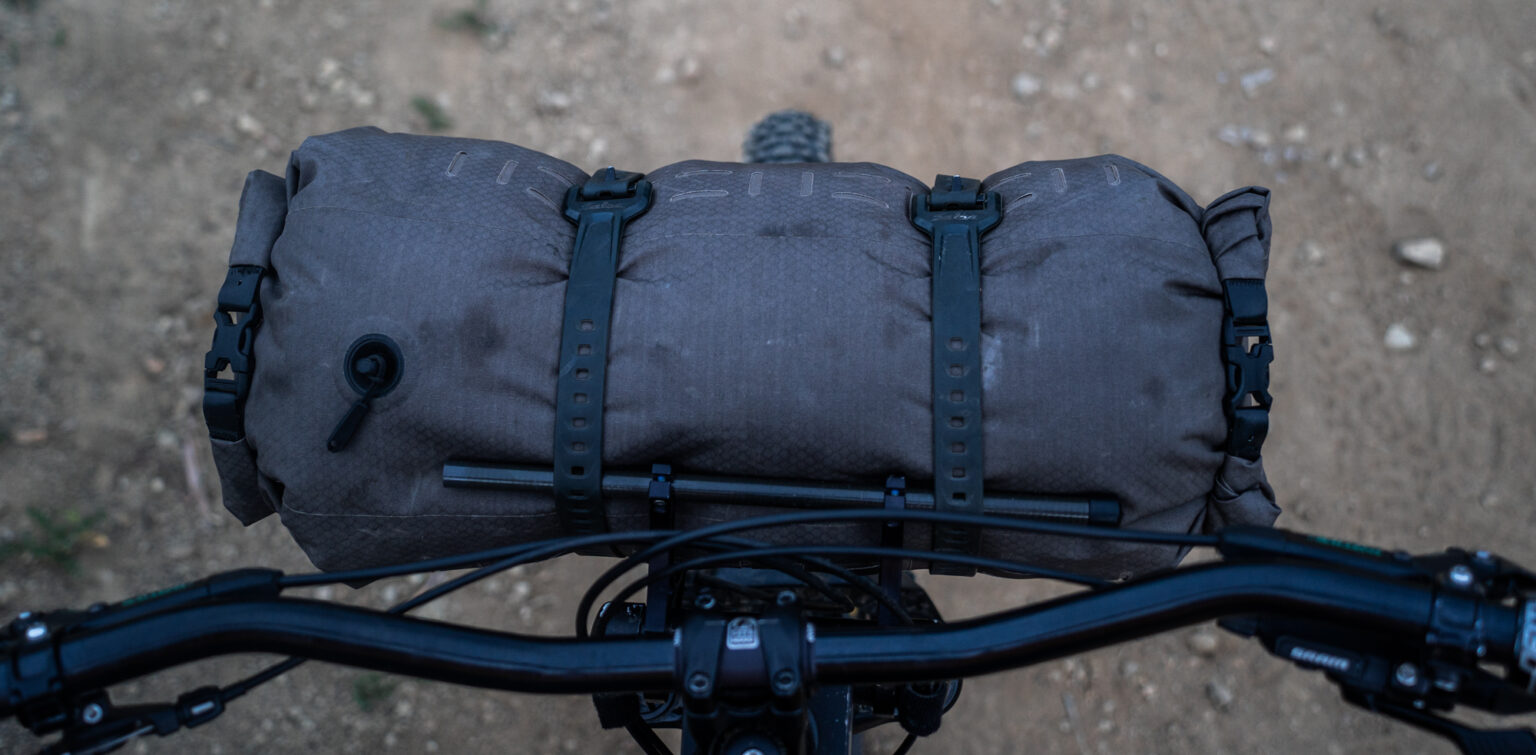
I went with a Rogue Panda Blue Ridge Harness for a few reasons. I wanted a short extension to keep the weight close to the frame, and to avoid obstructing my view given that my “tabs” had a forward offset. It also offered total control over the width of the mounting hardware. My steel box was too wide for the Salsa Anything handlebar cradle I already had on hand. I also liked that the Blue Ridge Harness shares my creation’s brutal industrial aesthetic
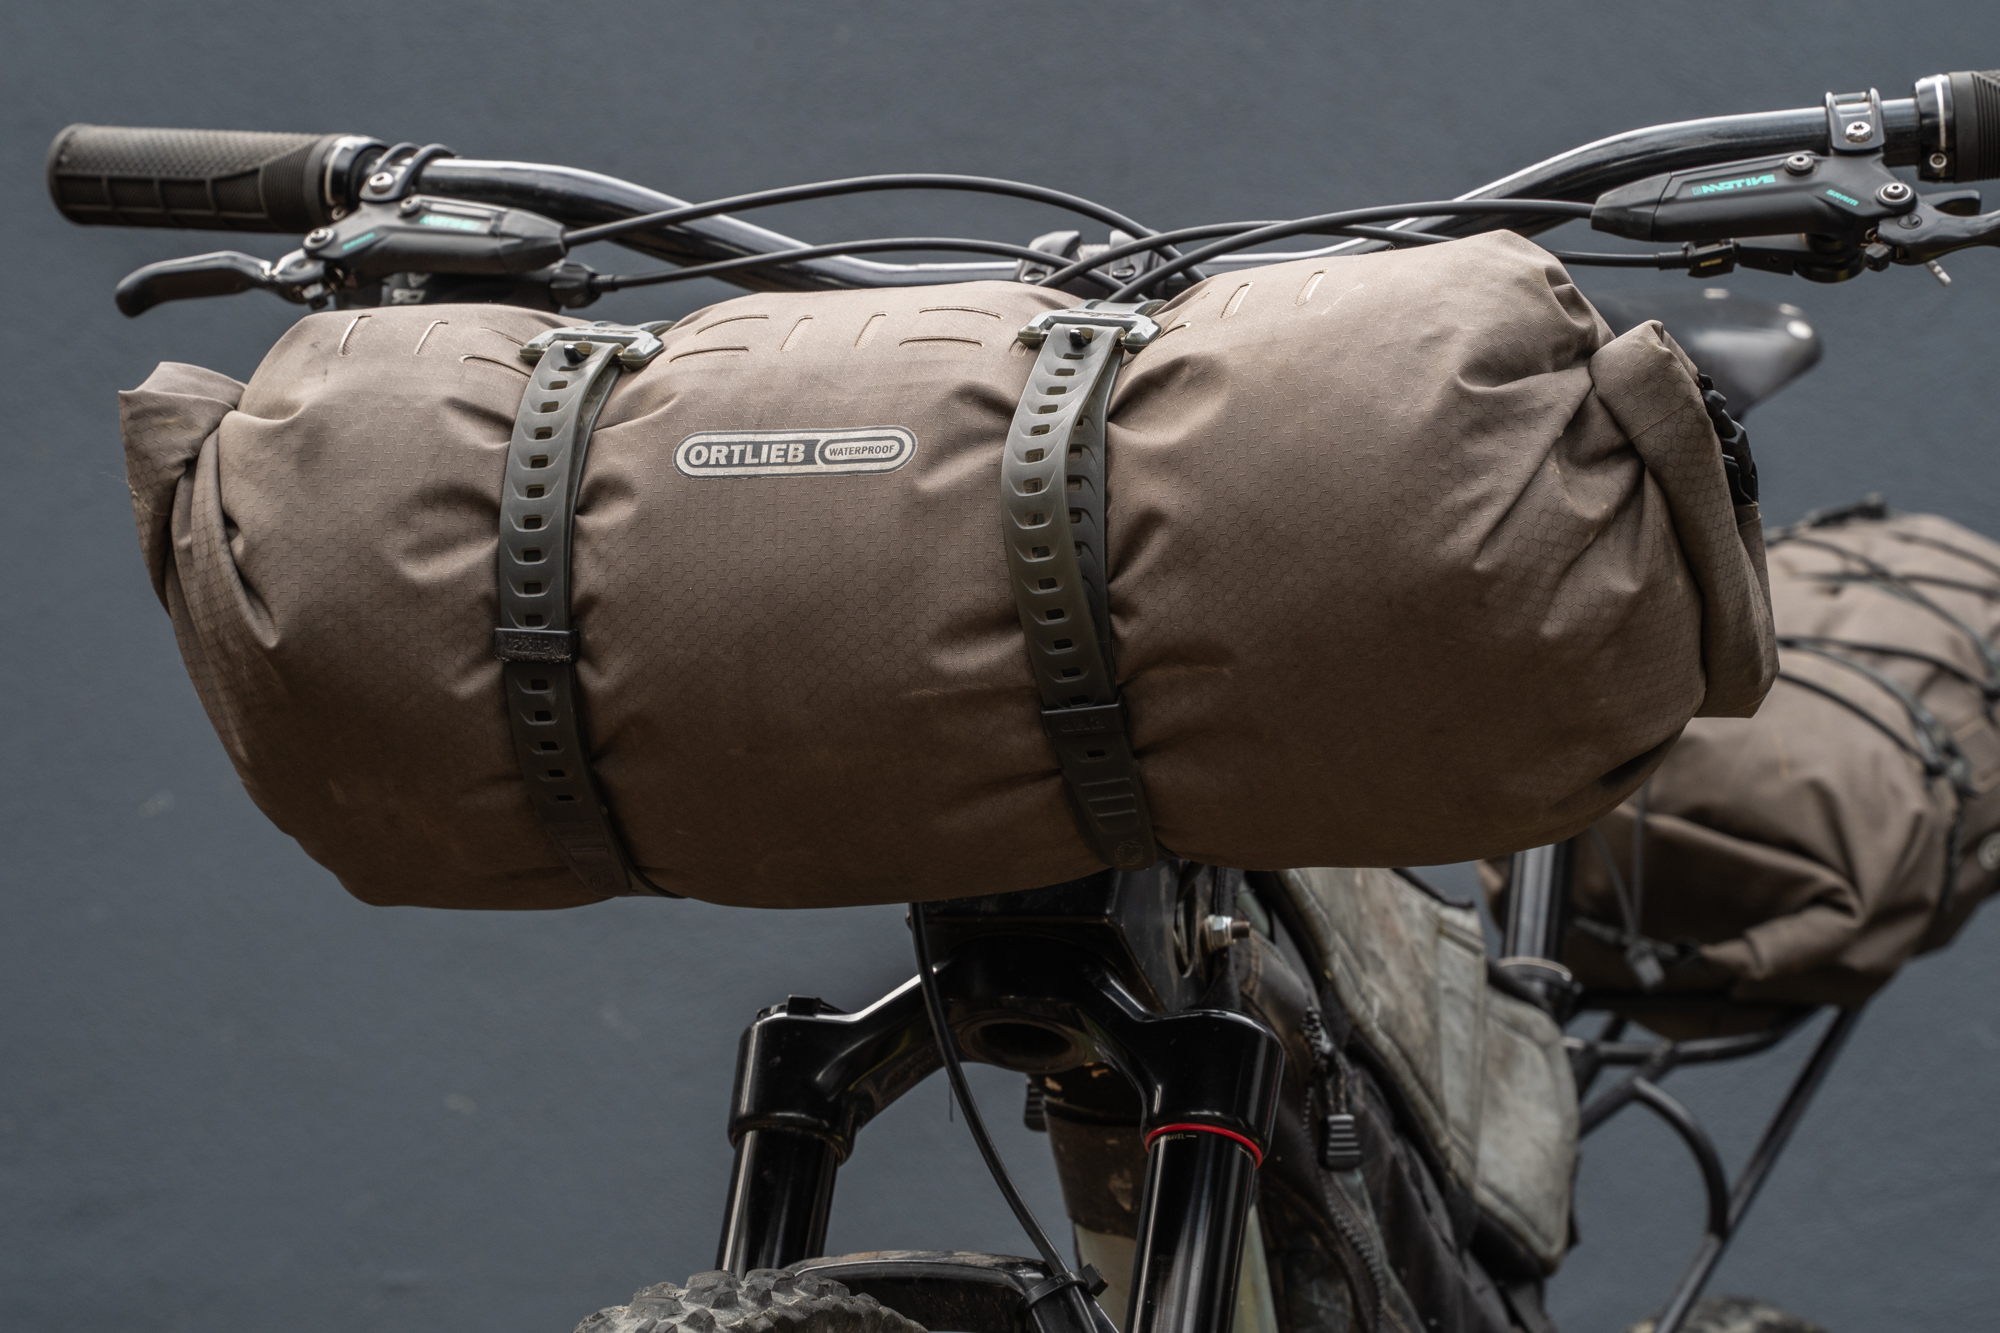
Sure enough, there was ample clearance for my large-diameter Ortlieb Dry-Pack 16L. And I almost nailed the tab positioning. The height I chose allowed me to mount the Blue Ridge facing pretty much straight forward. But I should have cut a deeper miter in the tabs to pull the load back towards me another inch. It would have improved visibility and weight distribution. And on that note, it’s time to talk about how it actually functions.
The Ride
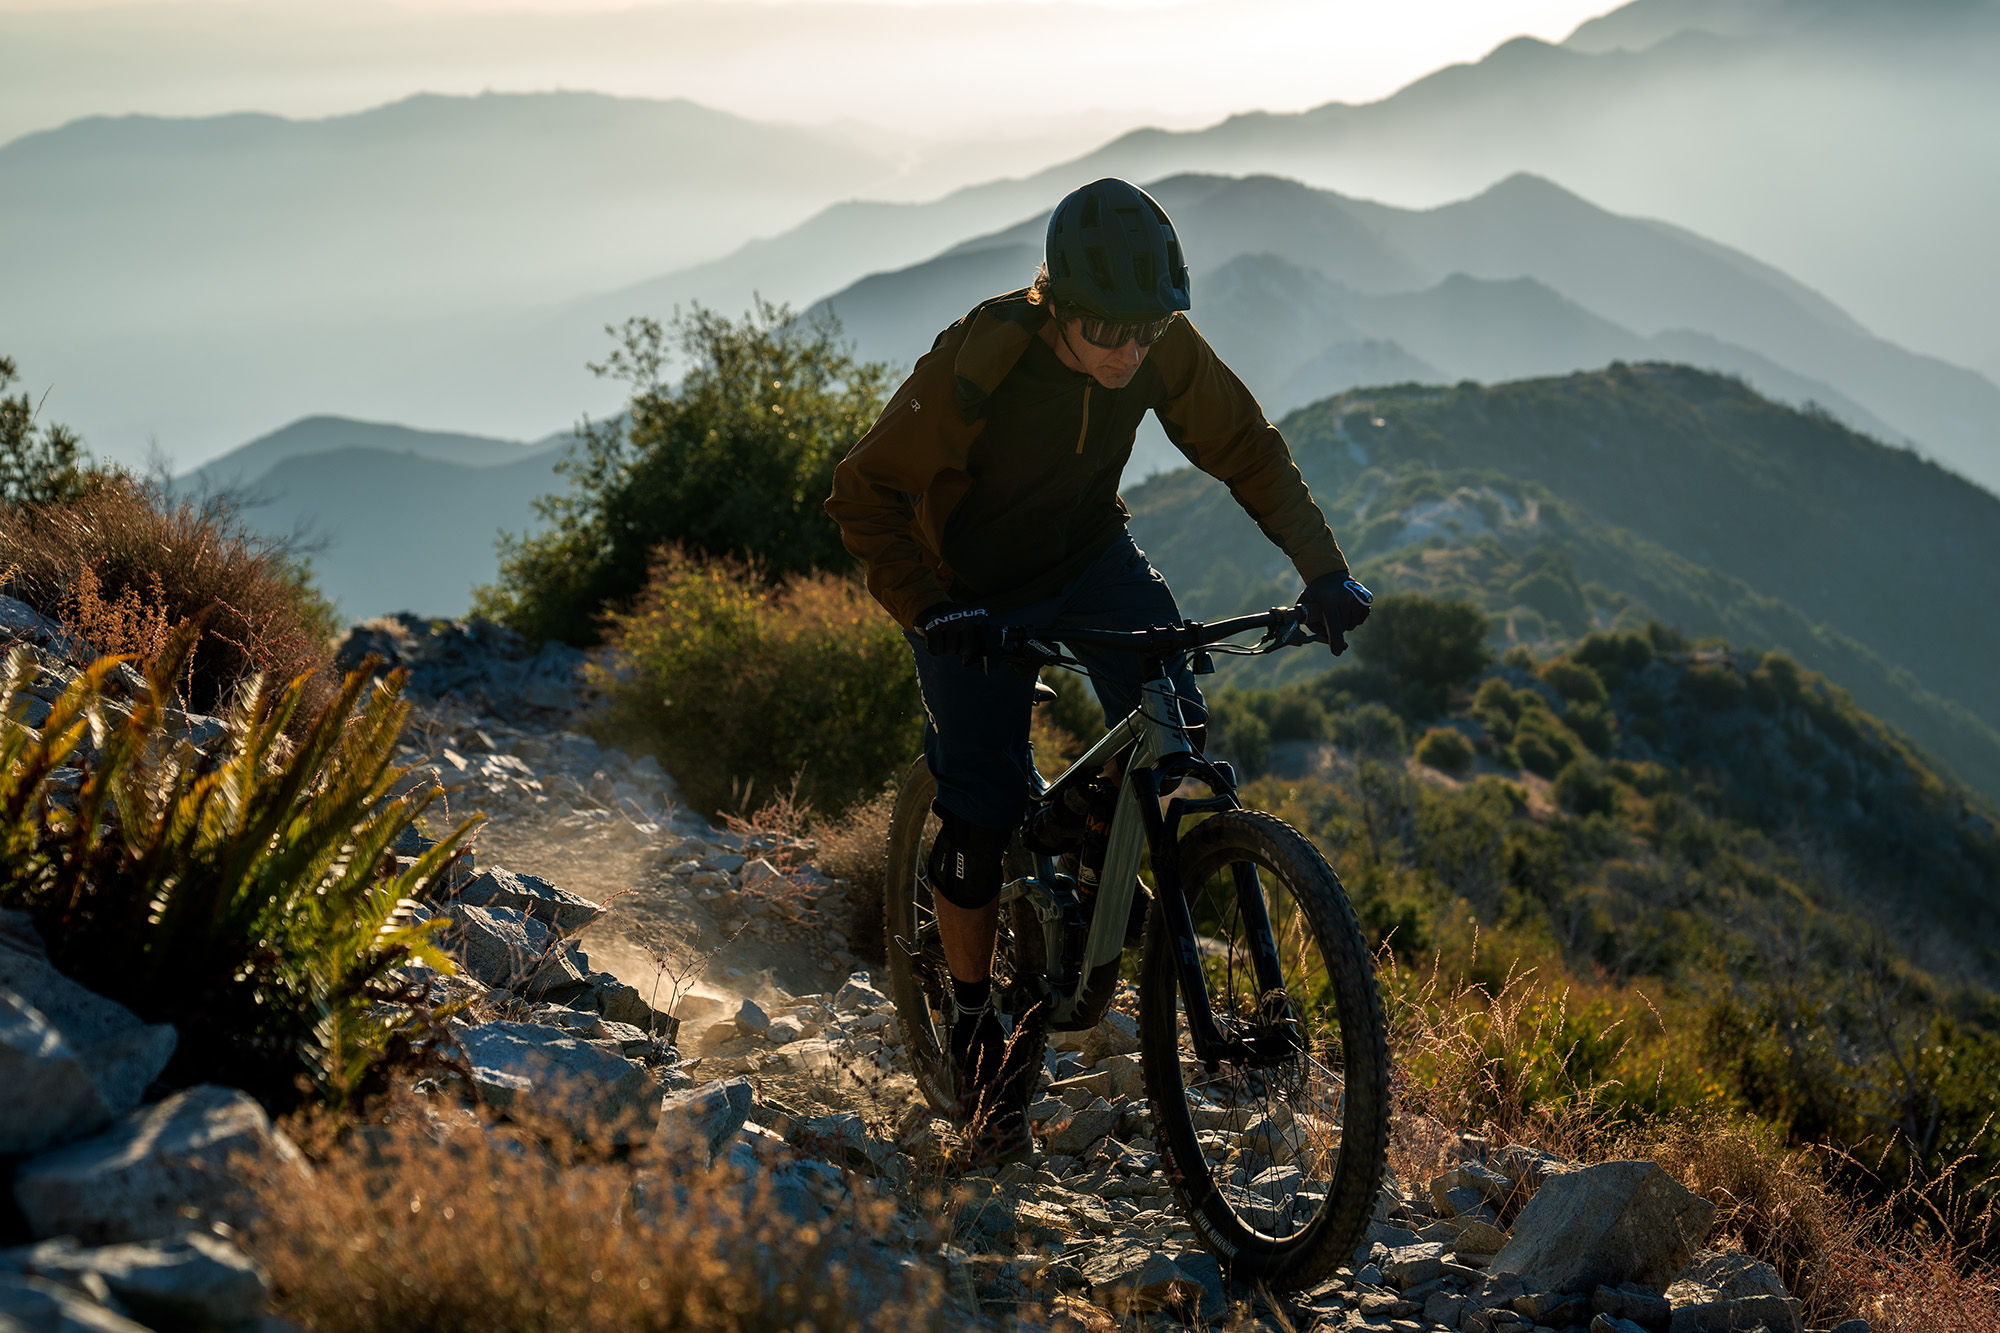
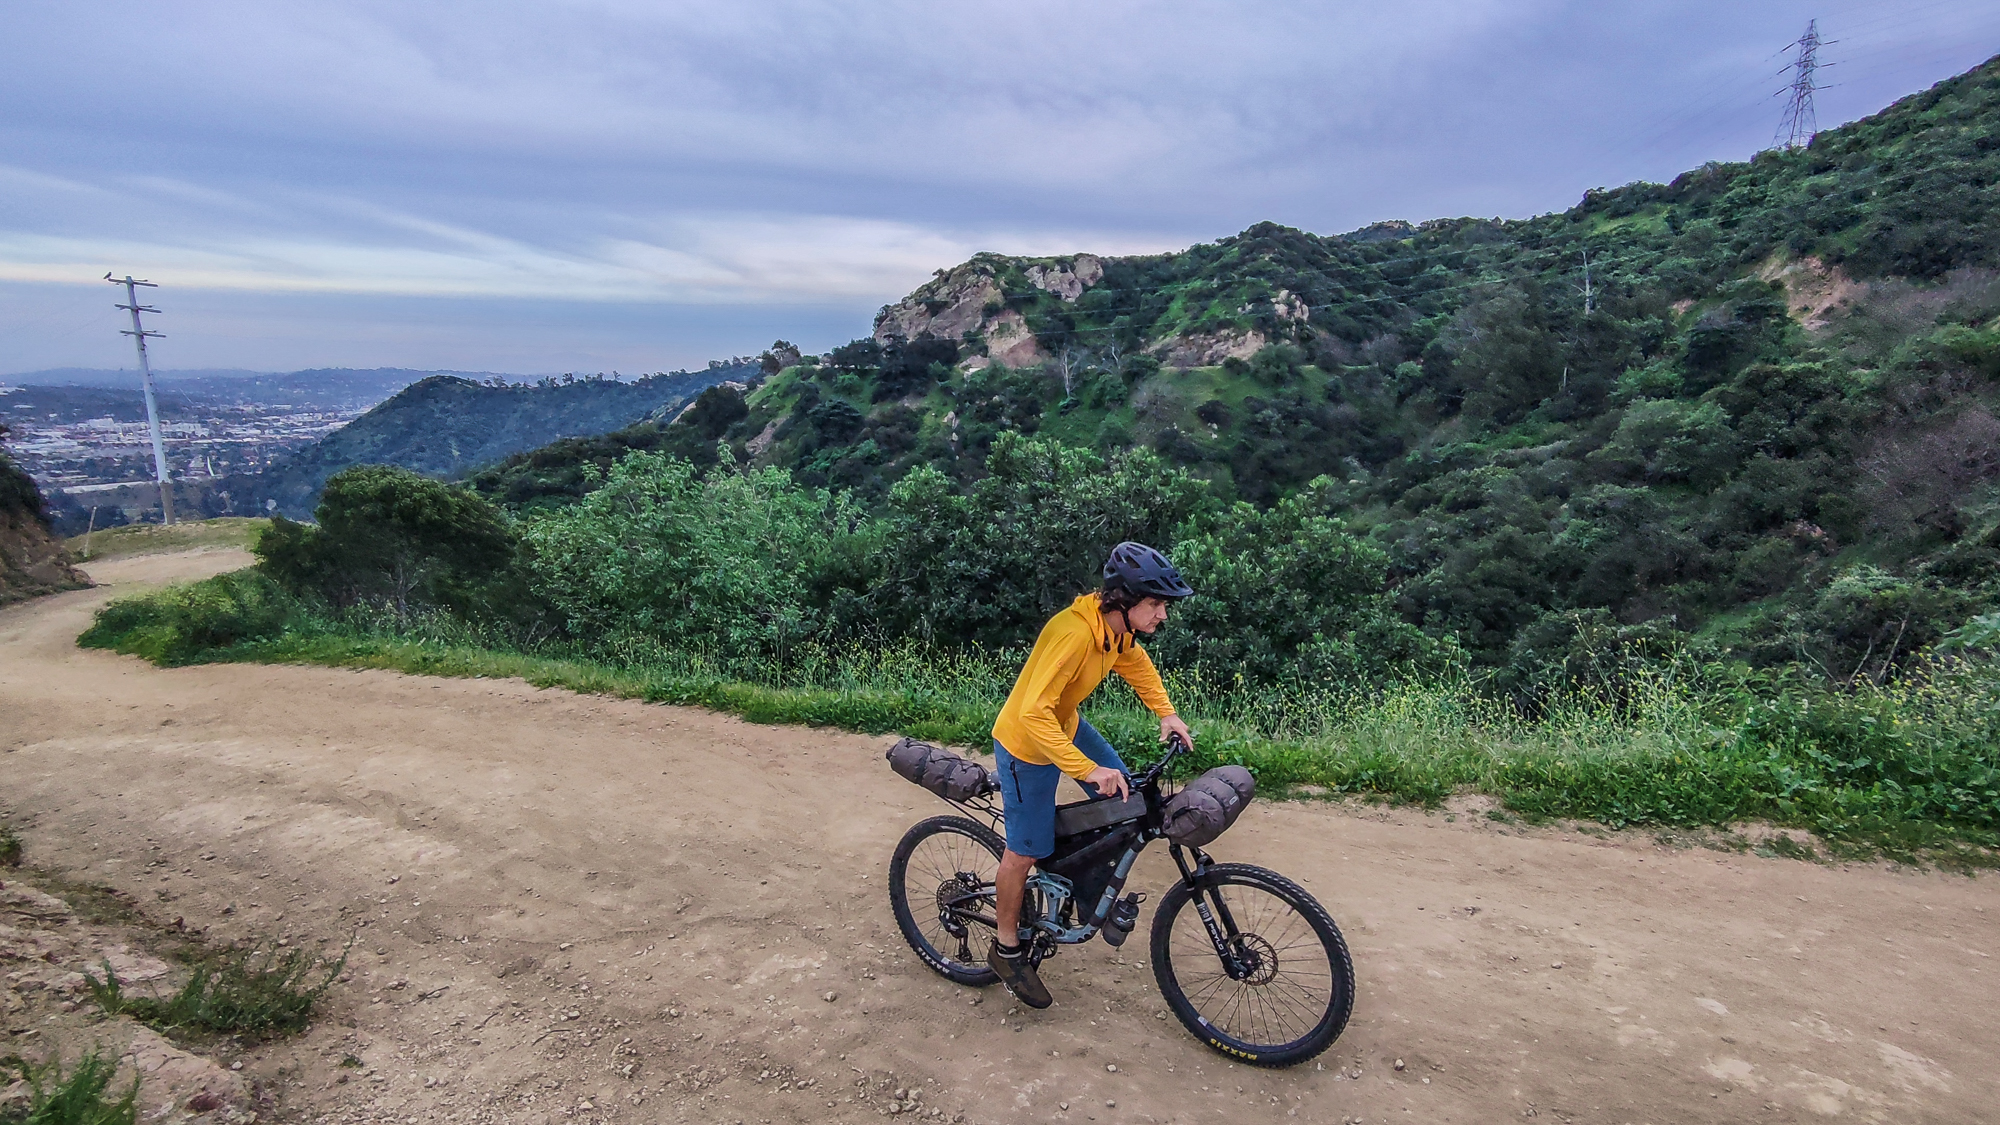
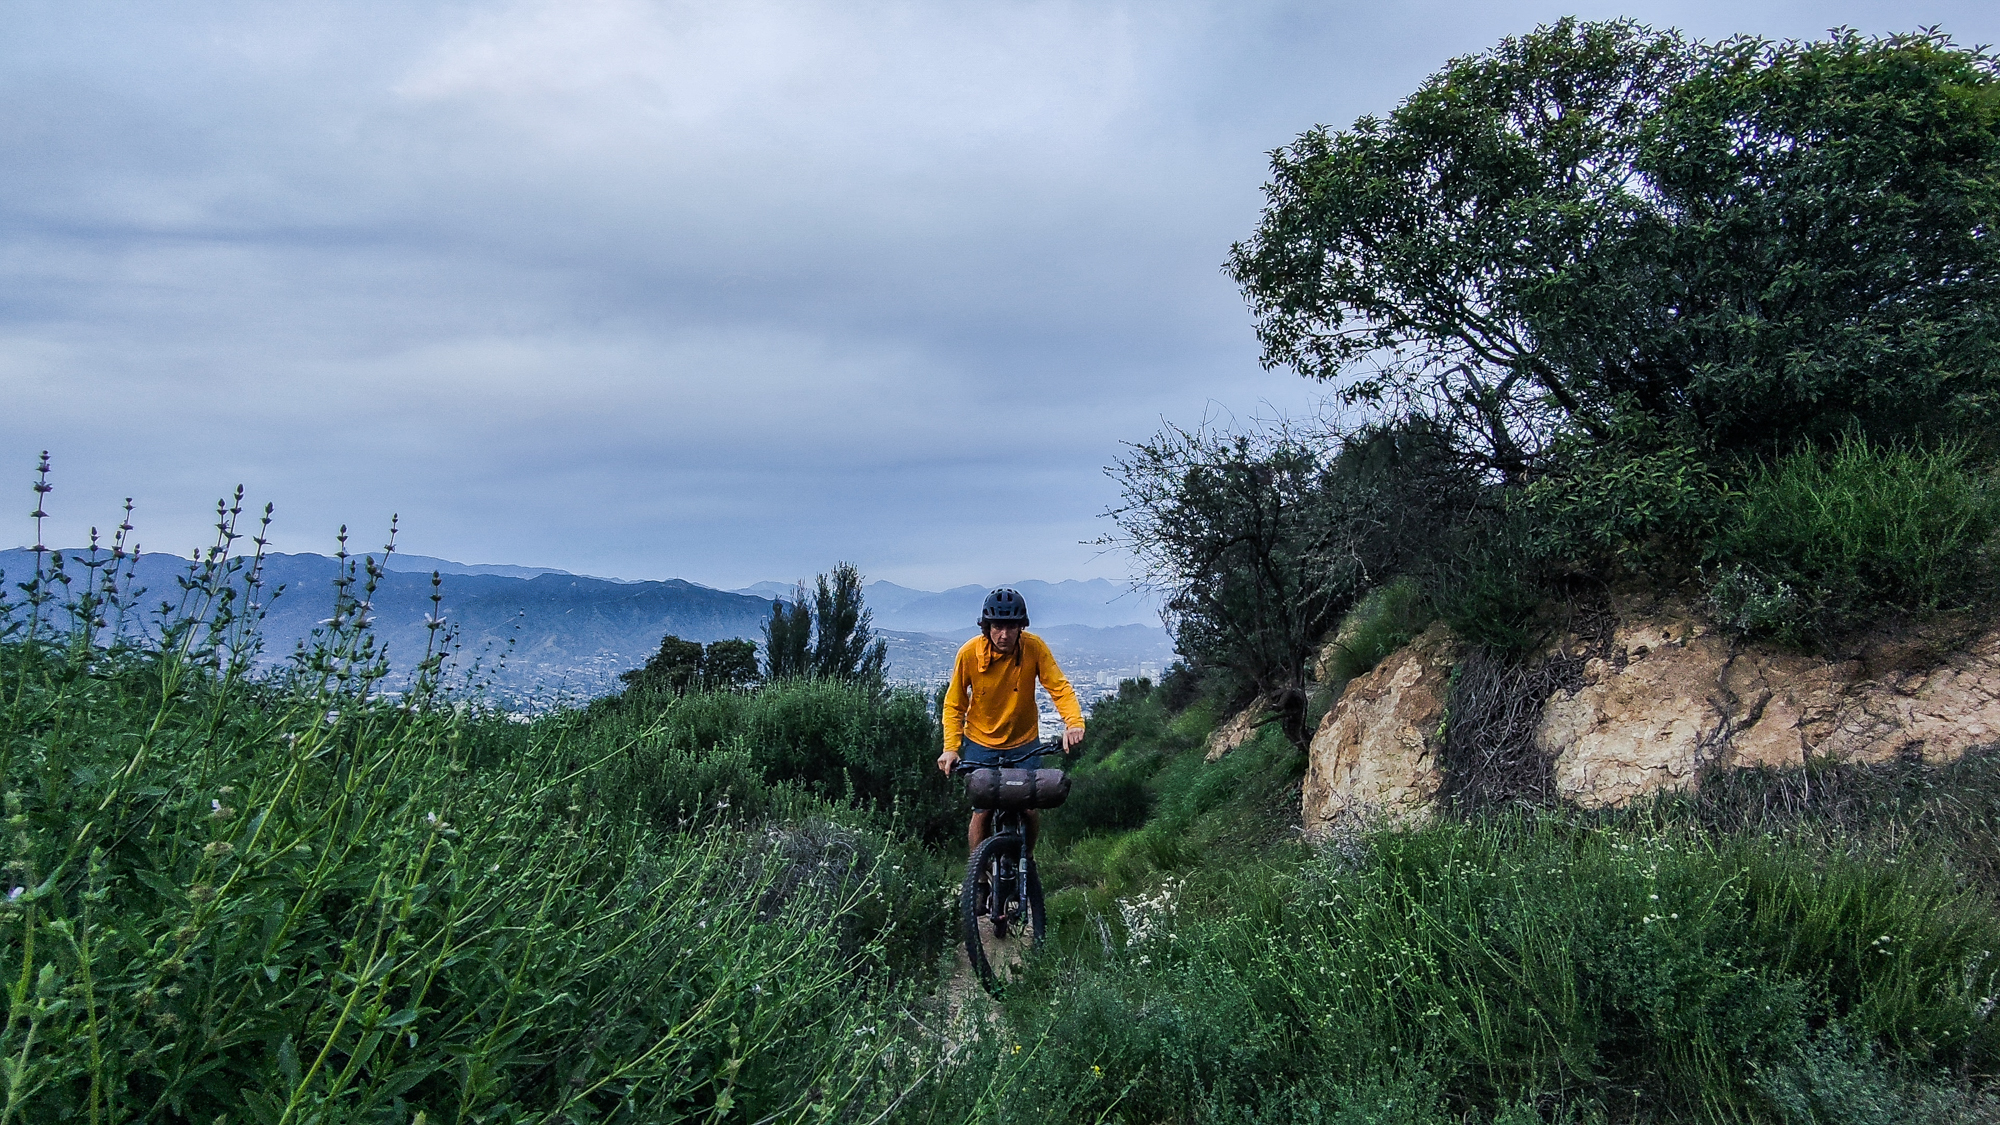
If you’ve ever ridden a front-load cargo bike, you know how disorienting it is when the basket remains stationary while you turn your bars. But if you’ve ever ridden one for more than 20 minutes, you know you get used to it. I think when you’re doing a parking-lot test, you’re riding slowly, and looking closer to your front wheel where the bag or basket takes up more of your field of view. When I get my bike up to speed and I’m looking ahead, I’m not distracted in the slightest. And when I reach a technical section where I’m looking closer to the front wheel, I barely notice it now that I’ve hade it for nearly a year. I’ve acclimated to it just like I would any other spec change.
And about those technical sections, that’s where I declared my mission accomplished. I can now flick my bars instantly, and with little effort. Previously, it wasn’t uncommon for me to give up on a climb when an overloaded handlebar bag or fork rack caused my front end to flop, and I couldn’t recover. I’m now more likely to clean a rocky uphill and avoid the momentum disruption of getting off to walk. But that’s just an extreme example of this concept’s benefits.
It’s surprising how much work our arms do just to maintain balance on a slow climb. Countless little twitches are required to stay upright. It’s sometimes hard to notice shoulder fatigue at the end of a day when your entire body is fatigued. But it’s not hard to notice when some of that fatigue is gone. My trapezius muscles are noticeably less tender when I lay me down to sleep. And they’ve been less tender the whole day leading up to it.
It’s also a delight when charging the descents. At speed, I’m of course not making the same drastic, forceful bar motions as I would when carefully negotiating a rocky uphill. But slight adjustments do take less effort and feel more natural. And then there’s the sprung mass. My bike’s chassis now has an extra six or seven pounds of inertia. That’s aided by about the same amount on the rear rack, and then again in the frame bag. Carving lines down sweeping dirt roads or plowing across primitive singletrack is almost relaxing. The bike isn’t getting bounced around as much beneath me, and my inputs are slightly muted. It’s that moto sensation that I love so much. But not everyone will love it as much as I do.
The Downsides
Tinker Tantrums aren’t necessarily technical advice. These are simply the kinds of weird experiments that every lifelong cyclist does. We just think they’re fun to talk about. My handlebar cradle concept happens to serve my tastes perfectly. But it won’t serve everyone. Never mind the fact that it would probably have to be custom-made for each rider who wants one. Never mind that some headset configurations wouldn’t work with it at all. And never mind that I’m not an engineer, so there may be unseen stresses at work that could cause a catastrophic failure some day (knock on wood). It’s also got a number of practical disadvantages that cheaper, simpler, easier-to-use systems do not.
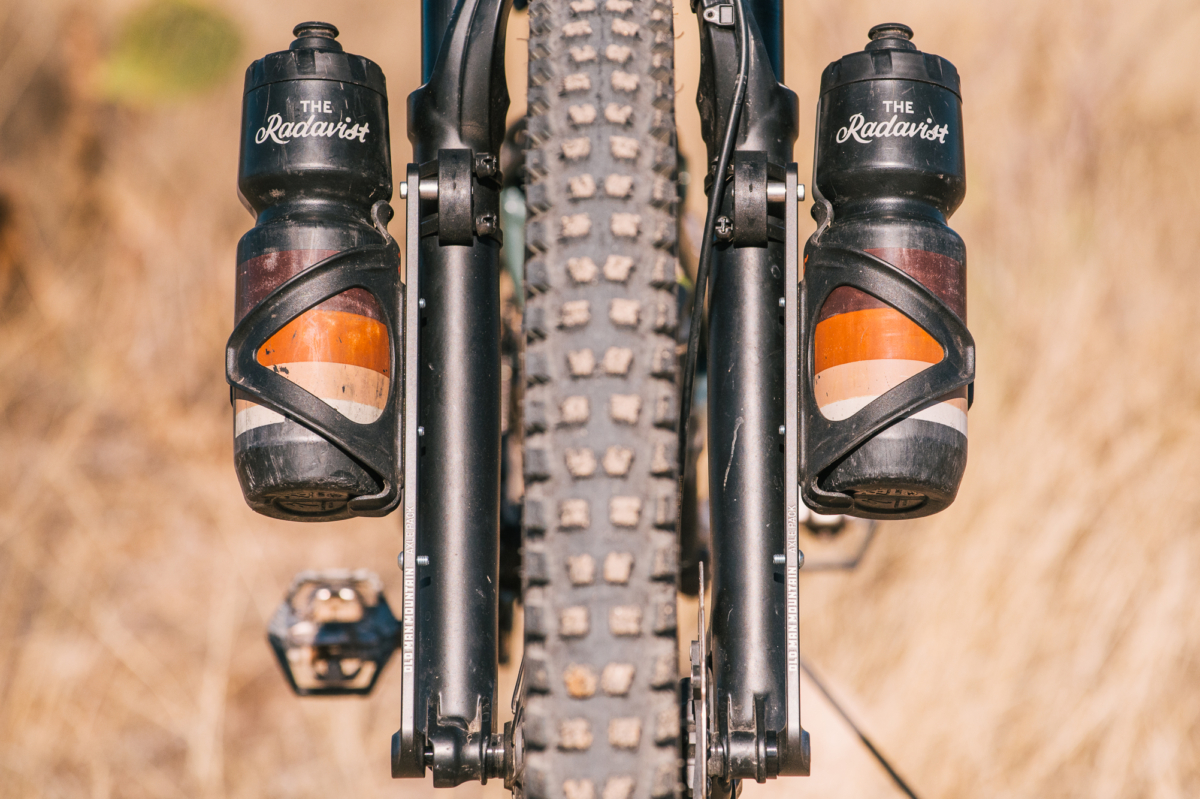
The whole sprung-weight debate has two sides. Mounting excess cargo to suspension-fork lowers (like the Old Man Mountain Axle Packs do) eliminates the need to adjust air-spring pressure as load weight changes. It also prevents that weight from effectively spiking under front braking or on steep descents. And increasing sprung mass makes a bike less poppy. It’s harder for me to bounce my wheel into a slightly better line, or to get off the ground for whatever reason.
The concept also relies on the clearance offered by my high, flat handlebars. Low bars will limit clearance for this concept, and drop bars may not work with it at all. And though it’s not necessarily any more obtrusive than a normal handlebar cradle, it does block your view of your front tire. And that can be even more disorienting given that it’s decoupled from your steering motion.
But most importantly, it further pigeon-holes a bike into one purpose. This big hunk of steel will be on this bike until it dies. And my custom rear rack is a pain to remove, as is my under-down-tube Nalgene cage. And untangling the Velcro of both a front-triangle bag and top-tube bag is something I’ll avoid at all costs. Concepts like these can erode a bike’s versatility. But I don’t care. My head-tube-mounted handlebar cradle makes bikepacking feel like less of a moment-to-moment struggle, while maintaining my pride in the day-to-day struggle. It’s smoother, quieter, and arguably faster. That’s worth adding a whole bike to my collection … though I really do need a garage.