
")
Recommended Pressure
Front: — bar · — kPa
Rear: — bar · — kPa
Enter your bike details and hit Calculate Pressure to get a personalized recommendation.
A few PSI in either direction changes how your bike corners, how fast it rolls, and how your legs feel at the end of a ride. Most cyclists either guess their pressure or pump to whatever number is printed on the sidewall. Both leave a lot of performance on the table.
This bike tire pressure calculator uses the weight-based methodology trusted by SRAM, ENVE, and SILCA. Enter your rider and bike weight, tire width, and surface type to get personalized front and rear PSI adjusted for tire setup (tubeless, clincher, or tubular) across road, gravel, MTB, and hybrid bikes.
Below the calculator, I break down exactly how the formula works, why lower pressure is usually faster, and the most common mistakes that cost you grip and speed.
How This Bicycle Tire Pressure Calculator Works
The formula starts with your total system weight (rider + bike + gear) divided by your tire width.
This is the same weight-based approach that SRAM, ENVE, and SILCA use in their own pressure tools. The logic is simple: narrower tires have less air volume, so they need more pressure to support the same load. Wider tires need less.
That gives you a base PSI. Then the calculator applies three adjustments:
Tire type. Tubeless setups can safely run about 8% lower than clinchers because there’s no inner tube to pinch on impacts. Tubulars sit about 3% lower due to their supple casing.
Riding surface. Smooth pavement gets the full calculated pressure. Rough roads drop about 5%. Gravel drops 12%. Off-road trails drop 20%. Rougher terrain means more vertical deflection, and lower pressure lets the tire absorb that instead of bouncing off it.
Front/rear split. Your rear wheel carries roughly 55% of total weight. So it gets slightly more pressure than the front. The calculator uses a ±4% split, which produces the 5 to 7 PSI gap that SRAM and ENVE recommend. Not the 15 to 20 PSI difference that older calculators used to spit out.
The result is a starting point. Fine-tune from there, 3 to 5 PSI at a time.

Why Lower Pressure Is Actually Faster
For years, every cyclist believed the same thing: harder tires roll faster.
And in a lab, that’s true. On a perfectly smooth steel drum, higher pressure reduces tire deformation. Less deformation means less rolling resistance. The math checks out.
But you don’t ride on steel drums.
Real roads have cracks, chips, micro-texture, and patchy surfaces. When your tire is over-inflated, it bounces over all of that. Each bounce lifts you off the ground for a split second. That’s wasted energy. SILCA calls this “impedance loss,” and it doesn’t show up in drum-based lab tests at all.
Research from SILCA and Bicycle Quarterly confirmed what pro teams had been noticing for years. On actual pavement, a 28mm tire at 70 PSI is often measurably faster than the same tire at 95 PSI. Lower pressure lets the tire conform to the surface instead of fighting it.
I used to pump my road tires to 100+ PSI because that’s what everyone did. Dropping to 75 PSI felt wrong at first. Softer. Slower. But my average speed on the same routes stayed identical, and I wasn’t getting rattled to pieces on rough stretches anymore.
The calculator already factors this in. Trust the number it gives you, even if it feels low.
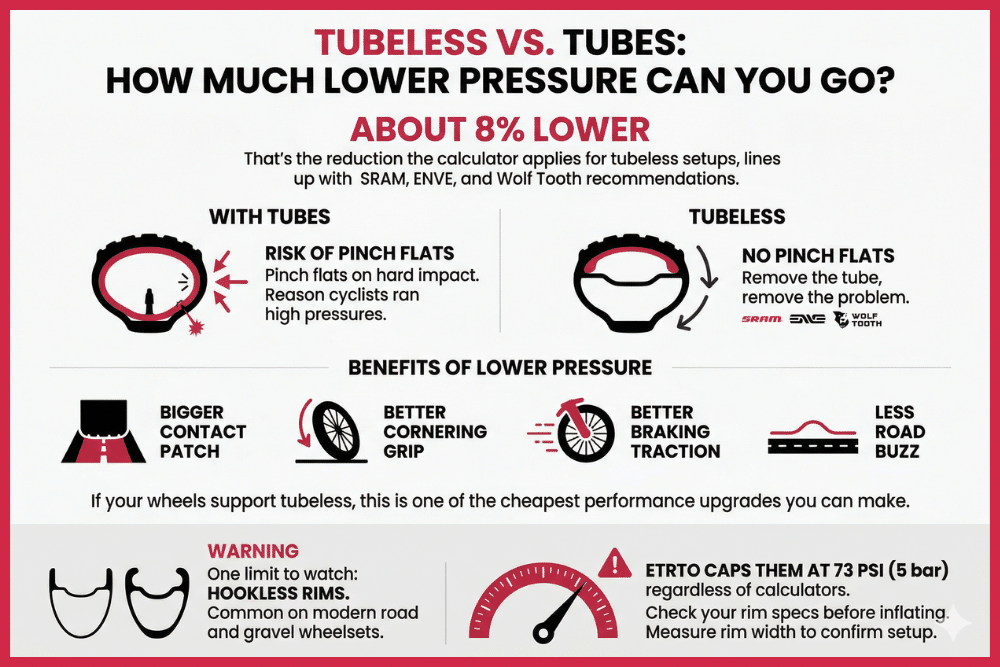
Tubeless vs. Tubes: How Much Lower Can You Go?
About 8% lower. That’s the reduction this bicycle tire psi calculator applies for tubeless setups, and it lines up with what SRAM, ENVE, and Wolf Tooth recommend.
The reason is straightforward. With tubes, you risk pinch flats. The tube gets squeezed between the tire and rim on a hard impact, and it punctures. That’s the main reason cyclists ran high pressures in the first place. Remove the tube, remove the problem.
Lower pressure means a bigger contact patch. Better cornering grip. Better braking traction. Less road buzz. If your wheels support tubeless and you’re still running tubes, this is one of the cheapest performance upgrades you can make.
One limit to watch: hookless rims. They’re common on modern road and gravel wheelsets, and ETRTO caps them at 73 PSI (5 bar) regardless of what any calculator says. Check your rim specs before inflating. Our guide on how to measure rim width can help you confirm your setup.
Front vs. Rear: Getting the Split Right
Your rear wheel carries about 55% of total weight. Your front carries 45%. So yes, the rear tire needs more pressure.
But not as much more as you’d think.
A lot of riders run their front tire 15 to 20 PSI softer than the rear. I used to do this too. It seems logical. More weight, more pressure. But that big of a gap creates a real problem: your front tire feels vague. Cornering gets sketchy. Braking traction drops. You’re basically riding on two bikes that behave differently from each other.
SRAM, ENVE, and SILCA all recommend keeping the gap between 3 and 7 PSI for road and gravel. For mountain bikes, it’s even tighter. Just 2 to 4 PSI. Weight shifts constantly on technical terrain, and you need consistent front wheel grip to stay upright.
The calculator uses a ±4% split from the base pressure. For most setups, that lands right in the 5 to 7 PSI range.
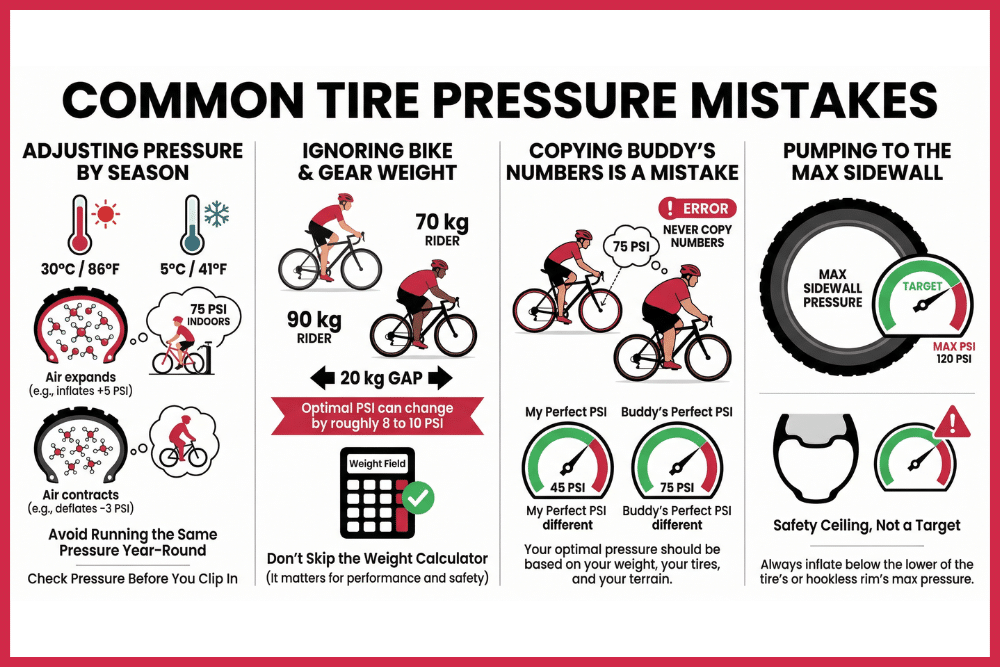
Common Tire Pressure Mistakes
Running the Same Pressure Year-Round
Summer heat can add 5+ PSI during a ride as the air inside your tire expands. Winter cold does the opposite. If you inflate at 75 PSI indoors on a cold morning and ride out into 5°C weather, you’ve already lost about 3 PSI before you clip in. Adjust your starting pressure by season.
Ignoring Bike and Gear Weight
A 70 kg rider with a 9 kg bike and a 90 kg rider on the same frame need very different pressures. That 20 kg gap changes optimal PSI by roughly 8 to 10 PSI. Don’t skip the bike weight field in the calculator. It’s there for a reason.
Copying Your Buddy’s Numbers
Even if you ride the same bike with the same tires, a 10 kg weight difference changes everything. Your pressure should be based on your weight, your tires, your terrain. Not someone else’s.
Pumping to the Max on the Sidewall
That number is a safety ceiling, not a target. Most riders should be running well below it. And if you’re on hookless rims, the rim’s max pressure is usually lower than the tire’s. Always go with whichever number is lower.
Frequently Asked Questions (FAQs) About Bike Tire Pressure
How often should I check my tire pressure? Before every ride. Tires lose 1 to 2 PSI per day naturally. A pre-ride squeeze isn’t accurate enough. Use a dedicated digital pressure gauge instead.
Can I use this bike tire psi calculator for e-bikes? Yes. Just include the full bike weight (battery, motor, everything) in the bike weight field. The heavier system will produce appropriately higher pressure.
What’s the difference between PSI and BAR? 1 BAR equals 14.5 PSI. The calculator shows both. Most cyclists and pump gauges use PSI.
Should I run different pressures on different terrain? Absolutely. That’s why the calculator has a surface selector. Drop pressure for rough stuff. Keep it higher on smooth pavement.