
")
Body weight with riding gear
Bike + pack, bottles, tools
Check your tire sidewall
Thicker casings support the tire at lower pressures
Inserts add rim protection, allowing lower pressures
Recommended Pressure
Front: — bar
Rear: — bar
Enter your MTB details and hit Calculate Pressure for a personalized starting point.
Tire pressure on a mountain bike can make or break your ride. Too high and you’re bouncing off every rock with zero grip. Too low and you’re denting rims and burping tires on the first square-edge hit. Most riders guess, copy a friend’s numbers, or just pump to 30 PSI and hope for the best.
This mountain bike tire pressure calculator uses a weight-based formula adjusted for riding discipline, tire width, casing type, trail conditions, and inserts to deliver personalized front and rear PSI for XC, trail, enduro, and downhill setups on both tubeless and tubed tires.
Below, I break down exactly how the formula works for MTB, what pressures to expect by discipline, and the mistakes I see riders make constantly.
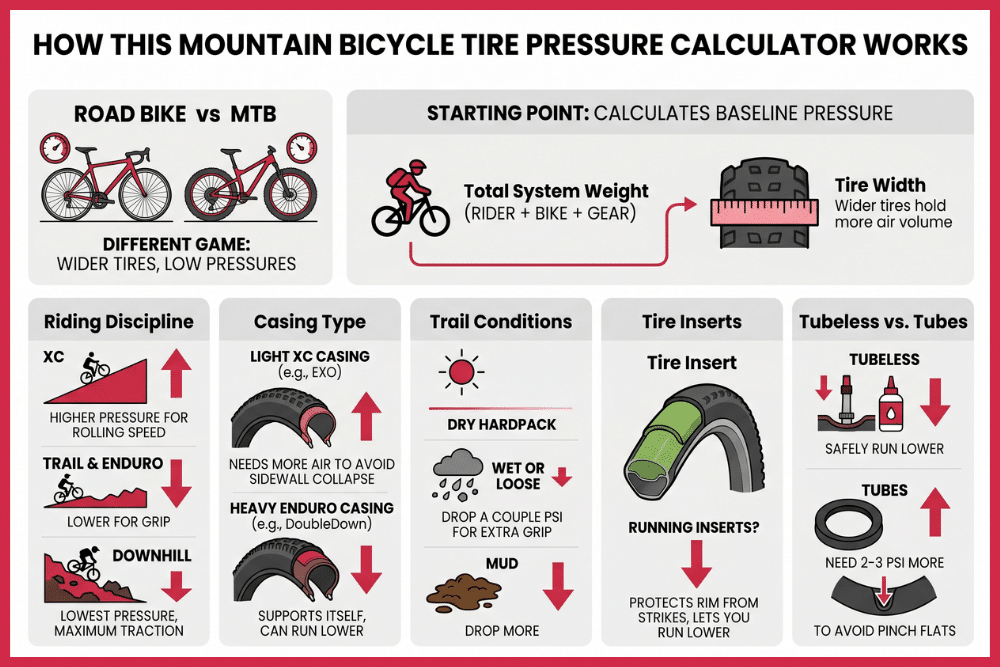
How This Mountain Bicycle Tire Pressure Calculator Works
Mountain bike tire pressure is a completely different game from road. You’re dealing with wider tires, rougher terrain, and pressures low enough to make a road cyclist nervous. That’s normal.
The calculator starts with your total system weight (rider + bike + gear) and factors it against your tire width. Wider tires hold more air volume, so they need less pressure. A 2.5″ trail tire needs far less PSI than a 2.1″ XC tire to support the same load.
From there, it adjusts for five MTB-specific variables:
Riding discipline. XC gets higher pressure for rolling speed. Trail and enduro drop lower for grip. Downhill drops further because you’re hitting everything harder and need maximum traction.
Casing type. A light XC casing like Maxxis EXO needs more air to avoid sidewall collapse. A heavy enduro casing like DoubleDown supports itself better, so you can run lower.
Trail conditions. Dry hardpack gets your baseline pressure. Wet or loose trails drop a couple PSI for extra grip. Mud drops more.
Tire inserts. Running CushCore or similar? The calculator drops pressure slightly because the insert protects your rim from strikes.
Tubeless vs. tubes. Tubeless lets you safely run lower. Tubes need 2 to 3 PSI more to avoid pinch flats.
PSI Ranges by Riding Discipline
These ranges assume a tubeless setup and average rider weight (70 to 85 kg / 155 to 185 lbs). Your exact number depends on your specific weight, tire width, and casing. Use my mtn bike tire pressure calculator above for a personalized result.
Cross-Country (XC)
Front: 22 to 28 PSI. Rear: 24 to 30 PSI.
XC is the one discipline where rolling speed actually matters more than maximum grip. You’re on smoother trails, climbing more, and hitting fewer sharp edges. That’s why pressures sit higher here than any other MTB style.
I used to race XC at around 25 PSI all around. It felt fast on hardpack, but I was losing seconds in every loose corner. Dropping my front to 22 PSI and keeping the rear at 26 made a noticeable difference in technical sections without costing me on the climbs.
Trail and Enduro
Front: 20 to 26 PSI. Rear: 22 to 28 PSI.
This is where most mountain bikers live. You need grip in corners, absorption over roots and rocks, and enough support to not smash your rims on square-edge hits. Heavier riders (85 kg+) should start at the top of this range. Lighter riders can push toward the bottom.
Enduro racers who run reinforced casings like DoubleDown or Super Gravity can safely sit 1 to 2 PSI lower than trail riders on the same tires.
Downhill
Front: 21 to 26 PSI. Rear: 24 to 30 PSI.
Pressures here are surprisingly close to trail and enduro numbers. The difference is that DH casings are much thicker and stiffer, so the tire holds its shape at the same PSI where a trail casing would fold. You’re also hitting rocks and drops at speed, so the rear needs extra support to absorb square-edge impacts without bottoming the rim.
Tire inserts are common in DH for good reason. They let you push 1 to 2 PSI lower for extra grip without risking rim damage.
Why Tire Inserts Change the Equation
Tire inserts are foam or plastic rings that sit inside your tire between the rim and the tube (or sealant in a tubeless setup). Brands like CushCore, Tannus, and Vittoria Air-Liner are the most common.
They do two things. First, they protect your rim from hard impacts. A rock strike that would dent an unprotected rim just gets absorbed by the insert. Second, they support the tire sidewall, which means the tire holds its shape at lower pressures instead of folding over in corners.
The practical result: you can safely drop 1 to 2 PSI below what you’d normally run. That’s a bigger deal than it sounds. On a rocky trail, that small drop gives you noticeably more grip and a smoother ride without the usual penalty of rim strikes.
The trade-off is weight. Most inserts add 150 to 250 grams per wheel. For XC racers counting grams, that’s a tough sell. For trail, enduro, and DH riders on rough terrain, it’s one of the best investments you can make.
Common MTB Tire Pressure Mistakes
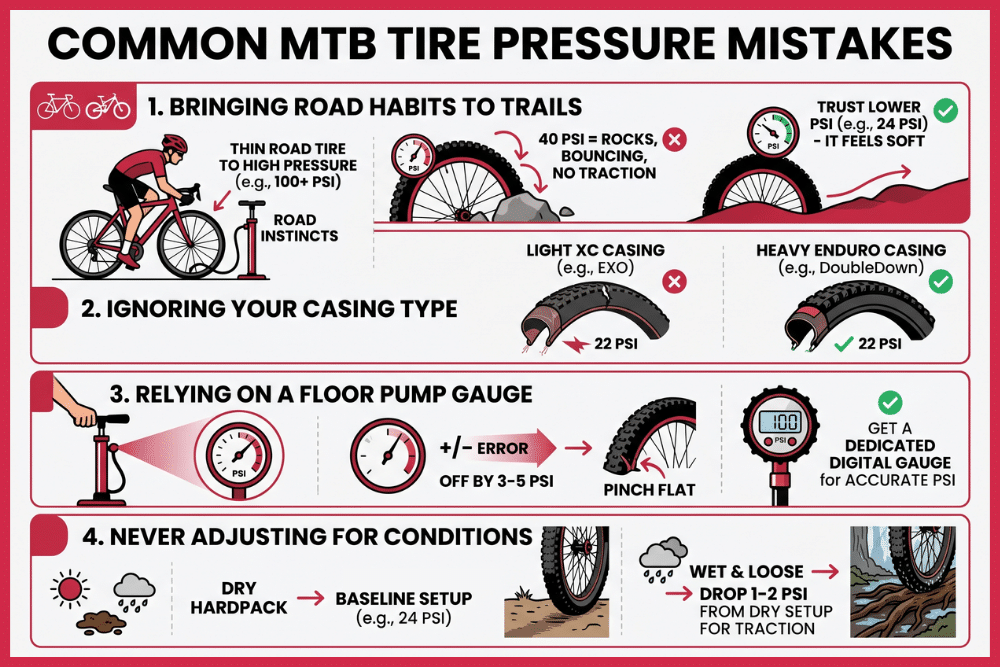
Bringing Road Habits to the Trail
If you came from road cycling, your instinct is to pump your tires hard. On a mountain bike, 40 PSI turns your tires into rocks. You’ll bounce off every root and lose traction in every corner. Trust this mountain bike psi calculator when it says 24 PSI. It’s supposed to feel soft.
Ignoring Your Casing Type
A light XC casing and a heavy enduro casing behave completely differently at the same pressure. Running 22 PSI on a thin EXO tire is asking for a sidewall tear. That same 22 PSI on a DoubleDown casing feels planted and controlled. My tire pressure calculator for mountain bikes accounts for this. Make sure you select the right casing.
Using a Floor Pump Gauge
Most floor pump gauges are off by 3 to 5 PSI. At road bike pressures, that’s minor. At MTB pressures, 3 PSI is the difference between perfect grip and a pinch flat. A dedicated digital bicycle tire pressure gauge costs less than one tire and pays for itself immediately.
Never Adjusting for Conditions
Dry hardpack and wet roots need different pressures. If the trail is muddy or loose, drop 1 to 2 PSI from your dry setup for extra traction. Running the same pressure year-round means you’re always slightly wrong.
Frequently Asked Questions (FAQs) About MTB Tire Pressure
What PSI should a mountain bike tire be? It depends on your weight, tire width, and riding style. Most trail riders on 2.4″ to 2.5″ tubeless tires land around 22 to 26 PSI front and 24 to 28 PSI rear. Use the calculator above for your specific setup.
Should I run the same pressure front and rear? No. Your rear tire carries more weight and takes harder hits. Run it 2 to 3 PSI higher than the front.
Do 29ers need different pressure than 27.5? Slightly. 29″ wheels have more air volume at the same tire width, so you can often run 1 to 2 PSI lower. The calculator adjusts for this automatically.
Can I use this for e-MTBs? Yes. Just include the full bike weight (motor, battery, everything) in the bike weight field. E-MTBs are heavier, so expect pressures a couple PSI higher than an analog setup.