

Bike acting up? Chain squeaking, brakes feeling soft, gears skipping under load? You’re not alone, and you don’t need a mechanic to fix most of it. After years of looking after my own bikes (and learning every lesson the expensive way), I’ve put together exactly what works.
Bike maintenance involves a layered routine: a 90-second ABC check (Air, Brakes, Chain) before every ride, a 10-minute weekly cleaning and inspection, monthly checks of chain wear, cables, and bearings, and a deep clean with a pro tune-up twice a year to keep components running smoothly.
The trick is knowing what to do, when to do it, and what to skip. Let’s break it down.
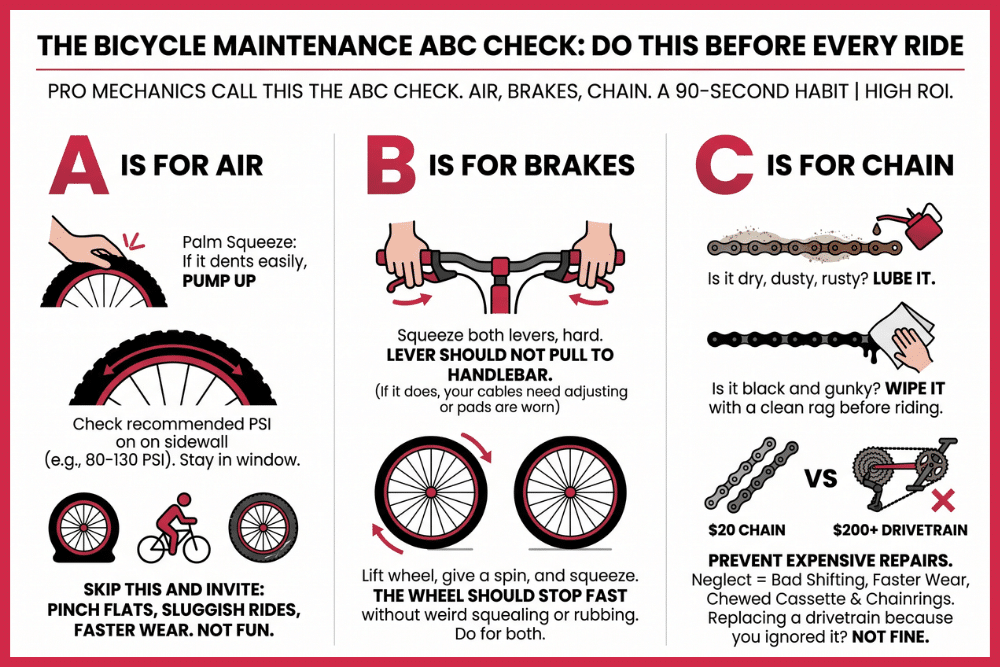
The Bicycle Maintenance ABC Check: Do This Before Every Ride
Pro mechanics call this the ABC check. Air, Brakes, Chain.
It takes 90 seconds. And it’s the single highest-ROI maintenance habit you can build.
Here’s what each letter actually means.
A is for Air
Squeeze the top of each tire with your palm. If it dents easily, it’s time to pump up.
Every tire has a recommended PSI range printed on the sidewall (something like “80-130 PSI” or “35-65 PSI”). Stay inside that window.
Skip this and you’re inviting pinch flats, sluggish rides, and faster tire wear. Not fun.
If you’re not sure how to actually inflate your tires, I wrote a full step-by-step guide on how to use a bike pump.
And to dial in the exact PSI for your weight and riding style, plug your numbers into our bike tire pressure calculator.
B is for Brakes
Squeeze both brake levers, hard.
The lever shouldn’t pull all the way to the handlebar. If it does, your cables need adjusting (rim brakes) or your pads are worn (disc brakes).
Then lift the front wheel, give it a spin, and squeeze. The wheel should stop fast without weird squealing or rubbing.
Do the same for the rear. Two-second test, but it’s saved me from a few sketchy descents.
C is for Chain
Glance down at your chain. Is it dry, dusty, or rusty? Lube it.
Is it black and gunky with old grease? Wipe it with a clean rag before riding. (More on full chain care later in this guide.)
A neglected chain shifts badly, wears out faster, and slowly chews through your cassette and chainrings. Replacing a $20 chain is fine. Replacing a $200 drivetrain because you ignored it for 2 years? Not fine.
Your Weekly Bike Maintenance Routine (10 Minutes)
Once a week (or every 50-100 miles, whichever hits first), give your bike 10 minutes of attention. That’s it.
This is where you catch the small stuff before it becomes the expensive stuff.
Here are the 6 tasks I run through every weekend:
1. Wipe down the chain. Hold a clean rag around the chain and backpedal slowly. You’ll be shocked at how much black gunk comes off. Then add a few drops of fresh lube, backpedal another 20 rotations, and wipe off the excess. Lube belongs inside the rollers, not coating the outside where it grabs dirt.
2. Inspect your tires for cuts and embedded glass. Spin each wheel slowly and look closely. I once found a tiny shard of glass in my rear tire that would’ve punctured my tube within a few miles. Pick out anything sharp with tweezers or your fingernail.
3. Check brake pad wear. On rim brakes, look for the wear indicator grooves. If they’re nearly gone, replace the pads. On disc brakes, peek at the pad thickness through the caliper. Below 1mm of pad material? Time for new ones.
4. Tighten loose bolts. Run a multi-tool over your stem, seatpost clamp, bottle cage bolts, and rack bolts. Don’t go gorilla mode. Snug is the goal. If you have a torque wrench, even better.
5. Spin both wheels and check for wobble. A wheel that wobbles side to side has a loose spoke or needs truing. Catch it now or risk a busted spoke mid-ride.
6. Test your shifting. Run through every gear, front and rear. Skipping or hesitating? Your derailleur cable might be stretching. A quick barrel adjuster tweak usually fixes it.
That’s the whole routine. Faster than making a coffee.
Monthly Bike Part Maintenance Tasks
Once a month, slow down and look closer. These checks take 20 minutes and catch the issues your weekly routine misses.
Here’s what I run through:
1. Check chain wear with a chain checker tool. Drop the tool onto your chain. If it reads 0.5% wear (or 0.75% for 11/12-speed drivetrains), replace the chain immediately. Riding past that point destroys your cassette and chainrings, turning a $25 fix into a $200+ rebuild.
2. Inspect cables and housing. Look for fraying near the levers and rust spots along the housing. A frayed cable can snap mid-shift, and trust me, that’s not a fun roadside surprise.
3. Test your bearings. Grab the top of each wheel and rock it side to side. Any clicking or play means your hub bearings need attention. Do the same with the front brake pulled and rocking the bike forward (headset check) and the cranks (bottom bracket check). Smooth and play-free is the goal.
4. Look over the frame. Check the tubes, weld points, and dropouts for hairline cracks or paint bubbling. Especially around the bottom bracket and head tube. Catching a frame crack early can save your collarbone.
5. Clean the entire drivetrain. Not just a chain wipe. Pull off the chain, scrub the cassette teeth, clean the chainrings, and wipe down the derailleur pulleys.
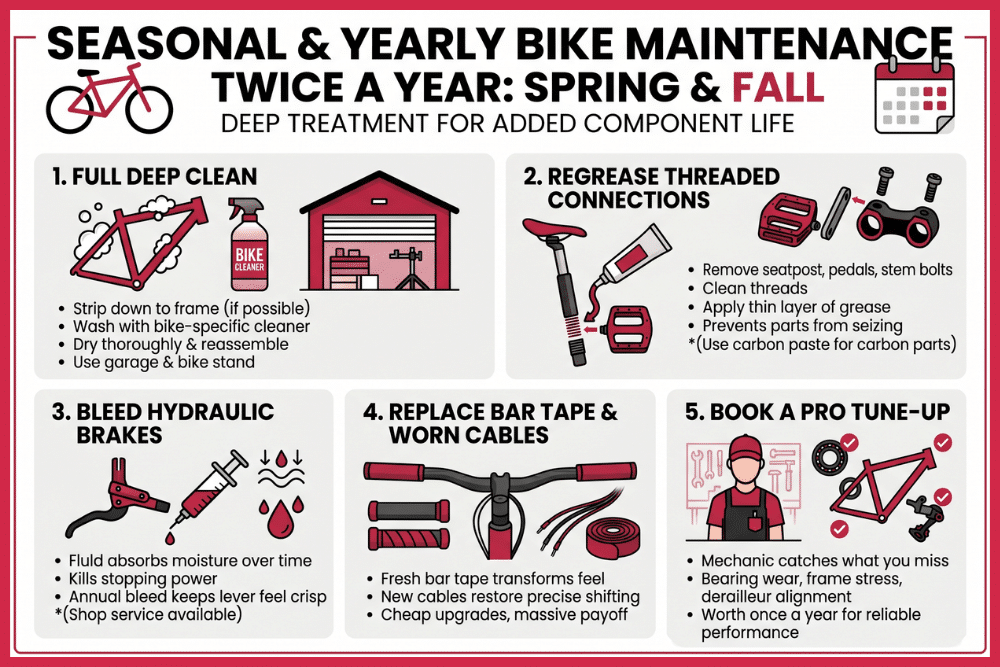
Seasonal and Yearly Bike Maintenance
Twice a year (think spring and fall), give your bike the deep treatment. This is the maintenance that adds years to your components.
Here’s what to do:
1. Full deep clean. Strip the bike down to bare frame if you can. Wash everything with a bike-specific cleaner, dry it thoroughly, and reassemble. Do this in your garage with a bike stand if you’ve got one.
2. Regrease all threaded connections. Pull out the seatpost, pedals, and stem bolts. Wipe the threads clean and apply a thin layer of grease before reinstalling. This stops parts from seizing into your frame, which is a nightmare to fix later. Carbon parts get carbon assembly paste instead of grease.
3. Bleed hydraulic brakes. Brake fluid absorbs moisture over time, which kills your stopping power. An annual bleed keeps the lever feel crisp. If this feels intimidating, your local shop will do it for $30-50.
4. Replace bar tape and worn cables. Fresh bar tape transforms how your bike feels in your hands. New cables and housing restore the precise click of every shift. Cheap upgrades, massive payoff.
5. Book a pro tune-up. Even if you do everything else yourself, a trained mechanic catches things you’ll miss. Bearing wear, frame stress, derailleur alignment. Worth $80-120 once a year.
Want a printable version of this whole maintenance schedule?
I put together a free ‘Complete Bike Maintenance Checklist PDF’ you can print and stick on your garage wall. It covers every pre-ride, weekly, monthly, and seasonal task in this guide. Just leave your name and email in the form below this article and I’ll send it to your inbox.
How to Clean Your Bike (Without Wrecking It)
A clean bike isn’t about looks. Dirt grinds down moving parts, eats into your drivetrain, and corrodes your frame.
Here’s how to clean it the right way.
The 5-Step Bike Cleaning Process
Set your bike on a stand or lean it against a wall. Then:
- Knock off loose dirt with a soft brush. Skip the hose. High-pressure water forces grit past your bearing seals.
- Mix warm water and a few drops of dish soap in a bucket. That’s it. No fancy cleaner needed for the frame.
- Scrub the frame, fork, and wheels with a sponge or soft brush. Work top to bottom.
- Rinse with a gentle stream of water. Garden hose on its lowest setting, not jet mode.
- Dry everything with a clean rag. Pay attention to the bottom bracket, dropouts, and anywhere water pools.
The whole job takes 15 minutes if you don’t get distracted.
What Not to Use on Your Bike
A few things will quietly destroy your bike. Avoid them:
- WD-40 on your chain. It’s a degreaser, not a lubricant. Strips your chain dry and accelerates wear.
- Pressure washers. Even cheap ones blast water past sealed bearings, leaving them to rust from the inside out.
- Dish soap or household degreaser on disc brake rotors. Causes contamination, which leads to permanent squealing and weak braking.
- Household furniture polish on the frame. Some brands contain silicone that messes with future paint or decals.
When in doubt, use a clean rag and water.
Cleaning the Drivetrain
The drivetrain is the dirtiest part of any bike, and it needs its own treatment.
Use a chain cleaning tool or an old toothbrush dipped in bike-specific degreaser. Scrub the chain, cassette teeth, chainrings, and derailleur pulleys until the gunk lifts off. Wipe everything down with a rag, let it air dry, then re-lube the chain.
Fair warning: this is messy work. If your hands or clothes end up looking like you wrestled a bike (mine usually do), I’ve got a guide on how to get bike grease out of clothes that actually works.
Chain Care: The 80/20 of Bike Maintenance
If you only nail one maintenance habit, make it chain care. It punches way above its weight.
Here’s why, and how to actually do it right.
Why Your Chain Matters More Than Anything Else
Your chain is the hardest-working part on your bike. Every pedal stroke, every gear shift, every climb runs through it.
A dirty, dry chain shifts poorly, robs your power, and grinds down your cassette and chainrings as it wears. A clean, lubed chain shifts crisply, lasts longer, and protects the expensive parts around it.
Replacing a chain on time costs around $25. Ignoring it until your cassette and chainrings need replacing too? You’re looking at $150-300, easy.
How Often to Clean and Lube Your Chain
The honest answer: it depends on your conditions.
Here’s my rough rule:
- Dry, dusty rides: Lube every 100-150 miles
- Wet or muddy rides: Lube after every ride
- Indoor trainer: Lube every couple of weeks (sweat is brutal on chains)
Listen to your chain too. If it starts squeaking or feels rough, it’s begging for lube.
Always wipe the chain clean before applying fresh lube. Pouring lube onto a dirty chain just creates expensive sludge.
Wet Lube vs Dry Lube: When to Use Each
This trips up most beginners, but it’s pretty simple.
Dry lube is thin and clean. It’s perfect for dry, dusty conditions because it doesn’t attract dirt. The downside: it washes off in rain.
Wet lube is thick and sticky. It hangs on through rain, mud, and wet roads. The downside: it grabs dirt fast and needs more frequent cleaning.
My setup: dry lube for summer road riding, wet lube the second the weather turns. If you only want to buy one, get wet lube. It’s more forgiving.
When to Replace Your Chain
Buy a chain checker tool. They cost $10-15 and they’re the only way to know for sure.
Drop the tool onto your chain. Most checkers have a 0.5% and 0.75% indicator:
- 0.5% wear: Replace your chain (works for most bikes)
- 0.75% wear: Replace if you have an 11 or 12-speed drivetrain
If you wait past those numbers, your stretched chain wears matching grooves into your cassette. Then a new chain won’t even sit right on the worn cogs, and you’ll be replacing both.
Catch it early. Save your wallet.
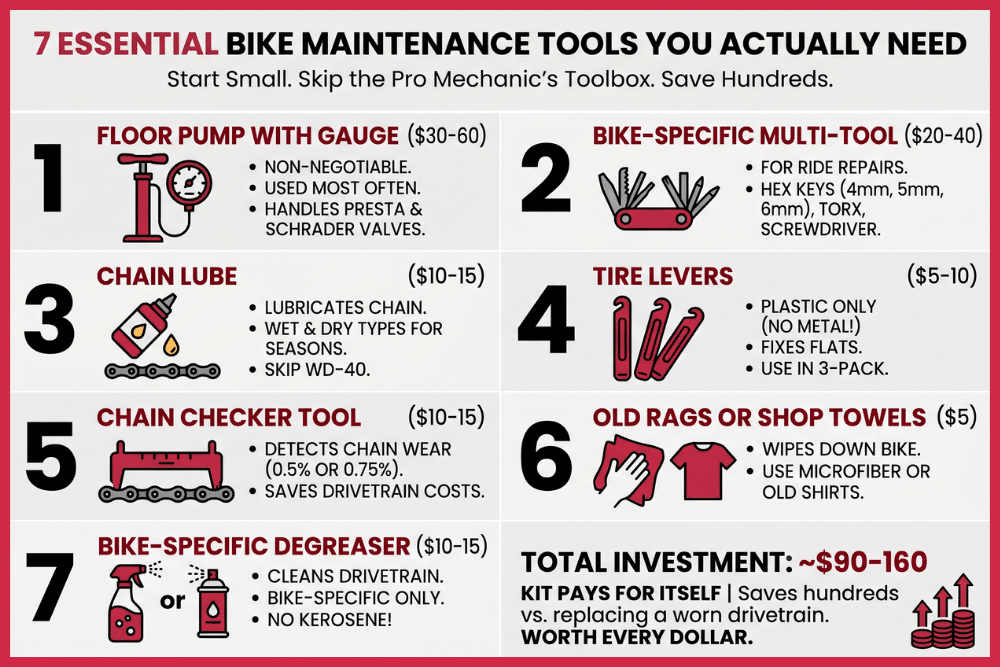
Essential Bike Maintenance Tools You Actually Need
You don’t need a pro mechanic’s toolbox. You need 7 things.
Here’s the short list I’d buy if I was starting from scratch today:
1. A floor pump with a built-in gauge ($30-60). Non-negotiable. You’ll use it more than any other tool. Get one that handles both Presta and Schrader valves.
2. A bike-specific multi-tool ($20-40). Look for one with hex keys (4mm, 5mm, 6mm), Torx bits, and a screwdriver. Crankbrothers, Topeak, and Park Tool all make solid options. Carry it on every ride too.
3. Chain lube ($10-15). Buy one wet, one dry, and you’re sorted for any season. Skip the WD-40, please.
4. Tire levers ($5-10). Plastic ones, in a 3-pack. Metal levers can damage your rim. You’ll need these every time you fix a flat.
5. A chain checker tool ($10-15). Tells you exactly when your chain hits 0.5% or 0.75% wear. Saves you hundreds in drivetrain replacements.
6. Old rags or shop towels ($5). Buy a pack of microfiber cloths or just cut up old t-shirts. You’ll burn through them faster than you think.
7. A bike-specific degreaser ($10-15). For drivetrain cleaning. Don’t use kerosene or paint thinner. Both wreck rubber seals.
Total damage: around $90-160.
Compared to a single shop visit for a worn drivetrain, this kit pays for itself the first time you catch a problem early.
Worth every dollar.
How to Stay on Top of Bike Maintenance Without Losing Your Mind
Here’s the truth nobody tells you: most people fail at maintenance of bike not because it’s hard, but because they forget.
Three things make it stick:
1. Make pre-ride checks a habit. The ABC check takes 90 seconds. Do it while you’re putting your helmet on. Within a month, you won’t even think about it.
2. Use a maintenance tracker. I got tired of guessing when I last lubed my chain or checked my chain wear, so I built a free maintenance tracker at app.bikingbro.com. You log your tasks, it tracks your mileage, and it tells you what’s due next. No spreadsheets, no sticky notes, no “wait, did I do that last month?”
3. Know when to call a pro. If your hydraulic brakes feel spongy, your shifting won’t stop slipping after a barrel adjustment, or you hear weird grinding from your bottom bracket, take it to a shop. Some jobs need experienced hands and proper tools. There’s no shame in it. I still drop my bikes off twice a year for a full pro tune-up.
Maintenance isn’t about being a perfectionist. It’s about catching small problems before they become expensive ones.